✨Micro-Nether !✨

✨Micro-Nether !✨
And a small wither to go with it~
There’s not much to say about this build, it’s mostly just a tiny box with triangles and cubes inside. I’m considering making more of these in the future (feel free to suggest biomes/mobs in my inbox !) while keeping the scale (8*8*8), which is a bit of a challenge, but it’s fun.
More Posts from Antrylis and Others

✨Yet another combat mech !✨
A bit of laziness here, I couldn’t bring myself to get proper pictures, so I got old ones from when one of my LEDs broke, hence the blueish lighting-
Lore and closeups below, and previous work here !
Mech closeups :


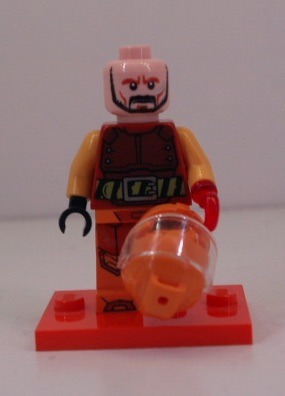
Pilot closeup :

Lore time (world explanation in previous works..) !
So, Scorcher (the mech) is terrifyingly large, next to most others, which is already impressive, but it’s also one of the most equipped ones on the field : large circular saw, flamethrower, integrated calculation computer, you named it. The only real weak point is the reservoir in the back, which is what the flamethrower is powered by, and it’s hard to reach because one has to get behind Scorcher to get it.
The pilot is well equipped too, with last gen holographic equipment and a powerful high resolution display helmet, under which he somehow manages to fit all his hair. But he’s not alone, since he also have an entire team behind him (called Dragon, for obvious reasons), which helps him during and outside of combats, making this make one of the bests there are.
Unrelated to the lore, the large dome used for the head falls off every time I try to move something. It may have plot armor in the lore, but in real life I think a fly could beat it. Most of these joints are rigid, except at the waist, which is a mistake I probably won’t make ever again, it’s terrible. I’m also glad I stole the arms of another minifig for this one, because it was quite bland with purely red arms.

✨Quake and its pilot✨
Another one of my combat mechs ! (See previous here)
Same as last time, closeups and lore under the cut
Mech closeups


Minifig closeup :
So, mech lore !
As I said in the previous post, mech battles happen some times after the third world war. Well, some of the veterans quickly took interest of this new sport, including today’s pilot. As you can see, sequels of the fights are still visible on his body, his hand being the most visible one. Of course, he could have had a normal hand, because it’s an easy thing, but he didn’t want to. He wanted to show what he had partook in, and this glowing hook was the coolest thing he found on the market.
At first, he didn’t really even watched mech fights, but eventually, some of his friends made during the war decided it would be fun to watch it together. And they enjoyed it. Enjoyed it so much, they decided they wanted to participate.
So, they did what any normal group of war veteran did : they looked for a place to scavenge spare parts and assemble a mech of their own, that would be out of the usual roaster of mark III and IV mechs. What they found was what was left of a large dig site, abandoned at some point in the past. Among the scraps, one of them found the large QUAKE panels. Probably the name of the company that used to be here. It would do the job.
It took some time for Quake to get into large-scale tournaments, because it usually fell apart quickly. With some experience, the team managed to get it in a usable state, and when it didn’t break down, the mech was doing some heavy damages. Don’t trust the electric panel on its back, it’s entirely coal-fuelled (coal which was provided by the dig site) and Quake is probably one of the only mechs powered by a thermal engine, but it gives it a powerful advantage : as long as it’s fuelled, it can deliver extremely powerful blows with its large arms, as well as it can withstand powerful attacks (that’s what the shoulder plates are for). With this mining equipment, Quake, after it began to be known, made itself quite of a name in the arena.
That’s it for this one, the next competitor, named Quetza, will be introduced next week :}
Also, I’m trying an old camera of mine to take pictures, because the lighting is better, although it’s less flexible than my phone’s. I’m still trying to get a good feeling as to what I’m preferring.
Random interesting thing to notice about the build itself : All articulations have different kinds of joints : bionicle ball-joints for the arms, technic pin for the hips, small ball joints to connect the legs and the body, old technic joints for the knees, and simple handle joints for the feet. It was accidental, but I think it fits well with the history of the mech.

✨Tragon !✨
Trans...dragon..It's funny, right ?- Also, I know it's a wyvern...Dragon sounds better...
It's pride month, so it was the perfect occasion to finally make a dragon, yay ! It's also my first time making something akin to a dragon (technically the second time,, but the first one is truly horrible), and even if the proportion are still a bit out of place, it could have been worse. It's also my first time doing custom wings, but I'll talk about that in more details beneath :}
Also, it needs a name ! I’m really bad with names, but I would gladly take suggestions ! (And here is an alt picture, in its natural habitat-)

Anyways, details/closeups under the cut !
None of these picture below are edited, because it's exam period- Enjoy the green backgrounds :}

I have to say, before any other comment, that I made the body way to heavy for the two poor sockets of the legs. The position above is the only one where it's actually standing upright. Also, my stock of pink and rightly-shaded blue was much smaller than originally anticipated, so I would have done a bunch of tings differently, if it wasn't for that. Still, I was lucky to have that many curved blue pieces for the top part. Well, all of the ones with purple diamonds on them have been forcefully taken from a small Elves dragon, but it was worth it (I also really enjoy the purple here, it contrasts nicely).
All of the joints are mixel socket joints, except for the knees, which are just hinges. It gives a lot of movements, from the tail to the jaw. Even if these are limited, it gives it a wide range of positions (even if, realistically, it won’t change it much from the one I gave it). Still, it can sit ! (Including small trans flag)

The pointy scales on the back are some of the only elements which aren’t directly attacked to the body : one 2*2 plate holds them down, and a modified 2*1 under the plates keeps it from sliding in any other direction, so even with little connections, it doesn’t budge. I really liked these angular pieces. To keep them from being too repetitive, they are only connected to each other by one stud, with a small angle, which gives them a slightly "round" effect.

The tail here is not really complicated, it's just a bunch of socket joints linked together with curved tiles on top (one of the sticker is backward, and it's unnerving, but it's not my fault and I can't risk changing it...), with white arch pieces underneath. Not sure of why I added these in the first place, but it looks cool. And of course, the end of the tail is a big heart, because it simply fits the vibe, doesn't it?
Of course, I can't forget what is the most important, and what makes this creature as cute as it is ! (It is cute, and if that is the hill I have to die on, I will.)


The green background doesn't show it well, but the flame offers a good contrats with the rest of the head, and brings the eyes there first (instead of all the mistakes present). Because there are a bunch of these.
I spent nearly as long on the head as all the other body parts cumulated (except for the wings), because making something detailed yet small enough to be a good head is tough. I actually started from the top (for the piece with the sticker, more exactly), instead of the bottom, like I usually do, in order to get an idea of scale (because I already knew I wanted the jaw to move, and for that I needed to see how big it would be). Then, I did the back to quickly have a neck connection point, to see if it would fit. Because the neck is larger under the connection sockets, the socket of the head is actually pretty high up, but the colours are practically aligned so it works well.
Then, the next thing was the eyes and the spikes. The spikes took me a hile to figure out, because without the rest of the head, they looked kinda dumb, but it does bring the head together when everything is in place. Then the eyes : on the small dragon I took apart, there were these blue tooth pieces which I used to get some texture above them, so that they don't look flat, and then, I connected them to the center connectors of a 2*4 plates. That works well in placement, but I ran into the issue of what would be around. If I didn't do anything, there would be two gaps, which would look terrible. Instead, I stuck two 1*4 tiles in these gaps, and since the tooth pieces are around either side, they don't move - well, not much, they still produce a shaking sound when I'm moving the head.
Then under these plates, I directly have 1*4 pink bricks, which stick out behind the head. At first, it was a problem, and I had nothing else to replace them; but they actually restrict and hold the neck, so that even if the head is technically a bit too heavy, it remains in place.
The actual teeth are modified 2*1 plates, four at the top and four at the bottom. To keep them with such a small gap (and to attach them to either sides of the jaw) I have use modified 1*1 plates with a ring. There is a single one at the bottom, and then underneath a few cut 2*1 and 2*2 curved tiles to make the jaw triangular; and two on top, one which connects it to the head and one with holds the snout (which is using a cheese piece and another one of the blue tooth).
So, custom wings ! It isn't actually complicated, if only a bit tedious. Here below is all that I needed to make them :

As you can see, it's not much. Most important, of course, is a good, solid sheet of paper, and a cutter (precision cutter is better, in my opinion, but anything works). To make things easy (or if, like me, you don't know how to draw properly), you can take a basic lego wing, and trace the outline and where the holes go. I would advise only doing a single, blank one, at first. Once you have your proto-wing, you can start to make the actual frame it will be attached on. I chose to use bricks above it to act as claws, but you can use socket joints, like in most sets. The advantage of using plates is that the overall look is better, but if you want overhangs like I did, you have to get the holes really close to the edge of the wing.
Once you have your frame, trace where the holes would go on it ! (if you used a wing model, it might be easier, but it could also not fit, which is why you make a prototype first). To make holes just the right size, I would advise first cutting squares (easier than circles) at just the right size, then scratching the edges with the blade of the cutter. Once it looks good, try to fit an axle inside. If it just about fits, and can rotate, it's good ! Otherwise, just remove it and scratch again.
When that's done, test if it can correctly fit on your frame. Once that's done, you can either make two wings with that pattern, or simply make another copy. I personally made two new from my first prototype because it took me a while to figure out exactly how to place the holes.
Finally, once you got two wings, you can finally add whatever you want on them (easier when they're not actually on the frame, although that should've been obvious), and you're done :}

I went for a really basic thing, but technically, any shape is possible. I'll likely use it again someday, because it's quite fun !
And of course, the bonus picture, since you’re here ! I like the symbolic of this (also don’t pay attention to the tentacles).

I actually really wanted to get rid of this castle (which was gifted, not exactly desired, although I must admit it’s really well designed), and well. Now, it’s gone, and in its place lies the dragon…and my horrendous crab, too.

✨Books !✨
A small gift made for a relative ! I’m not entirely happy with the result, because it feels a bit empty, but anything I tried to add did not help (such as plants, to get a result similar to this old MOC I made a while ago).
Anyway, other angles, because I like these small MOCs to be visible from all angles :


Also, if anyone like the design of these books, you might want to check what lies below~

Feel free to use this !
I made this because I did some tests virtually before actually building it, and although I slightly modified the design to stack them up, it’s pretty much the same~

✨Christmas tree !✨
…Yes, it’s a very tall picture…So tall, in fact, that you can actually see the top of my shelf studio. I made this last year, and I think it’s about the time to showcase it, along with this year’s project, which I’ll post next week !
Fun fact : the top of the tree isn’t connected at all to the rest, it’s only held in place without any stud. I also couldn’t find a neat star for the top of the tree, so I opted for another shiny pointy thing instead-


✨Brick separators !✨
Run, they have teeth now !
This is a silly project I did ages ago; given that I've officially been posting for a year straight each week (ignoring my disappearing space station post, ahem), I thought it would be nice to post that little guy whose view welcomes me every morning.
And, sure, it's not my finest work, by far, albeit I could go on a rant about the many fun technics I used (look at the horn !). But that's alright !Why ? Because the main goal of legos is not to build extravagant looking buildings, or ships, and landscapes. I don't even need to give a profound answer to what it's meant to be; everything is in the title :
"The name 'LEGO' is an abbreviation of the two Danish words “leg godt”, meaning “play well”. It's our name and it's our ideal." - Lego.com 'About Us' page
In the end, it's just a toy, and what you build with it is not important, as long as you had fun making it ! The pieces I enjoy the most are the one that come to me as a vision that I develop, and I appreciate them much better than some of my (arguably better) commissions I get (because, yes, that somehow happens), because commissions are not spontaneous.
The morale of the story, I guess, is that you don't have to hesitate if you want to build something, no matter how silly it is, no matter it's your first or hundredth moc; and you should be proud of it, no matter how it turns out, if you had fun with it.

✨Clone wars diorama !✨
Another one, technically the largest I have posted (yet~), featuring the 212th and a (placeholder) Jedi.
Of course, closeups and additional details below !
Views from directly in front/above :


Before I continue, I must confess it. This horrendous mistake, which you might spot by paying close attention to the right part of the image.
Yes. I somehow created an offset on the entirety of the wall’s height.
Overall, I’m quite happy with this one, mostly the environment, which turned out great (except for the offset….). What I’m not really sure leases with are the cheap AT-RTs from the battle packs, which are too bulky, but it works well enough for the moment, and since I’m not exposing to any connoisseur, it does the job.
Most of the minifigs are from these battle packs too, except for the Jedi, which is actually a savage oppress with a cloak, but every time I try to just remove the minifig, it feels like something is missing. The paratrooper captain has the hold grey kama and pauldron which always work well, even if it could have done with an additional visor.
Anyway, let’s get going with the closeups !
AT-RT scenes :


On the left, an engineer (my favorite kind of clone) fixing a broken down leg, with the help of one of the pilots. It was hard to get the minfigs in a 'lively' position, and the photo doesn’t render it correctly. The small white backpack is a piece I’ve stolen from the 501st specialist pack, because it’s nice.
On the right, a paratrooper with a completely inaccurate rocket launcher (the clone wars’ ones don’t look as cool, though). I quite like the way this part came together, even if it’s just a small detail.
Explosion scene :


I’ll admit it’s my first try with building explosions, and I’ll hopefully improve.
On the right, the clone says hi ! Well. No. He doesn’t, but it’s what he looks like on the photo, which I funny, I’ll admit, but not the image I wanted to convey, even if technically he’s set properly, as a projectile caused by the explosion.
The picture on the right convey the feeling of movement much better, with the clone shooting on the left, the others running along, and the paras being blown.
Other scenes :


The focus on the left is the droid ! I really like how it’s sprawled over that rock. Other droids can be found in the diorama, notably one being crushed by the rocket launcher AT-RT, partially under a rock, and part of one in the explosion.
On the right, we see a paratrooper down (but still fighting !) with, at his side, a medic applying a hypo. While it’s hard to see with this picture, he has a pouch at his side, and some chroma-black legs, because I was missing a pair of legs the medic has prosthetic legs, isn’t that awesome and convenient ? That is a lesson to learn, any lack can become lore ! Well, kind of. It’s what I also did with the Kashyyk MOC : I was missing all but the helmet of my ninth minifig, so I turned it into a grave of the missing squad member.

✨Another edited photo, yay !✨
This is an entire version of the blog’s banner, too !
Technic details under the cut !
So ! Looking through my archives, I found images for the process I described in my previous similar post, including my made up studio (and very messy desk…) :

As you can see, it’s not quite a professional set up..
To be more precise, this is three led bands hooked to a power bank, on top of which my phone is meant to be sitting to take two photos in a row. Obviously, there is also a desk lamp illuminating the scene, so here is a picture without it :

So, the way this is organised is that I have my black screen in the background which reflects the lights a little, but not the actual minifigs; the characters are held by transparent pieces connected to ball joints, so that I can have a steady but adjustable display. Light-wise, the two prominent led bands are colour-coded with the character’s color (kinda) to get them in opposition; the junction between the two is covered by some black bricks to create a darker area to offer more contrast; ans on top of the stage is help a (theoretically) white led with lesser intensity to make sure the scene stays lighted up properly, even if the light sources are from underneath. The red pieces I have used as frames are really good to hold these light bands, because I can have varied angles and heights plus a very solid structure, which is all I want.
Finally, to get the floating render, I take a first shot with the characters, then a second one at the same place without the characters :


And then, with a bit of editing magic and other simple image manipulations, you get the result I have at the top of the post ! I’d recommend trying it for yourself, because it can be a lot of fun !

✨Small theatre !✨
A small but really fun build made for a relative’s birthday.
While there isn’t much to mention build-wise, a few details are interesting :


Firstly, I managed to get the effect of multiple curtains in a row by making 'banners' which are directly connected to the ground.
The base is partially empty, and behind the gold details are 1*4 black tiles on snots which give a pretty nice black aspect (although now that I think back on it, 1*4 bricks would have done the job.
Finally, the floor is a single, large door from a castle set ! I really like the way it’s shaped and likely will reuse that technic again someday.

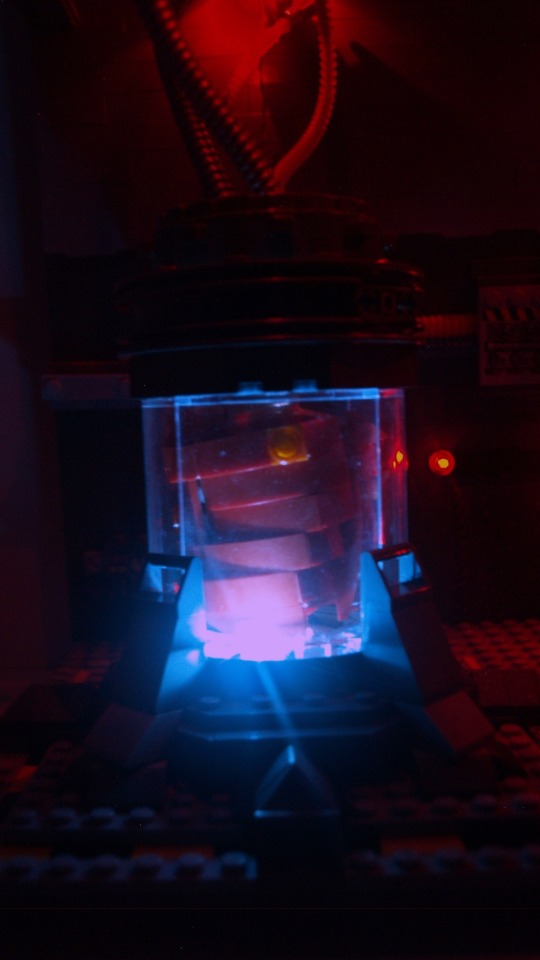
✨ Breach of containment ✨
This is the last I’ve been working on for the past few weeks, very, very inspired by the game Carrion (if you haven’t played it yet, you absolutely should !), which is made all the more special because I finally took time to use my lighting kit (seem below). Of course, closeups and commentaries below the cut

Left containment unit closeups :

Right containment unit closeups :


Top closeup :

Alt version (studio lights + in-built lights) :

This is one of the screenshots I’ve been working with (where the monster just breached containment) :

So, as I said previously, this piece is heavily inspired by Carrion. I tried to look up any previously made Lego thing related to the game, but all I could find were a few Reddit posts with (debatably) interesting takes on the monster. So, the good news is that this is most likely the most original piece I’ve made yet.
The original plan was to have only one container, and one monster, with left being the body inside and right being the outside part. However, placing Left in the middle of the transparent pieces made it mostly good on its own, so with some modifications, I made it work alone and expanded the outside part inward, and ended up with two of them.
Left is pretty okay from all angles, but Right is not necessarily as good from the back, and had a supplementary jaw on the side of the container which can’t be seen on the photos.
Getting back to comparing that to the game. I tried to stay close while adding my own little details. The wiring and cable system is from me, but the container is mostly inspired by the game, just like the electric box (middle) and the little informative display (under the electric box) which is…empty, yes.
Some details can’t be seen on the photos (or barely), which are mostly some filler sci-fi stuffs to make the wall less flat and less empty.
What also helped with breach the flatness of the wall is the switch from dark grey to light gray, using the awesome spring projectile launcher piece, which has this very nice shape which make the transition just a bit smoother.
So, let’s talk about whatever I’ve done with the lighting !
I’ve had this old lighting kit (originally designed for a car model) lying around for a long time, and finally got to use it ! It doesn’t look really good without my studio lights because my camera is not made for that (The effect in reality really gives escaping monstrosity a dark vibe which is not well depicted with my photos…). Another thing which is not noticeable with the photos is that the two red dots in the center are actually blinking lights (and somehow, they tend to desynchronise).
The choice of letting some of the wires out is debatable, but I think it adds to the vibe (and some of them would have been a pain to hide anyway). And sadly, the back is but a mess of wires, but I can’t actually do anything about that.
Speaking of the back, the whole thing is one dot large and completely flat, and the ceiling only hold without pillars because of the use of tension linking directly the baseplate and the roof through the use of technic bars; and probably because the ceiling itself is not that heavy. It is, in fact, only constitued of six old road pieces connected together and frames, which give the roof little weight and high sturdiness (and the shape on the side of the piece offers a nice sci-fi effect as a bonus).
The addition of tentacles in the vent (which hides the connection between road plates in the roof) is just another reminder of the game : you can’t be safe anywhere, if air flows~
-
 dorktapus42 reblogged this · 1 month ago
 -
 obsidiandragongenderwhatgender liked this · 6 months ago
 -
 aeramisu liked this · 7 months ago
 -
 egg-poacher liked this · 7 months ago
 -
 antrylis reblogged this · 7 months ago

They/them - AroaceLego MOCs and photography with a wide range of different characters and environments, every Wednesday (in theory-)
77 posts