Madadreferencearchive - Just A Reference
More Posts from Madadreferencearchive and Others
hot artists don't gatekeep
I've been resource gathering for YEARS so now I am going to share my dragons hoard
Floorplanner. Design and furnish a house for you to use for having a consistent background in your comic or anything! Free, you need an account, easy to use, and you can save multiple houses.
Comparing Heights. Input the heights of characters to see what the different is between them. Great for keeping consistency. Free.
Magma. Draw online with friends in real time. Great for practice or hanging out. Free, paid plan available, account preferred.
Smithsonian Open Access. Loads of free images. Free.
SketchDaily. Lots of pose references, massive library, is set on a timer so you can practice quick figure drawing. Free.
SculptGL. A sculpting tool which I am yet to master, but you should be able to make whatever 3d object you like with it. free.
Pexels. Free stock images. And the search engine is actually pretty good at pulling up what you want.
Figurosity. Great pose references, diverse body types, lots of "how to draw" videos directly on the site, the models are 3d and you can rotate the angle, but you can't make custom poses or edit body proportions. Free, account option, paid plans available.
Line of Action. More drawing references, this one also has a focus on expressions, hands/feet, animals, landscapes. Free.
Animal Photo. You pose a 3d skull model and select an animal species, and they give you a bunch of photo references for that animal at that angle. Super handy. Free.
Height Weight Chart. You ever see an OC listed as having a certain weight but then they look Wildly different than the number suggests? Well here's a site to avoid that! It shows real people at different weights and heights to give you a better idea of what these abstract numbers all look like. Free to use.
People with low spoons, someone just recommended this cookbook to me, so I thought I'd pass it on.
I always look at cookbooks for people who have no energy/time to do elaborate meal preparations, and roll my eyes. Like, you want me to stay on my feet for long enough to prepare 15 different ingredients from scratch, and use 5 different pots and pans, when I have chronic fatigue and no dishwasher?
These people seem to get it, though. It's very simple in places. It's basically the cookbook for people who think, 'I'm really bored of those same five low-spoons meals I eat, but I can't think of anything else to cook that won't exhaust me'. And it's free!


Visible Mending
Introduction:
Visible mending is a decorative way to fix up an item. Instead of trying to make your mend as invisible as possible, the idea is to make it part of the garment's design.
Visual mending is not a single technique: it's more of a mindset. If you've got an item you love, it deserves to be mended, and if you're going to put that love into stitches, why not show them off?
That being said, there are some specific techniques that are popular with visible menders. Let's take a look!
Sashiko:
Sashiko is a type of traditional Japanese embroidery that is used to both decorate and reinforce fabric. In visible mending, sashiko is often used to cover up holes with patches or to reinforce thinning fabric. This technique uses a variation on the running stitch.
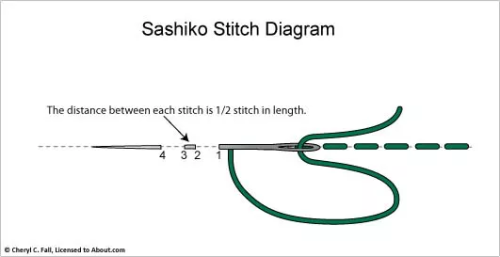
(Image source) [ID: sashiko stitch diagram: the distance between each stitch is 1/2 stitch in length.]
Some resources on sashiko:
SashiCo on YouTube: sashiko livestreams and information on the cultural aspect of sashiko.
Written tutorial by Upcycle Stitches.
Free sashiko templates by TheSpruceCrafts.
Fixing jeans with sashiko by Soluna Collective.
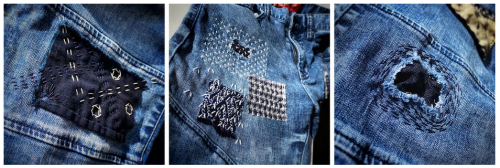
(Image source) [ID: three examples of sashiko embroidery on jeans fabric.]
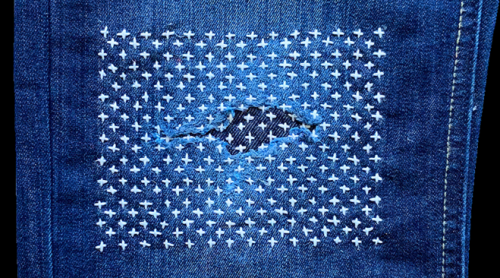
(Image source) [ID: sashiko embroidery with white thread on blue jeans fabric.]
Embroidery:
Regular embroidery is also a popular technique to accentuate your mends. Check out my embroidery 101 post to learn how to get started. You can embroider patches, or use embroidery to hide or accentuate any stitches you've made to fix holes. Embroidery's also a great way to cover up stains.
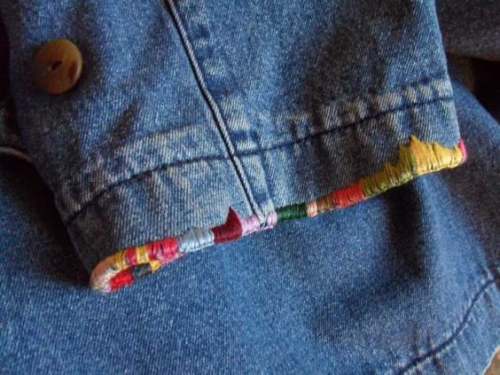
(Image source) [ID: colourful embroidery floss covers a worn sleeve edge of a jeans jacket]
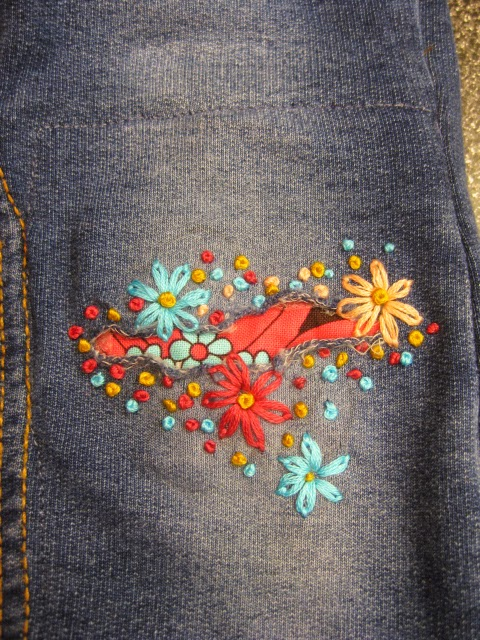
(Image source) [ID: colourful flower embroidery surrounds a hole in a pair of dark gray jeans. Fabric with a red and black flower print peaks out of the hole.]
Patches:
There are many ways to add patches to a garment. My tutorial on patches is a good place to start if you want to make custom-shaped patches to sew on top of your fabric. You can also sew your patch on the inside of your garment and have it peek out from beneath the hole you're trying to fix. Fun ideas for this are lace or superheroes.
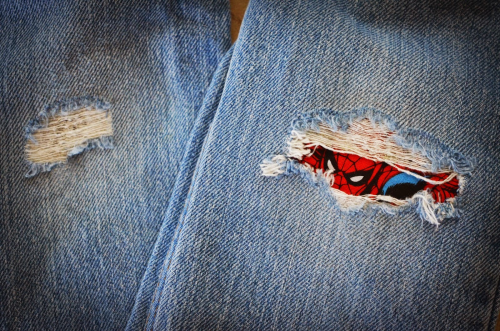
(Image source) [ID: Spiderman peaking out of a rip in a pair of blue jeans.]

(Source) [ID: a red flannel heart-shaped elbow patch on a gray knitted sweater.]
Darning:
Darning is a technique used to repair holes in fabric by using running stitches to weave extra fabric over the hole as to fill it up again. While traditionally darning is done in an invisible way by using the same colour of thread as your fabric, you can also use contrasting colours to accentuate your fix. Check out this written tutorial on darning by TheSpruceCrafts.
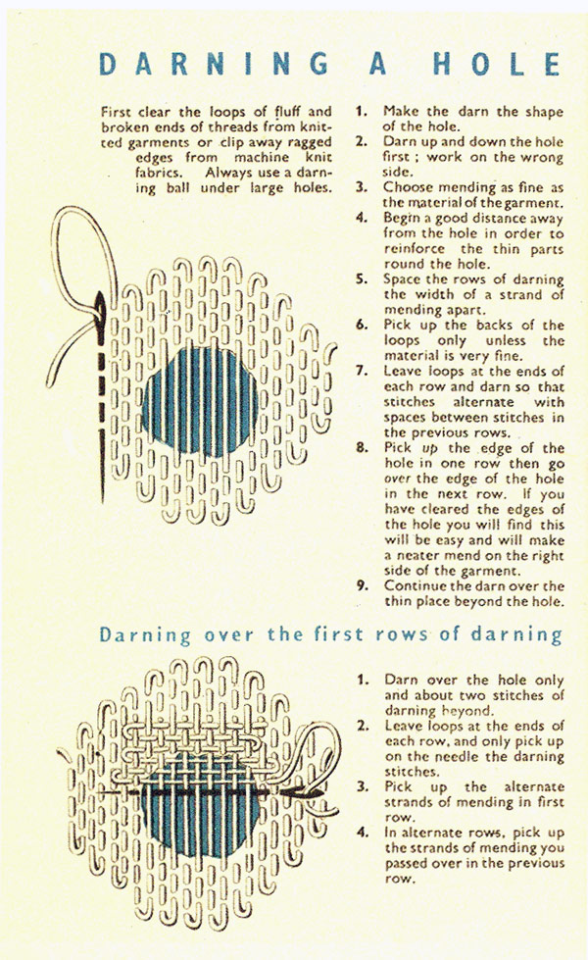
(Image source) [ID: vintage instructions on how to darn a hole.]
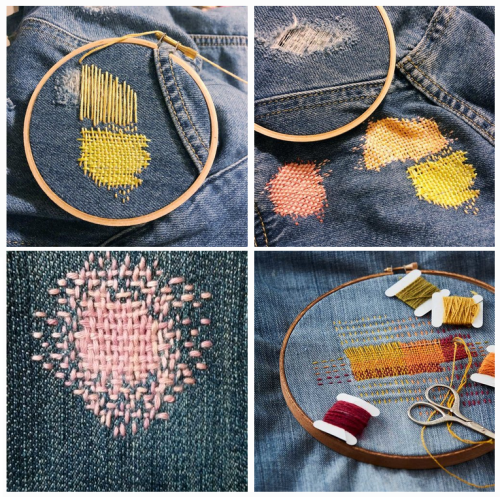
(Image source) [ID: four examples of darning on blue fabric with colourful contrasting thread.]
Conclusion:
Visible mending is a creative way to fix up your clothes and give them some personality at the same time.
You should be proud of the fact that you took the time and learned the necessary skills needed to mend your clothes! Show off what you did!
A fun side effect of wearing these obvious mends is that people will notice them. They'll remember your fixes the next time they're faced with a hole in their wardrobe, and it will make them more likely to try it for themselves.
These are just a few ways to visibly mend your garments. Want more inspiration? Check out Pinterest or r/Visiblemending on Reddit.

not me realizing that with tumblr moving the icons to the side, it eliminates xkit, which was situated at the top. what a scumbag move
You know, I bet the Ferengi have someone like Ea-Nasir and he's like. a saint or something
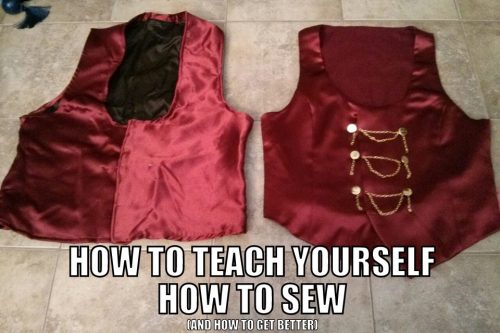
A lot of people don’t believe me when I say that I’ve only been sewing for a little over 3 years. Previous to that I had only really ever sewn plushies, pajama pants or pillows during Guide Guide workshops aka I could put fabric through a machine and sew in (sort of) straight lines but not much else. I had never used a clothing pattern before, I had never used anything other than a basic straight stitch, and I had never bought fabric. October 2012 was the first time I ever sewed any garments completely from scratch and those were my Fushimi from [K] vest and coat and now this October (2015) I will be competing at the Master’s level for cosplay craftsmanship. So I figured I’d give a short rundown of how I taught myself how to sew and how I improved.
1) I watched a lot of Project Runway (the earlier seasons… Annnndreeee, where is Annnndreee?). While this didn’t help much in actual sewing, it got me familiar with a whole lot of terminology and types of fabric and outfits. Plus it also showed me where people tended to take shortcuts and when those shortcuts tended to fail.
2) I got a very basic sewing machine and I READ THE ENTIRE USER MANUAL. I started off on a Singer Simple which was a gift from my parents (who actually bought it 2 years earlier but never gave it to me thinking I’d never use it… HA!) and I went through every single English page of that user manual. I became familiar with all the parts of my machine, how to thread it, how to change bobbins, how to clean it, how to fix jams, all the different stitch types, and I practiced sewing a bunch of random stitches on scrap pieces of fabric just to see what they looked like and how they changed when I changed different tension settings.
3) I got a basic sewing book (from like 1965… it’d probably better to get an updated/current book) that acted as a glossary of sewing terms. I had no idea what 50% of the stitches I needed to use were called so this became very useful later when I bought my first pattern.
4) I bought my first patterns and chose something fairly simple to start off with which was a lined vest (followed by an immensely more difficult jacket). I went with Simiplicity patterns after doing a lot of googling for the most new-user-friendly patterns.
5) Then I FOLLOWED THE PATTERN INSTRUCTIONS. It seems like an obvious step but even now I sometimes skip a step and then later regret it. Everything the pattern said I needed, I bought. I bought the specific types of fabric, interfacing, thread, buttons, I did not deviate from their suggestions for the first trial run. Then I read through the pattern instructions, cut out all the corresponding pieces for my size and got to work. The key was to work slowly and re-read things as I went. I also used my sewing book and google to help better explain some of the instructions that were not 100% clear to me just starting out. I also looked up youtube video tutorials on how to iron seams, sew darts, properly clip curved edges, sew button holes, and finish inside seams. Research, research, research!
6) To re-iterate: TAKE YOUR TIME. Slow and steady wins the race. It took me probably a solid 4 days to sew a very simple vest that would probably take me maybe a couple hours now but damn it was one of the cleanest looking vests I had ever sewn. I made sure not to rush anything and gave myself lots of time.
7) I kept practicing. The more I sewed, the more familiar I became with how garments were put together and where I could change things to better fit my size or how to alter things to better fit the garment I was trying to create. I experimented whenever I could on scrap fabric to see what would and would not work for stitching and ironing.
3 years later and I can now draft my own patterns and sew dozens of different types of garments with dozens of fabric types. I would attribute 90% of my learning experience to taking it slow at first and researching as I went. I didn’t allow any guesswork on the first couple of projects I worked on because how would I ever learn if I didn’t look into how something was properly done? Google, youtube, tutorial blogs (wink wink), reference books, and pattern instructions are you friends, do not take them for granted.
Pictured at the top on the left is the first Kirishiki vest I (rush) sewed in July 2012 without following instructions and trying to do it myself. The vest on the right is from December 2012 after I decided to take my time and follow instructions and actually learn while I was sewing. You can improve 100% just by taking your time, doing some research and following the instructions.
Bonus: What I bought for my sewing starter kit
A green rotary/cutting mat. They can be really expensive but I have been using my large mat for 3 years straight and it works wonders at not only protecting the surface you are working on, but giving you a nice sturdy pinning and cutting surface that is self-healing and doesn’t get destroyed by pins and exacto knives.
1 large and 1 small pair of orange handled sewing scissors.
A 6" x 24" clear sewing ruler.
A pack of white/blue fabric pencils.
A box of standard pins, plus a pin cushion.
A pack of extra bobbins.
A pack of standard sewing needles for hand-sewing.
A pack of standard sewing needles for my machine.
An iron and mini ironing board.
Happy sewing!
-Heather
USERNAME LORE GIVE IT TO ME NOW YOU ALL

But Aston was suffering from EDS, a genetic disorder that members of her family also had. Although EDS generally affects connective tissue — like joints and blood vessel walls — the vascular type, which Aston was thought to have had, is a more serious form of the syndrome that the Mayo Clinic says can “cause the walls of your blood vessels, intestines or uterus to rupture.”
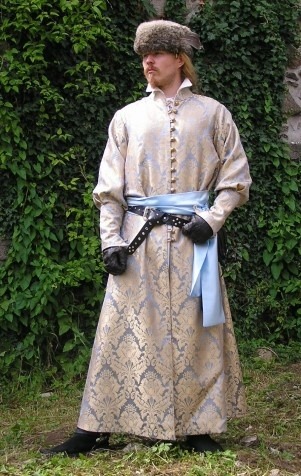
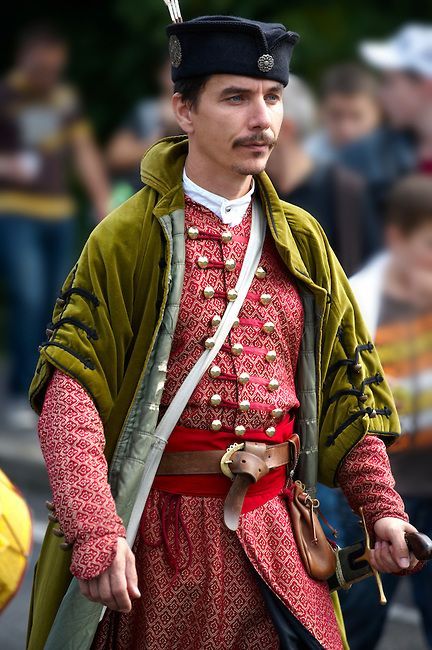
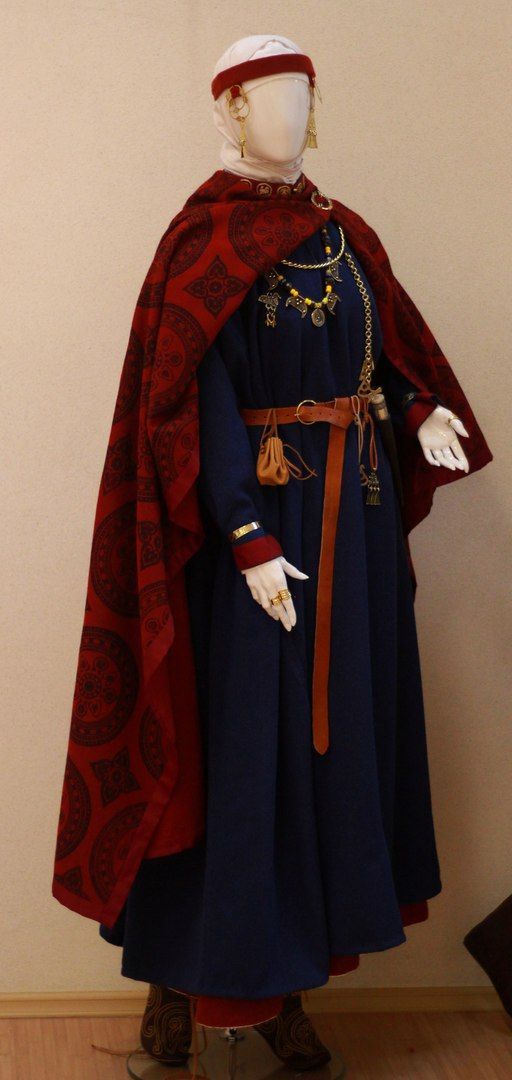
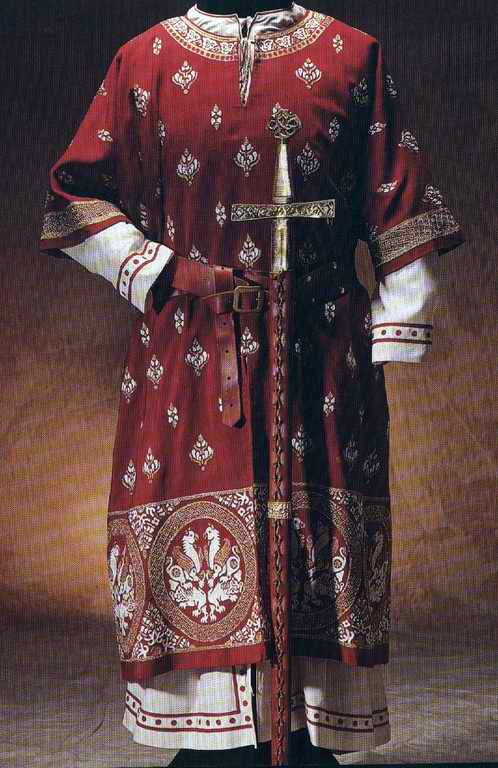
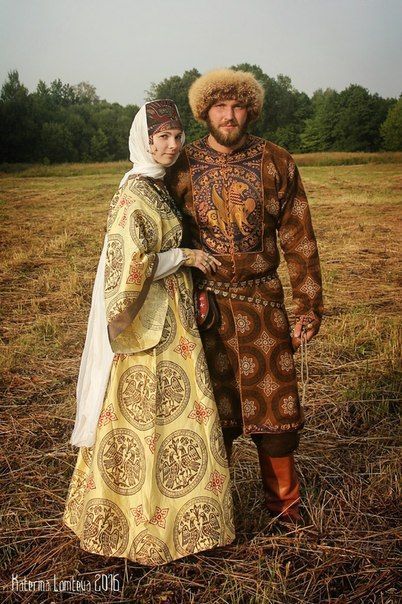
Don’t get me wrong, I love it when people design medieval fantasy clothing based on western European fashions, because they were awesome (did somebody say chaperon?) but there was lot of great design in eastern Europe and the Byzantine Empire too.
I’m pretty sure the second picture is actually 16th century Hungarian dress, but I’ll let it in because it looks cool.


-
 pika-yolo liked this · 1 week ago
 -
 bugsupport liked this · 2 weeks ago
 -
 leaf-fanatic liked this · 4 weeks ago
 -
 swirlspill reblogged this · 1 month ago
 -
 palindome liked this · 1 month ago
 -
 stratusstormcloud liked this · 1 month ago
 -
 seifrin liked this · 1 month ago
 -
 isuggestwishcraft reblogged this · 1 month ago
 -
 yfantis liked this · 1 month ago
 -
 faustian-bargain-bin reblogged this · 1 month ago
 -
 name-to-change reblogged this · 1 month ago
 -
name-to-change liked this · 1 month ago
-
 the-timeline-owner reblogged this · 1 month ago
 -
 queer-talmid liked this · 1 month ago
 -
 intersectingparadigms reblogged this · 1 month ago
 -
 acookiedragonblog reblogged this · 1 month ago
 -
 thetaikatalvi reblogged this · 1 month ago
 -
 nix-daughterofmagic reblogged this · 2 months ago
 -
 hipparkheion reblogged this · 2 months ago
 -
 themostdivinetrash liked this · 2 months ago
 -
 julibf liked this · 2 months ago
 -
 zimshan reblogged this · 2 months ago
 -
 sharp-edges-of-the-night reblogged this · 3 months ago
 -
 fauxdoc liked this · 3 months ago
 -
 lightsareout liked this · 3 months ago
 -
 songue85 liked this · 3 months ago
 -
 teachpositive42 reblogged this · 3 months ago
 -
 lexiapalace reblogged this · 3 months ago
 -
 cactus-extraordinaire liked this · 3 months ago
 -
lexiapalace liked this · 3 months ago
-
songue85 reblogged this · 3 months ago
-
 lazyusernamemaker reblogged this · 4 months ago
 -
 mia-brb reblogged this · 4 months ago
 -
 ladyicepaw liked this · 4 months ago
 -
 cringe-edition-syl liked this · 4 months ago
 -
 alsayn reblogged this · 4 months ago
 -
 sunshineraccoon liked this · 4 months ago
 -
 sffan42 reblogged this · 4 months ago
 -
 forgiven-whimsy liked this · 4 months ago
 -
 subcultureblues liked this · 4 months ago
 -
 otherworldrealms liked this · 4 months ago
 -
 serpentsbite liked this · 4 months ago
 -
 superduperzorel liked this · 4 months ago
 -
 not-all-trains liked this · 4 months ago
 -
 captainsugaraddict reblogged this · 4 months ago
 -
 guglefug reblogged this · 4 months ago
 -
guglefug liked this · 4 months ago
-
 rahayn reblogged this · 4 months ago
 -
 mindelanandalsea liked this · 4 months ago

Hey my main is mad-ad I use this side blog to keep posts I want to save handy and my drafts clear
76 posts