Some Good Study Playlists
Some Good Study Playlists
Here are some study playlists I think are really motivating and keep you working. I personally love listening to study playlists while studying this keeps me really motivating and i don´t even see the time pass by. Hope i could help you (:
-Eat.Sleep.Study.Repeat
-Studdy Buddy
-Survival kit to finals
-Study Mix I
-Concentration
-Concentration part 2
-Concentration part 3
-Study with Accompaniment II. III.
-Instrumental Mega Mix
and
-Rainy Mood
More Posts from Marathon-notasprint and Others
Got an Essay to Write?
Here’s how to use up space when you are just absolutely done with life
-make all periods a font size or two up from the one you’ve been directed to use
-put two spaces after every period
-WATCH YO COMMAS you’re prob missing fifty of them
-2.15 space it
-MLA format the header
-use “such as” instead of “like”
-use “therefore” or “as a result of” instead of “so”
-add a space after every indent
-make the margins on your paper a TINY bit bigger
-get rid of all contractions
-see that word that’s so close to being on the next line? put it on the next line
*keep in mind that one or two of these may conflict with the essay’s instructions
*don’t forget to take a break and breathe some non-recycled air and close your eyes and love yoself <3
this has gotten me through several papers so i hope this helps. reblog this please, save a grade and some sanity
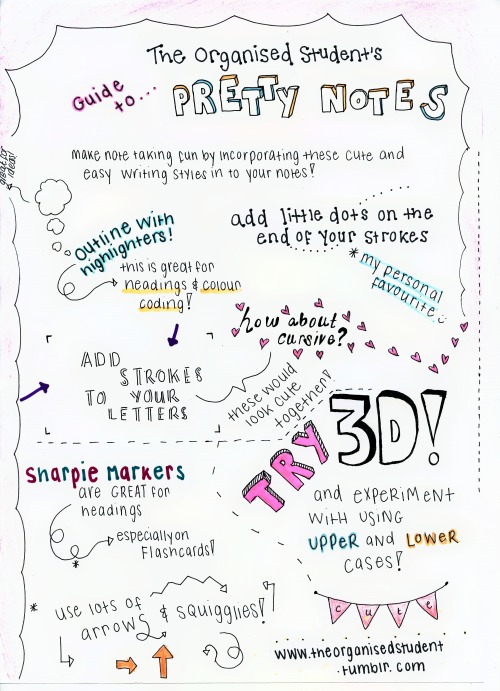
2/4/2015 // I love experimenting with pretty, new hand writing styles for my study notes! I made this info-graphic and scanned it in to show you some of the styles I am loving right now.
Superb Study Guides and Mini Moleskines
(A more concise version of this will be published in my college’s newspaper on Thursday. I will likely add or link diagrams and examples to this post, so you can check the original here.)
As a tutor, many students ask me for tips on making study guides. Generally, my response is that, “it depends”.
But hold on. Before we continue we should discuss what the purpose of a study guide really is.
Study guides fall into two main categories: study guides that prompt you to find/think about information and study guides that directly organize the information you need to know. Some professors provide you with study guides of the former kind (i.e., you’re not given the answers), and it’s essentially your job to create your own study guide of the latter type. Both categories serve the purpose of organizing information you already have in order to synthesize a study tool that best facilitates your comprehension and memorization of the information at hand, just at a different stage in the process.
Before you even start, it is helpful to be aware of the level at which you are required to know the information for your test. The most basic of these is recalling definitions, which can accomplished by use of flashcards. Other information you’ll have to know will require you to compare ideas or apply them. Think of your learning process as literal → interpretive → applicative, meaning you will need study guides that help you visualize, draw relationships, and understand material so you may memorize less in a way that helps you answer more, and better than straight memorization ever could.
–
Concept Map:
These can be anything from a basic branching diagram to a complex mind map. This type of study guide allows you to compare information in a more spatial manner than strictly linear. Let’s be honest; sometimes linear learning is unrealistic, because our world is not truly linear. This format allows you to start from the basic, bare bones of the topic you’re studying and expand into very specific details and examples. This way you can get a really solid overview of the information and delve deeper as necessary. At least for mind maps in specific, Mindly is a beautiful and highly functional mind mapping app for iOS. It’s worth the small price, I can tell you that.
Comparison Chart:
Another visually-oriented type of study guide, comparison charts are the easiest way to map out similarities and differences for various topics. The biggest advantage of this method is that you can easily find the important similarities and differences of the subjects in question without having to reread a chapter or search through your piles of notes. It won’t help you visually connect topics like a mind map would, but this very simple tool is important and useful in its own rite.
Index Cards:
Before you skip over this because you think you know what I’m talking about, this is not the same as a flashcard. Flashcards have the very basic purpose of helping you memorize information, and little else. Index cards, however, are like flashcards on steroids because they contain much more information and are used primarily to summarize key information in a portable way that allows you to easily locate more details if necessary. Allow me to break down how you might want to use this method.
Front:
Middle: Main idea [e.g. alveoli]
Upper Right: Organizational term [e.g. respiratory system]
Bottom Middle: Source of information [e.g. Chapter 17, pg. 479 or Notes from 11/26/2013]
Back:
In your own words, what’s most important to know about the concept.
Include examples, summaries, diagrams, definitions, etc.
Be detailed! Remember, this is not about strictly memorizing.
Make sure the content corresponds to level of understanding your professor excepts
Diagram:
This one is pretty self-explanatory, but is extremely dependent on the topic at hand. This could be anything from a chemical reaction scheme, a cycle, Venn diagram, etc. You may even consider making a timeline, which is great for chronological organization of ideas. This is not limited to history, though! You can also organize information from classes such as anthropology, psychology, biology, anatomy, physiology, ecology, etc. If it has a specific, linear order, it can be made into a timeline.
Question Prompts:
This method I find works very well if you use the Cornell note-taking method. If you’re using Cornell notes, you would write your prompts in the left hand column next to where the answers are located, then just cover up the answers when studying. For example, for something as simple as a definition you could write, “What is _____?” For something more complicated such as a comparison chart, you could write, “What are the key differences between _____ and _____?” If you want, you can even ask questions that aren’t directly answered in the adjacent text such as, “Why is [idea] important to [concept]?”
–
Now that you know what formats you might use for your study guides (remember you don’t have to stick with just one), you may wonder where you can put this information. The basic answer to that question: anywhere. Many people like to draw these things on computer paper. You may want to type some of these things. If you’re using Mindly then you would be inputting the information into an app. I would like to offer up the suggestion of little mini notebooks for each class. I personally make these study guide materials on paper or a computer first, then when I’m satisfied with the result, I copy it down into my pocket-sized Moleskine notebooks. I personally prefer the squared, dotted, or blank notebooks, but whatever suits your fancy. The benefit to these little notebooks is that you have all of the information you need to study for in a small, convenient little book that you can easily keep in your backpack all the time because of its size. (Ladies, it will even fit in a clutch!) Study on the bus, waiting for class to start, when eating at the cafeteria, while waiting for your laundry to finish, etc. Not to mention, this will help you avoid losing papers because they’re all in one place.
Just try not to lose the notebook.
Note Taking Systems
The Cornell Method
The Cornell method provides a systematic format for condensing and organizing notes without laborious recopying. After writing the notes in the main space, use the left-hand space to label each idea and detail with a key word or “cue.”
Method
Rule your paper with a 2 ½ inch margin on the left leaving a six-inch area on the right in which to make notes. During class, take down information in the six-inch area. When the instructor moves to a new point, skip a few lines. After class, complete phrases and sentences as much as possible. For every significant bit of information, write a cue in the left margin. To review, cover your notes with a card, leaving the cues exposed. Say the cue out loud, then say as much as you can of the material underneath the card. When you have said as much as you can, move the card and see if what you said matches what is written. If you can say it, you know it.
Advantages
Organized and systematic for recording and reviewing notes. Easy format for pulling out major concept and ideas. Simple and efficient. Saves time and effort. “Do-it-right-in-the-first-place” system.
Disadvantages
None
When to Use
In any lecture situation.
The Outlining Method
Dash or indented outlining is usually best except for some science classes such as physics or math.
The information which is most general begins at the left with each more specific group of facts indented with spaces to the right.
The relationships between the different parts is carried out through indenting.
No numbers, letters, or Roman numerals are needed.
Method
Listening and then write in points in an organized pattern based on space indention. Place major points farthest to the left. Indent each more specific point to the right. Levels of importance will be indicated by distance away from the major point. Indention can be as simple as or as complex as labeling the indentations with Roman numerals or decimals. Markings are not necessary as space relationships will indicate the major/minor points.
Advantages
Well-organized system if done right. Outlining records content as well as relationships. It also reduces editing and is easy to review by turning main points into questions.
Disadvantages
Requires more thought in class for accurate organization. This system may not show relationships by sequence when needed. It doesn’t lend to diversity of a review attach for maximum learning and question application. This system cannot be used if the lecture is too fast.
When to Use
The outline format can be used if the lecture is presented in outline organization. This may be either deductive (regular outline) or inductive (reverse outline where minor points start building to a major point). Use this format when there is enough time in the lecture to think about and make organization decisions when they are needed. This format can be most effective when your note taking skills are super sharp and you can handle the outlining regardless of the note taking situation.
Example:
Extrasensory perception
definition: means of perceiving without use of sense organs.
three kinds
telepathy: sending messages
clairvoyance: forecasting the future
psychokinesis: perceiving events external to situation
current status
no current research to support or refute
few psychologists say impossible
door open to future
The Mapping Method
Mapping is a method that uses comprehension/concentration skills and evolves in a note taking form which relates each fact or idea to every other fact or idea. Mapping is a graphic representation of the content of a lecture. It is a method that maximizes active participation, affords immediate knowledge as to its understanding, and emphasizes critical thinking.
Advantages
This format helps you to visually track your lecture regardless of conditions. Little thinking is needed and relationships can easily be seen. It is also easy to edit your notes by adding numbers, marks, and color coding. Review will call for you to restructure thought processes which will force you to check understanding. Review by covering lines for memory drill and relationships. Main points can be written on flash or note cards and pieced together into a table or larger structure at a later date.
Disadvantages
You may not hear changes in content from major points to facts.
When to Use
Use when the lecture content is heavy and well-organized. May also be used effectively when you have a guest lecturer and have no idea how the lecture is going to be presented.
Example:

The Charting Method
If the lecture format is distinct (such as chronological), you may set up your paper by drawing columns and labeling appropriate headings in a table.
Method
Determine the categories to be covered in the lecture. Set up your paper in advance by columns headed by these categories. As you listen to the lecture, record information (words, phrases, main ideas, etc.) into the appropriate category.
Advantages
Helps you track conversation and dialogues where you would normally be confused and lose out on relevant content. Reduces amount of writing necessary. Provides easy review mechanism for both memorization of facts and study of comparisons and relationships.
Disadvantages
Few disadvantages except learning how to use the system and locating the appropriate categories. You must be able to understand what’s happening in the lecture
When to Use
Test will focus on both facts and relationships. Content is heavy and presented fast. You want to reduce the amount of time you spend editing and reviewing at test time. You want to get an overview of the whole course on one big paper sequence.
Example:

The Sentence Method
Method
Write every new thought, fact or topic on a separate line, numbering as you progress.
Advantages
Slightly more organized than the paragraph. Gets more or all of the information. Thinking to tract content is still limited.
Disadvantages
Can’t determine major/minor points from the numbered sequence. Difficult to edit without having to rewrite by clustering points which are related. Difficult to review unless editing cleans up relationship.
When to Use
Use when the lecture is somewhat organized, but heavy with content which comes fast. You can hear the different points, but you don’t know how they fit together. The instructor tends to present in point fashion, but not in grouping such as “three related points.”
Three Examples:
Example 1:
A revolution is any occurrence that affects other aspects of life, such as economic life, social life, and so forth. Therefore revolutions cause change. (See page 29 to 30 in your text about this.)
Sample Notes:
Revolution - occurrence that affects other aspects of life: e.g., econ., socl., etc. C.f. text, pp. 29-30
Example 2:
Melville did not try to represent life as it really was. The language of Ahab, Starbuck, and Ishmael, for instance, was not that of real life.
Sample Notes:
Mel didn’t repr. life as was; e.g., lang. of Ahab, etc. not of real life.
Example 3:
At first, Freud tried conventional, physical methods of treatment such as giving baths, massages, rest cures, and similar aids. But when these failed, he tried techniques of hypnosis that he had seen used by Jean-Martin Charcot. Finally, he borrowed an idea from Jean Breuer and used direct verbal communication to get an unhypnotized patient to reveal unconscious thoughts.
Sample Notes:
Freud 1st – used phys. trtment; e.g., baths, etc. This fld. 2nd – used hypnosis (fr. Charcot) Finally – used dirct vrb. commun. (fr. Breuer) - got unhynop, patnt to reveal uncons. thoughts.
this school year will go successfully, and we will figure things out
this school year will go successfully, and we will figure things out
this school year will go successfully, and we will figure things out
this school year will go successfully, and we will figure things out
this school year will go successfully, and we will figure things out
this school year will go successfully, and we will figure things out
this school year will go successfully, and we will figure things out
this school year will go successfully, and we will figure things out
this school year will go successfully, and we will figure things out
this school year will go successfully, and we will figure things out
Medical Textbooks (PDF versions)
Hi Everyone!!
I was asked by @dankamphetamemes to share my holy grail textbooks and I did, but I thought I’d do you guys one better. I recommended that you should check them out in PDF versions before you buy them because honestly they’ll burn a hole through your pocket - so I gathered all the books I use and a couple of others for you to check out!!
Heres a list of books you’ll find in my google drive:
- Robbins and Cotran’s Pathological Basis of Disease
- BRS Pathology
- Lippincott’s Biochemistry
- Lippincott’s Pharmacology
- Physiology by Linda Costanzo
- BRS Physiology
- Moore’s Clinically Oriented Anatomy
- Gray’s Anatomy Flashcards
- Unfortunately I couldn’t find a PDF version of Medical Microbiology by David Greenwood - Ill keep looking and upload it when I find it
Extra books/flashcards:
- Guyton and Hall Textbook of Physiology
- Clinical Microbiology made ridiculously simple
- Netters Anatomy Flashcards
- Snells Clinical anatomy by regions
If you happen to face any trouble downloading them or accessing them shoot me a message and let me know
Here’s the link - enjoy!!
https://drive.google.com/folderview?id=0ByVv1ccrvWveUGVuZFRCQWp3MDQ&usp=sharing


My exams are rapidly approaching (just 9 days left!!) and amongst all the study tips posts that are popping up, I wanted to do a post about those days when things don’t go as planned. Be it that you walk out of an exam and feel like you bombed it, or that you get back a disappointing score. We all know the feeling. So here are some things that I like to do to make the day suck a little less!
Have some chocolate (light/dark/milk, hot/cold/whatever as preferred)
Have a bath, or a long shower
Go for a walk or a jog, preferably surrounded by nature
Find someone/something to cuddle
Even if you have things to do, give yourself a break
Tidy your room/flat/whatever to get a fresh perspective
Open all windows and air out your room
If you have things that need to be done, make a to do list and sort your brain out
Organise your clutter/notes/room/whatever
Do come colouring in a colouring book (these are awesome)
Try your hand at painting, even if you’re terrible at it
Make yourself some tea
Bake something (and eat it without feeling guilty afterwards)
Light a nice-smelling candle
Spend time with the positive forces in your life, be it parents, friends or pets
Watch your favourite movie (preferably with someone who loves it as much as you)
Go on spotify, pandora, soundcloud, 8tracks or wherever and look for new music
If you find some really good music, have a dance party
Put on your favourite outfit (+ makeup look if you’re into that)
Paint your nails, shave, moisturize, wash your face and pamper yourself
Check out universityandme‘s “You are a force of nature” tag
If you need someone to talk to, send me an ask, either here or on my main blog, saturdaystudying
5 Tips when it comes to Mind Mapping
1) Decide on your paper size Before you start writing anything it’s really important to work out what size paper you want to do your mindmap on. Be it A3, A4, A5 or any other size you can think of, deciding this early on will make things much easier in the long run and leave you with a much more organised mind map
2) Work out the basics Before you actually start writing anything it’s a really good idea to work out the basics of your mind map. What type of bubble do you want the title to be in? Spiky or a cloud or just a plain circle? What kind of lines to you want leading off from it? Arrows or just plain lines? Straight or curved? Taking 30 seconds to work these out before you start will make everything much easier in the long run and leave you with a much neater and better organised mind map
3) Choose what to write with This part is all down to personal preference. Do you prefer writing in a plain colour and then highlighting later? Do you want each section in a different colour? Felt tips or biros? Fineliners or pencils? This is the time when you can think about what you’re most comfortable writing with and what’s going to make it easiest for you to retain the information
4) Add pictures and diagrams Adding little drawings to aid your explanations is a really great way to help you remember what you write. You don’t have to be good at art to make this work, just add a few little diagrams here and there and you’ll be surprised how much more easily you retain the information
5) Have fun with it You may be looking at a picture of a mind map online and saying to yourself ‘that’s exactly what I want mine to look like’ but in reality that’ll never happen. You’ll never manage to get a mind map that looks exactly the same as someone else’s and in all honesty that would be a bit boring. Instead just get stuck in and create your own unique masterpiece
-
 steepedte4 liked this · 2 years ago
 -
 mega-bigbouquetfox liked this · 3 years ago
 -
 generic---blog liked this · 4 years ago
 -
 sayidah reblogged this · 5 years ago
 -
sayidah liked this · 5 years ago
-
 iloveyou-lol liked this · 6 years ago
 -
 peggycarterislife liked this · 6 years ago
 -
 pandora1798 reblogged this · 6 years ago
 -
pandora1798 liked this · 6 years ago
-
 constant-motivation reblogged this · 7 years ago
 -
 dreamcollectinguniverse reblogged this · 7 years ago
 -
 beccafcknhood liked this · 7 years ago
 -
 honey-lait reblogged this · 8 years ago
 -
 lolchic4152 reblogged this · 8 years ago
 -
 exolcbworld liked this · 8 years ago
 -
 andis-adventures liked this · 8 years ago
 -
 eew3-blog liked this · 8 years ago
 -
 hellowhatthehellisgoingonhere reblogged this · 8 years ago
 -
hellowhatthehellisgoingonhere liked this · 8 years ago
-
 flowerscantcry-blog liked this · 8 years ago
 -
 studyauthoress liked this · 8 years ago
 -
 life-as-they-knew-it liked this · 8 years ago
 -
 jenndoes-nt-care-blog reblogged this · 8 years ago
 -
 reversing-forwards liked this · 8 years ago
 -
 dkdjdjdjdjd-blog liked this · 8 years ago
 -
 currently-under-surveillance liked this · 9 years ago
 -
lolchic4152 liked this · 9 years ago
-
 wtfnomoreusernames liked this · 9 years ago
 -
 efedefernanda liked this · 9 years ago
 -
 blondbf reblogged this · 9 years ago
 -
 studysure reblogged this · 9 years ago
 -
 angelsure7 liked this · 9 years ago
 -
 justmedusaisenough liked this · 9 years ago
 -
 musingsofahardenedsoul-blog reblogged this · 9 years ago