
Carolina-animation student. Just a girl who loves lots of things. im just using @your-dead-art-student now
155 posts
Latest Posts by shookehded - Page 5
My Jack o lantern drawing
Okay, so, in art class we have been doing charcoal all this time, practising drawing statues.

Like this gorgeous first attempt of drawing with charcoal. Beautiful.

The man and the "I'm judging you" face woman. (The light is there too, I'm too sassy, I couldn't resist)

The awesome abstract drawing withe the "cube face". I swear, it's supposed to be a face there in the right.

"The man who used to not have half of his face" is there too. He seems a little sad, I wonder why.
And, so, the time passed. The teacher said we could draw anything we wanted.
Anything .

I present you MISS PUMPKIN. I'M NOT GIVING UP HALLOWEEN UNTIL IT'S DECEMBER. It's not finished yet. I started a few days ago, I don't want to give up, I have to finish it. Oh, and yes, she has not hand.
...
Halloween never diessss yaaaaaayy!!!
just for the heck of it, heres a 2 hr speed paint of a fabulous skeleton with appropriately dramatic musical accompaniment (photo ref from Heavenly Bodies: Cult Treasures & Spectacular Saints from the Catacombs by Paul Koudounaris)

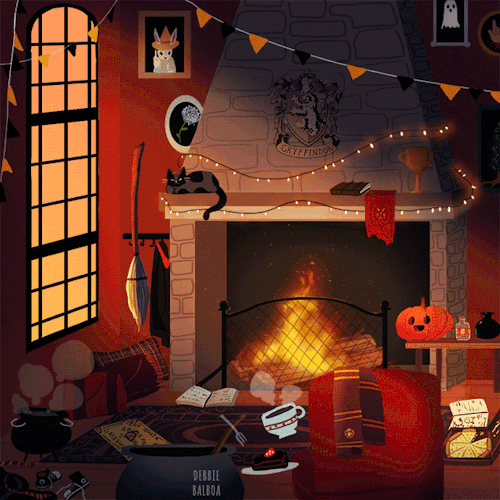
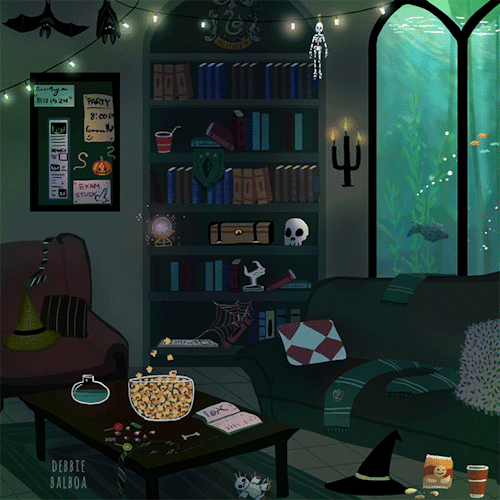
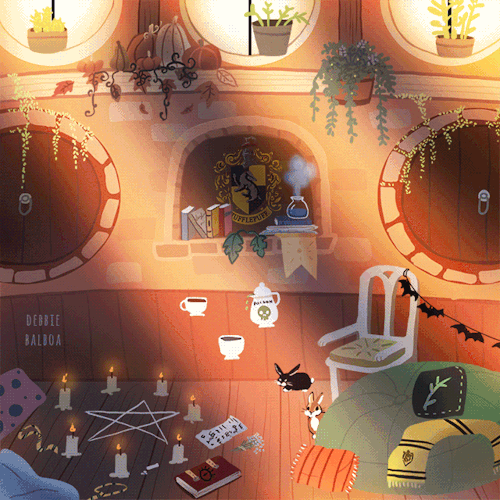
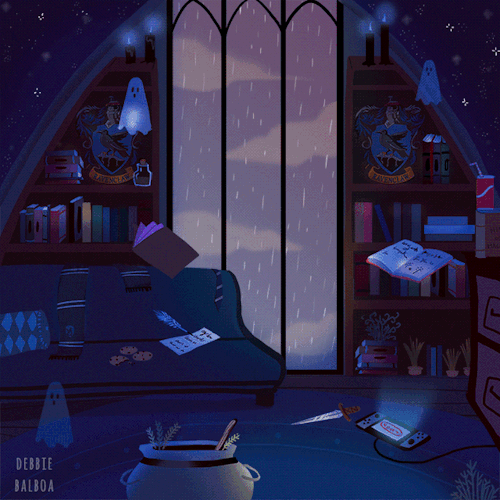
Hogwarts Houses common rooms in Halloween season

It's awesome ♡


ELI SHOWED ME A COOL THING where it generates a skeleton in various angles for you !!!!!!


A master post of Thomas Romain’s art tutorials.
There’s not enough space to post all of them, SO here’s links to everything he has posted (on twitter) so far : 1 2 3 4 5 6 7 8 9 10 11 12.
Now that new semesters have started, I thought people might need these. Enjoy your lessons!


I just loove Oropo.
And this scene is awesome
So, I was in the bus, listening to MCR. And then, my parabatai said "Hey, check this out" and lend me one of her headphones. I finished listening to MCR "I don't love you " and History "Queen" at the same time. Best. Remix. Ever.

I spent time on this.
Reblogs are appreciated! Don’t repost w/o my permission or remove my caption, thanks!
Quick CLIP STUDIO PAINT trick
If you’re like me, then you guys love shading your sketches or lineart. Like this:

But if you erase a bit and shade more with black on low opacity it’ll look all wonky so you use the color picker. Or hell you scan or take a photo of a drawing you made on paper. But then this happens if you wanna put color under it!

Oh no! Now I have to set it to multiply to color it in! And then I can’t color in the lineart! :(
Fret not, my dear friends! I found the solution! Go to [Edit] > [Convert brightness to opacity]

And suddenly you have this:

This way you don’t need to set the lineart to multiply and can color it in! It also works perfectly, if you use this nifty little trick on traditional drawings that you scanned.
I hope this helped you guys, because I sure as hell didn’t know about this until yesterday! ♥
Aaaa your art is so good, if you don't mind me asking, how do you draw grass like that? Whenever I try it looks like a big blob ;-; thank you :D
thanks. i feel like i do it differently every time, but i made a little tutorial here that hopefully gives you a good idea of how it usually goes


hope this helps!!!!!!!!!!!!!!!!!


the coloring system is so big that i don’t know what your problem really is, the environment, the style, the blending, or the whole picture looks just wrong and you don’t know exactly why. so i’m going to start from the problem i’ve been through.
this is what i know and how i do in short, please don’t take it as a tutorial or something. sorry for the bad grammar and ugly handwriting.


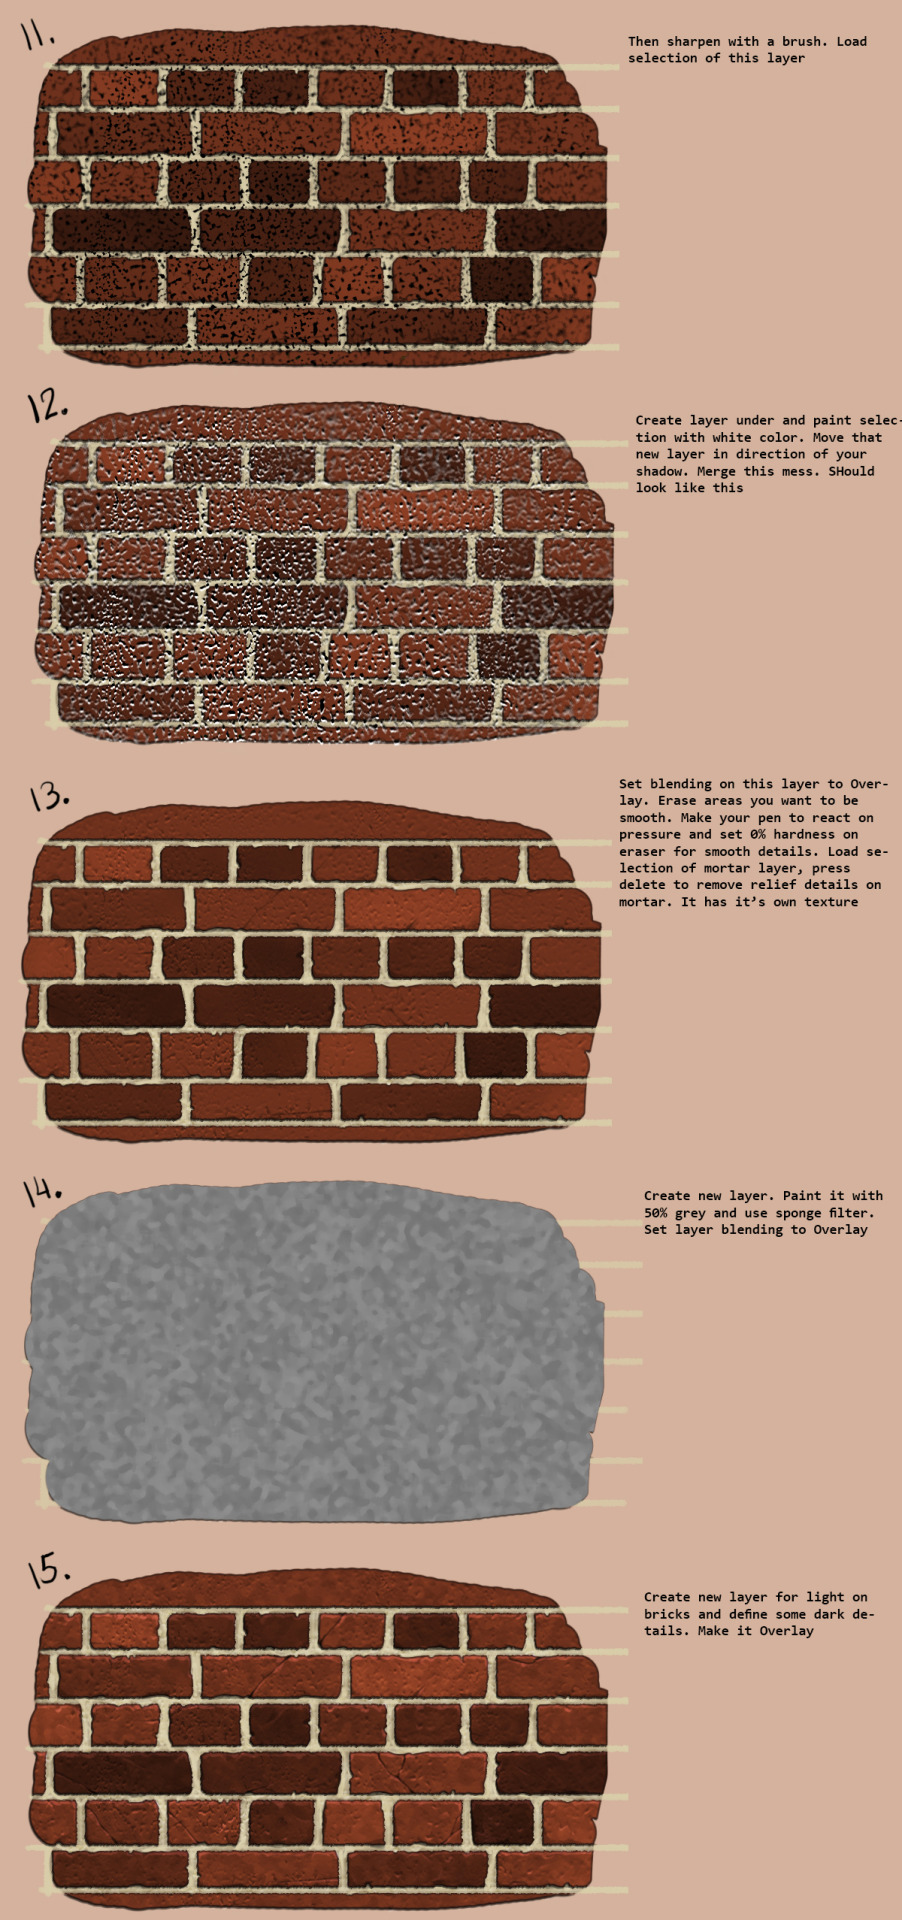

Made a quick tutorial about drawing brick walls. In step 2 I wrote “horisontal”, but it is “vertical”. Whoops.
could u do a tutorial on shading? how do u get your lines so straight? im a huge fan of ur art and i would love to learn how !!
Shading (without a specific light source)
1. Flat Colors

2. Add a lighter color or a darker color to the original color in order to add more value to the flat colors.

If you look at the image below it shows the comparisons of the new color that was added to the original color in order to see the difference between the two.

3. Add the shadows in order to show which object is above another object. To create the shadows I used the colors shown below and set them to ‘multiply’. This adds more depth to your work.

4. Use ‘multiply’ to give more emphasis on certain aspects on your work. Like for example the leaves.

5. Add the finishing touches and you are done!

Shading (with a specific light source)
All you gotta do is determine where the light source is. In the image below, the light source is the sun. The little sun will guide you on which parts should be illuminated or shaded.
Here are some examples:


In order to see the difference that shading can do, here is a process gif!!!

As for lines, I believe that everyone’s style is different. Some choose to do little strokes while others do just one big stroke. As for me, I just do one big stroke in order to maintain the fluidity and consistency of the line. Here is a picture of comparison:

If you want smooth lines then just try and draw it in one swift movement. If you don’t get it right, don’t erase the part that went wrong (because it will be obvious that it’s no longer one line but 2 lines because the continuity of the original line and the new line won’t be the same). You have to redo the whole line from the beginning.
If you practice this a lot you will notice that your lines will be better and at the same time, you will work faster because you don’t have to do so many strokes. Btw when you draw the line do it fast, like really fast, so that you won’t encounter any mistakes.
Just draw a lot and you will get the hang of it and I also hope you know that each artist has their own style. So maybe the one swift stroke works for me but the many short strokes work for you. Just draw in a way that’s more comfortable to you. Anyway, hope this was helpful and have a good day!
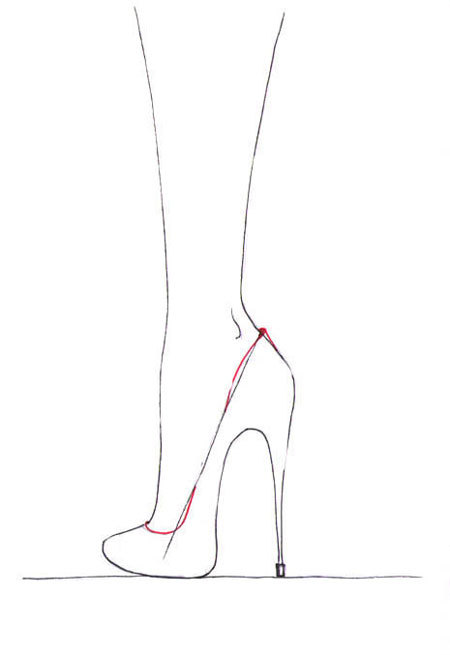
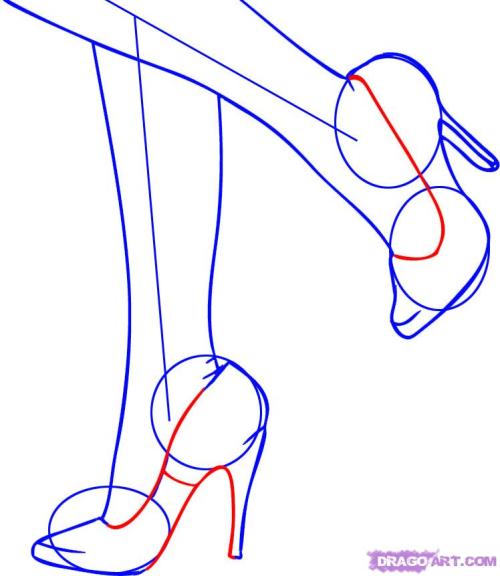
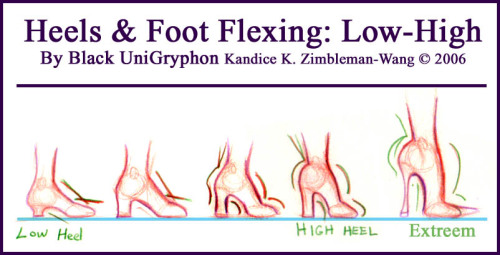
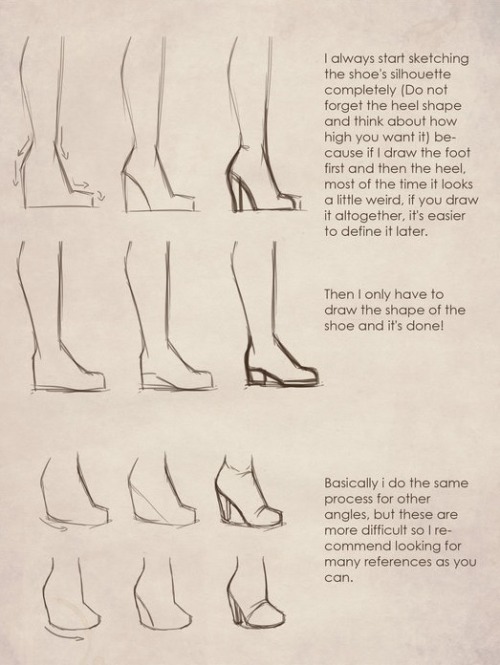
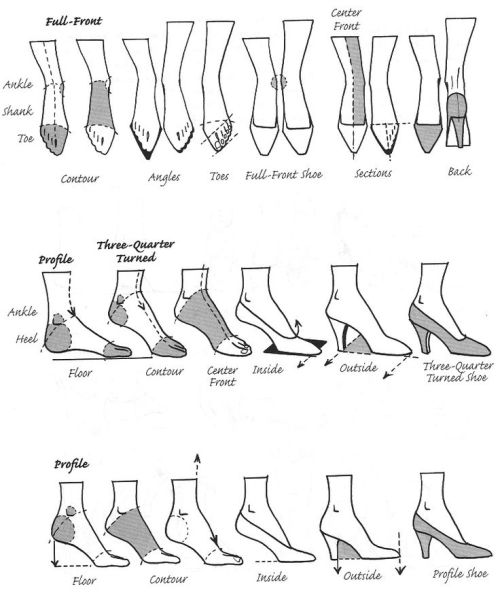

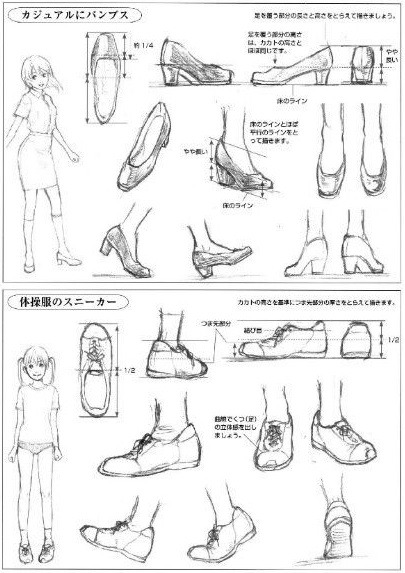
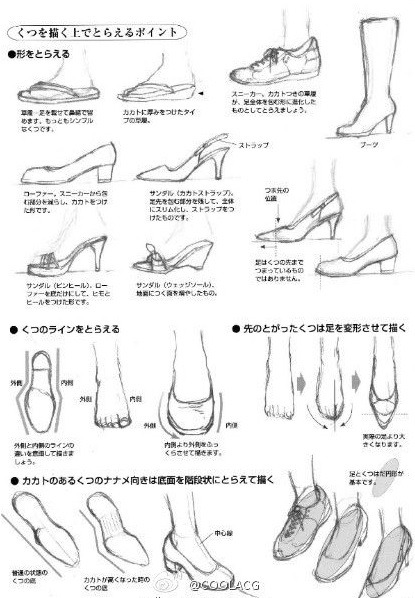


High Heels Row 1: Left Right Row 2 Row 3: Left, Right Row 4: (Source Unknown) Row 5 Row 6


!! ART TUTORIAL !!
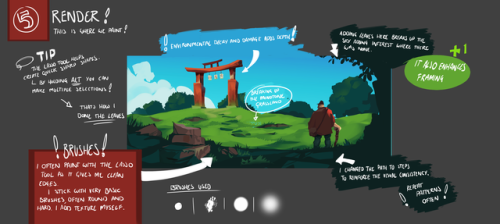
This is my first real attempt at doing a walkthrough for one of my landscapes, I’d really appreciate some feedback!
it is pretty much my workflow process, there’s always something slightly big to change during render I should have solved earlier!
Anyway everyone, feel free to message me if you have any questions and I hope this helps anyone!!
do you ever just

“no that’s not dramatic and cheesy enough”

“getting warmer”

“t HERE IT IS”
me: why are you destroying earth!!!
aliens: because theres people who think that english is the only language they need to speak
me: thats fair i understand
Mr. Darcy: Ah, congratulations, Miss Elizabeth. I see you’re on time today.
Elizabeth Bennet: So sorry to disappoint you.
Mr. Darcy: Oh, but I’m not disappointed, far from it. Merely surprised.
Both Elizabeth Bennet and Mr. Darcy: [fake laugh]
Jane Bennet: They always argue, why is that?
Mrs. Gardiner: Well it’s a simple chemical reaction, you see, when two people like each other very much-
Jane Bennet: They like each other?
Mrs. Gardiner: Well, I think so.
Jane Bennet: They like each other very much? Well, don’t you think we should tell them?
Mrs. Gardiner: They’d never believe us.


how do you draw space?
Assuming you’re asking about night skies,


The lip sync tutorial they DON’T give you
I mentioned on twitter that I wanted to do a lip sync tutorial and immediately got some people who were interested so I put one together real quick!
I’m going to use a bit of unfinished lip sync from my taz animated part as reference. They’re just gifs so no sound, but you should still be able to tell that he’s saying “I’d say a solid B… Solid B minus.”
Anyone who’s looked up how to do lip sync has seen phoneme charts. Phonemes are just the shape your mouth makes when you make certain sounds.

When you do lip sync, you want some kind of reference to make sure it’s right
What’s easiest is to say it yourself and pay attention to the shapes your mouth is making. Since you’re going frame by frame, your audio is slow enough that you can make each shape slowly and distinctly and you can get each individual phoneme down in the animation.

Don’t do this.^
An easy way to tell if you’re animating lip sync wrong is if you run out of frames to make each shape. You don’t need them! Making each shape is unnatural. People talk quickly and the mouth doesn’t have the time to get into each shape. They blend together, sometimes to the point where the shape doesn’t change at all!

Not only does the 2nd gif take less frames and energy to make, it’s more relaxed, it looks less distracting, and his lips are much easier to read!
These are reference charts to show the differences more clearly


This is the difference between getting swallowed up in every last detail and paying attention to reality.
What matters more than hitting every syllable is making it look natural and flow with the acting. That’s why anime mouth flaps can work so well. A strong pose through the whole body matters more than one mouth shape.

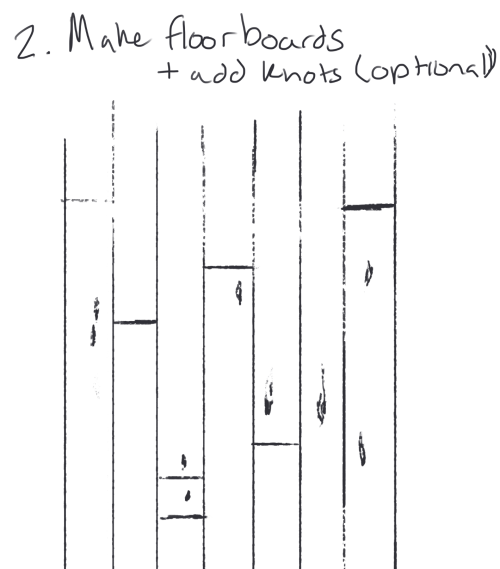
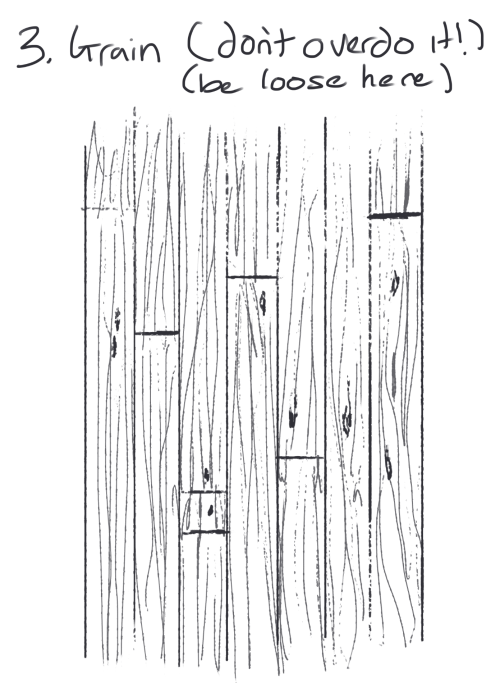
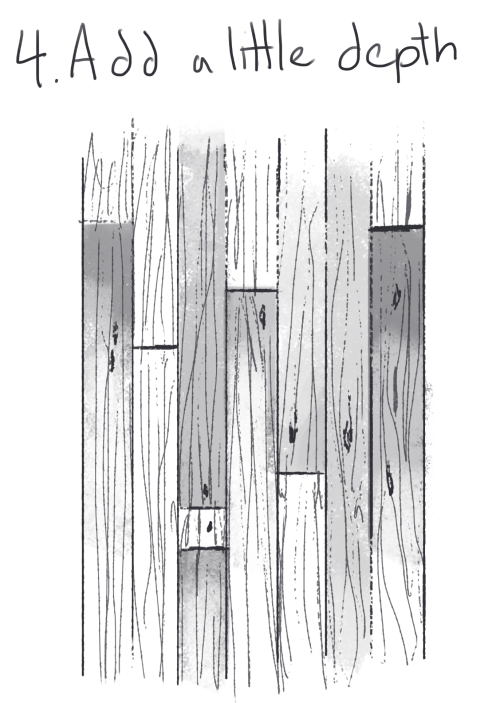
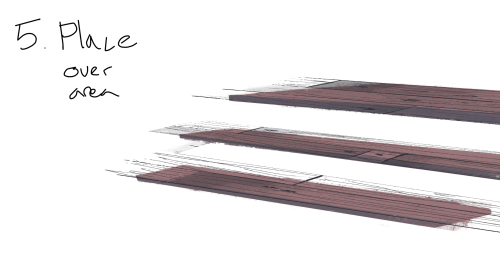
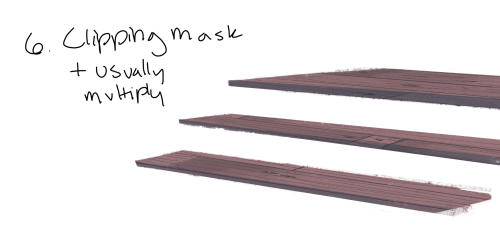
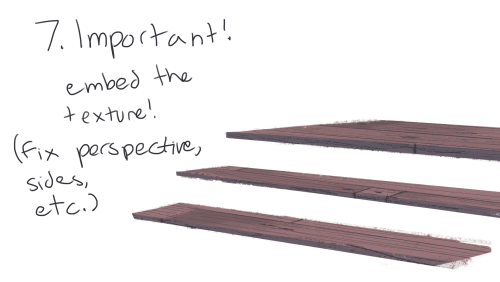
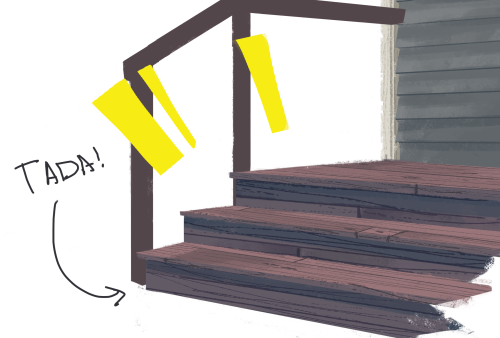
a super quick tutorial on how I make wooden board textures. (sorry for the handwriting)
I like making the textures myself, so I can mess with them and embed them easily
here are some examples:


Mini SAI guide - "Blending (color blending)", "Dilution (opacity mix)", and "Persistence" settings.
I’ve had a general idea what these things did but wasn’t completely sure what their specific functions were. I decided to sit down and figure it out, and I have thrown together a short reference guide for anyone who is confused about them. I know there are multiple translations of SAI floating around, so if some of these terms don’t sound familiar, just know that I’m talking about the three settings that appear under the texture in the brush tool settings (note that this won’t apply to any tool types except for brushes and watercolor brushes).

I don’t claim to be an expert so if you find I’ve made a mistake, let me know so I can update it, thanks! :3
—-
BLENDING (Color Blending)
This controls how readily the brush will inherit any colors you are painting over with it. For example, a 0% blending setting will pick up no existing colors, treating it as if you were painting on a transparent layer. A 100% blending setting will ONLY pick up existing colors (provided there are any). So at 100%, the color you’re using won’t even show up, unless you move to a transparent area. Blending is not affected by transparent pixels, so if you’re drawing on a blank layer it will have no effect.

So you can see from this example that the color I’m using gets harder to paint as the blending increases and more of the existing green is absorbed, until at 100% it is just completely turning green.
—-
DILUTION (Opacity Mix)
This controls how readily the brush will draw on a blank (transparent) part of the layer. A 0% Dilution will result in the brush painting very easily onto a blank surface, while a brush with 100% dilution will literally not paint on blank parts of the layer at all. Dilution is ONLY affected by transparent pixels. So it won’t do anything if the whole layer is already filled in (even with white). Dilution can be thought of as the inverse of the Blending setting in some ways.

So in this example, you can see that as dilution approaches 100%, the color I’m painting with basically becomes invisible. In fact, if you were to switch to binary color mode and look at this layer, there would literally be nothing there anymore!
Keep this in mind - if you ever can’t paint for some reason, check your dilution setting, it might have gotten accidentally bumped to 100!
—-
PERSISTENCE
This one goes hand-in-hand with blending. Basically, it controls how easily a brush shifts color as you are blending from one color to another. Rather, how long it “persists” if you will. Like blending, Persistence is only really relevant when painting over existing color so it’s mostly unaffected by transparent pixels. Basically, the higher the persistence, the longer it will take for the color to shift as you make a stroke, and subsequently, from which color to which other color it is shifting is dependent on the blending setting.
So for this example I’ve done the same test with three different levels of blending. I turned off all pressure sensitivity (actually I just used my mouse) to emphasize the effects in a controlled environment:

If blending is at 0%, persistence fails to have any real effect. With pressure on, there is only the difference of having to push harder, but the results will be the same as far as I can tell.

At a happy medium of 50%, persistence increase causes the orange that the brush is picking up to last longer as it goes into the green, until it never shifts to blue at all.

At 100% blending, there was never any blue in the first place, because as we already know, full blending causes you to only pick up existing color. So the persistence setting changes only how fast the orange changes to green.
Persistence is dependent upon the blending settings, so having them somewhere in the middle will probably produce the most optimal results.
—-
CONCLUSION
Ultimately how you use these is up to you, and is largely dependent on what kind of brush you’re making and what it will be used for. And most of these settings are meant to be used together in unison, so play around with them a lot!
If you are confused, or not sure what settings you want or what settings you should be using, a safe bet is to put them all at about 50% - that will produce fairly average results that are easy to work with, and it’s easy to remember in case you want to experiment but don’t want to forget your settings in case you decide to switch back.
Hope that helps!