✨Custom Earth Toa !✨

✨Custom earth Toa !✨
It’s spiky ! And we’re now at 5/6 !
More below !
Front/back :


He’s spiky ! Some might have already noticed I took for base the old Von Nebula set, because I acquired it recently and it worked well, plus the joints are interesting. Pretty much everything else was change, though I kept the mask, sphere, and spiky plates. These were nice, and even if stone colours are usually black and purple, but blue works well too.
I relocated the sphere directly in the thorax so that it looks like some kind of core. The back is mostly composed of two large car pieces.
The hands are using black pieces to make them larger, which works well with the blue blades (which supposedly come from either Chima or Hero Factory, I can’t remember).
Leg :
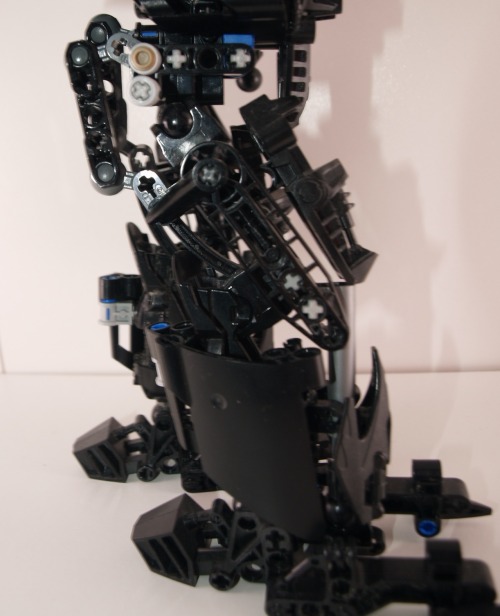
Another type of Bohrok piece to act as feet ? Yes. These are the head pieces, and they work well with a classic foot as a back piece. The piston in the leg was there originally, but I covered it with these large technic panels and some other technic pieces.
There is also an interesting mechanism to stop the legs from doing too odd moves on top, which can have some interesting applications. Here, I’m wondering about removing them to gain a larger range of movements though.
Head :

Kept the original mask and teeth, but with a cable and a spider’s claw to elongate it.
This picture also allows for a clear view of how much dust has accumulated. Don’t judge me, these are on a top shelf which isn’t the easiest to clean…
Also, my project is now finished (officially) ! I went to a small exhibition with it this weekend actually, and…a recruiter from a much larger exhibition found it good enough to offer me a place next month (I’ll post it here once the bionicle series is done) ! I also brought some of my pride flags, which seemed to be doing their effect, so I’ll bring more next time. So overall, yay !
More Posts from Antrylis and Others
Ah, I knew a special occasion would present itself that would be worthy of this cat !
Get booped
Get booped back ! Ah !
Oh, and have an actual (Lego) cat while I’m at it !


✨Progress pride flag !✨
Yay ! Finally some colours ! This was definitely trickier to do, compared to all the other ones, because of the triangles, but I like how it looks !
See previous here.
I rarely, if ever, reblog things, but that’s just beautiful; Lego at its finest.
BESTIES BESTIES BESTIES

FOUND THIS SUCKER IN A LEGO STORE IN NYC
and the employees had pronoun pins as well!

✨Neon and its pilot !✨
Combat mech again ! Wew ! (See other works here)
Closeups and lore under the cut !
Mech :


Pilot :

Lore ! (Check the previous posts of this series if you want to find out more)
So, if Artefact was a first-gen, this mech, called Neon (for obvious reasons), is from the last gen of mass-product combat mechs. It isn’t really meant to get to high level competition, simply for amateurs wanting to give the sport a try. Yet, this pilot made it further than most. Just like their mech, they are one of the youngest in this tournament, but both mech and pilots already have claimed multiple battles.
Indeed, if one pays close attention, it’s easy to notice that some of the claws were replaced, and scratches can be founded in multiple places. The base mech has also been modified a bit, mostly with the addition of electric arc creators (at the top of the mech).
What’s more surprising is how powerful this 'beginner' mech is. Because it’s meant for amateurs, it is extremely sturdy, to make things interesting (because breaking down after only one hit would make a lot of people abandon immediately, which isn’t the point).
Last but not least, the large and broken metal beam carried Neon is a piece which belonged to the first mech which was defeated in a qualification match. The mech was so wrecked only beams were lefts.
Building notes ? Building notes.
The feet were a pain to make, and may fall apart at any moment. But it is necessary to get this shape without being very bulky. All of the joints on that one are small ball and sockets joints, appart from the waist one, which is a turntable. Pragmatically, the three 'replaced' claws are actually just me missing blue pieces. Moreover, the broken beam I had no idea how to use. I acquired it twisted, and it would hardly be used anywhere, and this mech didn’t really have any aggressive stance, so this did the trick.
The sticker plate in the middle is of Nexo Knight origine, and so are probably all the 'shield' pentagonal pieces (which are really good, I might be in love with these). It was also originally all solid blue and grey, but as I added the figure, I realised it needed a bit more energy, so I added the amber and neon pink pieces to give some sparkly accents, which somehow worked in the end
Finally, the (blurry) pilot : most of the pieces come from my random character mix, except the torso (minus the arms) which come from a funky Ninjago character sold in a polybag, and the helmet, which comes from Power Miners (hopefully I’ll have enough time to make a diorama for that theme one day~)
Also, I’m not sure what happened with these pictures, they’re more blurry than usual, yet they all were taken in a batch with previous pictures. I’m hoping the next one isn’t gonna be as blurry, or I’ll have to look into things further. I only have one more builds of these, but another idea is there, so maybe it won’t end with the next one. Who knows, really ?

✨Cargo starship ! ✨
A 'little' part of a larger idea I’m developing~
Right under the cut, closeups and some explanations !
Tiny container carrier :


It’s small, it’s adorable, and I still haven’t figured to how the container will be properly held, so the entire system underneath is improvised and will be subject to changes, hopefully.
Cargo closeups :


Lot more to say about this ! Firstly, that the support I gave it is very unstable, but that should be fixed later.
I was playing around with the idea of a small ship with six rows of container in an hexagon, and ended using a combination of 3-branched crossed around a technic axe to do that. Then, one thing following an other, I needed up with two sections connected by one of these large rings like you see in some movies for gravitational purposes. The entirety of this piece, at the exception of the very beginning of it, it held by a single long technic axe. Obviously, large transparent-blue rods to make reactor trails and truncated cones as the reactor bases. The ring is held by rods, too, with an upside down tread — getting them to have a proper circular shape was a complicated journey.
The colourful containers were another fun thing to do : firstly, getting all the right pieces and make the pattern not too regular. And to pretend they’re all connected by nothing, they’re only partially connected, and 'held' by an electromagnetic field figured by the transparent blue pieces on each side of the container rows, which would then be picked by the small container carrier above.
And now, the most important thing : the reason of why I absolutely needed to make this cargo, instead of anything else. It’s quite simple, actually. I needed to get the scale of these containers. Because. Because I had this idea to make a large, large trading spare station with a ring around a large axis, which would be the perfect excuse to make an awful lot of small spaceships. And for that, I needed something for scale, and since it’s a trading station, a container was my best bet. So I have a plan, which I’ll elaborate on probably next week, along a batch of my small ships.


✨The Kraken !✨
I’ve been messing around with water technics recently, and this was born. It certainly could be improved, but I like it like that.
There’s not much to mention about the build itself; except maybe the tentacles, which are only made out of the 1x1 round bricks, and nothing inside : they bend quite well and remain relatively sturdy when doing so.
As for the water technic I mentioned, the goal is to cover everything with tiles of one of two colours; and make a gradient underneath (see below). I also added some dark red into the mix to try and replicate the body of the thing underwater, with mitigated results.


✨Christmas tree !✨
…Yes, it’s a very tall picture…So tall, in fact, that you can actually see the top of my shelf studio. I made this last year, and I think it’s about the time to showcase it, along with this year’s project, which I’ll post next week !
Fun fact : the top of the tree isn’t connected at all to the rest, it’s only held in place without any stud. I also couldn’t find a neat star for the top of the tree, so I opted for another shiny pointy thing instead-
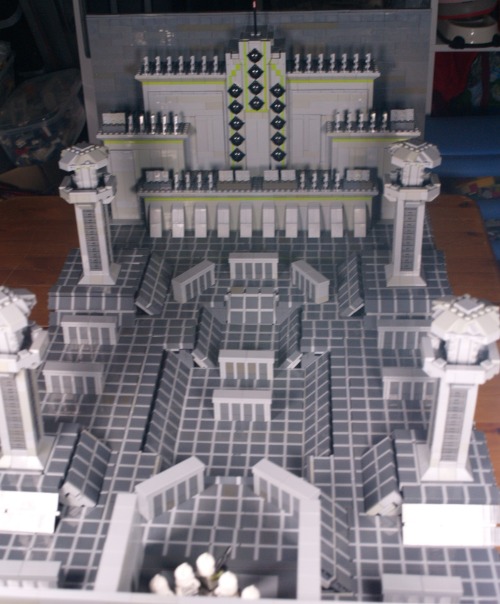
✨Kamino’s citadel challenge !✨
I am…very excited about this one. I’ve had this vision for a long time, and I’m so happy it’s ended up looking like that.
Now, there are a lot of things I’ll go into details along close ups under the cut; the only thing I’ll mention above is that I’m very grateful for TCW’s episode guides’ artworks, without which this would have been quite a hassle.

Okay ! Before diving into all the details and things, here is a view from above, to really display how big it is. Dimension-wise, the plank I built it on is around 110*70cm.

Now of course, the first detail which is noticeable is the floor, because, well, it’s everywhere.

This was probably the most challenging part of the build, because making a grid out of Lego is tough. Most of it is rows and rows of dark square, light lines, separated by 1*n tiles. It was the easiest way to get this pattern with as if it were just tiles; because this is one of the objectives I had here : most of this MOC is smooth, except for a few zones (usually voluntarily).
The fact I used this technic means that the floor in most place isn’t very stable, but it actually holds up pretty well because of some hidden connection points with the foundations underneath, which are mostly hidden under the cover blocks.

Here for instance, I’m using modified 1*2 bricks with a Technic hole : it hold the cover block, and it also attaches the floor to the foundation.
Of course, another problem I ran into were slopes. Much harder to get a smooth effect with the technic I’ve used, so it’s a bit wonky and unstable. Also, most them are not aligned properly, which is visible in the picture above (and some area have some really big misalignments because of a few problems I probably won’t bore anyone reading this with).
Now, since they’re also here, I can deal with the cover blocks. These were, among the details, the hardest to figure out, to get a good size while keeping some texture. Eventually I came up with this design, which, ironically enough, uses the same technic the floor uses, in a different orientation.
Another detail : the miradors :

This is one of the first elements I had in place, because I needed them to get a good sense of scale (and was made better by an existing concept art of a tower alone). Most of it does not have anything noteworthy, except for one illegal technic I used (can you spot it ?)
The pillar holding the roof of the mirador is using a technic I had in my toolbox for a long time, but had never had the occasion to use : if you take two 'brick' bricks and attach them perpendicularly on a snot brick, the small space separating the lines of 'bricks' align to let a 1*n tile in. It’s somewhat reliable (for an illegal technic) and an easy way to get octogonal shapes.
Now, before looking at the Citadel itself, let’s turn around for a minute.

This point of view obviously isn’t the intended one, but it’s still worth noting, if only for some composition.
Notice that the wall here is quite small (smaller than the miradors, even), and light gray; it’s in contrast with the towering dark gray wall on the other side, behind the citadel, which technically should give at least some impressions even to the people who never saw TCW.
Anyway, it’s also on this view that we can see most of my slope struggles, including the central one, which is the biggest I had to do.
And I can’t not mention the most important element :

What would be the challenge without a squad of clones to take it on ? These clones (4 privates and a sergent) are ready to fight ! Well. Kinda. I wish I could have actual cadets, but they are not part of the Lego universe (and the floor was enough of a fee, I can’t afford to get customs figures too). I wish I had the Dominos though. I have TBB Echo, and I plan to get my hands on Fives at some point, but they wouldn’t fit here, sadly, so instead I used some movie accurate clones (because all the others are used for a project I still haven’t posted..maybe later…)
Notably, I at some point tried to get the elevator to work - needless to say it was a disaster (it’s too close to the plate underneath to make something working).
Now, without further ado. The citadel.

I’m very proud of it. I got the proportions just right (I actually made some measurements to make sure of it), and there is just enough texture to not make it bland while leaving it as artificial. This alone took roughly 8-10h (which were all spent during an accidental all nighter, whoops), but it was worth it. It’s completely empty inside, and, in fact, the wall behind it isn’t full as well, anything behind the citadel is opened. The spikes are simple 1*3 angle plates illegally connected, and the walls’ small details were made with a bunch of modified 1*2 plates, there isn’t anything really special in it.
The only really complicated zone was the middle tower, because I had to put all the cannons while keeping it clean and smooth, and including the vertical lime lines. It was a fun challenge. And I included the 'flag' At the top, too, just a red transparent cone on a stick (there’s no need for more), which peeks above the gray wall (for composition and because of a lack of pieces).
Anyway, such a long project deserves one behind the scene photo :

Yes, my desk is messy (and include my mandatory tea cup).
On the left, you can see my remaining floor tiles, which have not been used yet; and just under the citadel, you might notice the foundations visible; it’s a checker of 2*2 tiles which gives my floor a good base to be fixed on. There are also some slopes which haven’t been placed yet (in front of the background miradors), and at this steps, there were no cover blocks or walls yet.
As far as my tools go, you might notice brick separators scattered all around my work environment (I never have enough of those), as well as a tablet in the bottom right hand corner (which i use to check and measure concept arts), and in the middle, the red triangle is an official (albeit old) Lego measurement tool which counts in stud, Lego bar holes and axe length.
Also visible, finally, is the bottom of the foundations, which are stacks of 1*2 bricks (each of the three floor layer is separated by a height of 3 bricks), which means that looking directly under it can lead to watching the dark basement of my build (which isn’t aesthetic…).
Anyway, if you read until here, thanks, I guess ? I still have a few TCW related stuff (a small one next week, some other in the foreseeable feature), so feel free to stick around and maybe leave a note, if you feel like it ? That’s it, bye !

✨Clone wars Scuba trooper !✨
A like to make custom clones only using official pieces, here is a scuba (because lego did not give us a Monnk...)
It's not really complicated, although trying to get a DC-12U was far from easy. It's still a bit bulky but I like how it turned out (and one day, I'll try to have multiple of these to get a small underwater diorama, that would be lovely).


-
 anasianfriend liked this · 1 year ago
 -
 tempelbeast liked this · 1 year ago
 -
 toaofconfusion reblogged this · 1 year ago
 -
toaofconfusion liked this · 1 year ago
-
 antrylis reblogged this · 1 year ago

They/them - AroaceLego MOCs and photography with a wide range of different characters and environments, every Wednesday (in theory-)
77 posts