Your personal Tumblr library awaits
Lego Space - Blog Posts

✨Space ships (and hangars, too !) !✨
(Or, last post for the space station)
<Previous< [4/4]
Under the cut are closeups of (practically) all ships and hangar from the station !
Before anything, the third post is somehow completely gone, even if I do have proofs that I did do it. Well, it was already posted late, and I don’t have the courage to do it again — and it’s not like people would care much anyway, so how this station is holding up will remain a mystery~
Anyway, closeups.
Hangars (groupes by similarities)


This first batch here contains the 'empty' hangars. Left is meant to be a closing/opening hangar, which I usually keep in the back because it's not the most interesting one; while the right one is the bare hangar. There are two of these across the ring, in which I sometimes pluck a ship, though it's hard to keep them in place because of the station's inclination.


Next is a batch of random boxes and other scifi-y grates and boxes. To keep the boxes in place, I use modified 1*1 bricks (because the floor is is made of horizontal pieces, aligned with the outer tiles). Minor variation are present in the middle hangar, where a third of the floor is composed of 1*2 modified bricks to add a tiny bit of texturing. While these might a tad repetitive displayed like above, they actually are separated by three other different hangars, so the repetition is barely visible.


A bit similar to the previous ones, these have (in my opinion) more interesting details. Left is two racks of large barrels, supposedly fuel. Middle had another barrel (made with flowers pieces) and a yellow cable, which was surprisingly hard to add because it pushed the back plate (which holds a lot of the hangar together). The last one is a stack of long crates, and an observation deck (I'm guessing the original sticker comes from a small star destroyer).


Last batch, and probably the best of all, the containers (scaling from not too crowded to very crowded). These are the same size as the big ship's. There are very few attachment points to the ground, as most of them are held by other containers above or bellow, although the middle hangar had two modified 1*4 bricks in the floor. The original plan was to get them all aligned, but it looked terrible, so I went for this more haphazard placement, which works better.
Ships


These first two are the smallest of my little fleet. The top one is two 2*1 plates held by black 1*1 mod plates. It's small, it's smooth, and it works quite well with the station. I'm probably gonna make other of these in different colours someday.
The next is one of the first I made, using some shiny pieces. The two chromatic studs on the reactors are differently shades of chroma silver on purpose because this is meant to be a much older ship (compared to other most of the other, smoother ships).


This is a much larger one. More of a military design, I mostly played with angles on that one (and added big reactors for fun purposes). The transparent light blue used here is the same as the fuel barrels of the station, and are the most used on the ships I have. Lore would say it's because it's the most common fuel used in the universe; pragmatism would say it's because it's the most common transparent colour in my boxes.


More blue reactors ! The top one is my one of my favorite. Only 7 pieces, including an old aquaraiders piece which I had to use as a ship the moment I found it. It's simply ship-shapes ! Given the colours, you could imagine it's an old model (not as old as the small one). The bottom one is a very thin one, with a Y piece which can allow for many cool shapes (like this one) !


Weird alien ships ! The first one is curvy~~ It's a nice concept which is quite common, but I really like the idea, and thus made one. Notice the green reactor this time, because alien fuel. Next one is more organic (or at least trying to), using mostly car pieces (and an orange reactor, wew !). It's also quite compact, with a single mod 1*1 brick as the core. The final one is by far my favorite (and not only because it has a purple trail). While hard to because of my lighting, the three main parts of the ship are separated by clear studs. I originally made it without the in-between studs, but then it fell the the floor, broke, and separated, and it looked much more futuristic. Consider this a very advanced ship of a peaceful species, or something like that.

✨Trade space station !✨
<Previous< [2/4] >Next>
Today’s gonna be about the progress of the build in time, which allows me to ramble about the building process. Yay !

Before actually commenting the build. You may notice chocolate and my (empty) tea mug. They should be apparent in most of the earliest pictures (there was not enough space on the table for them at the end of the project, sadly~
So, here, you can see that my first step was to see the scale of my project. The template of the large ring to see how much space it would take, and the small ring to see how round I could make it (and at the bottom, you can see the white curved pieces. Enjoy this view, it won’t last.)
You can also notice above that I already stared making some small ships.

The next day ! You can see on the left my long rod. This was the ideal height for the central cylinder. I also created the first core of the build (replaced later because too fragile), and the first arms to hold the ring (too fragile too).

Progress ! This is the moment I realised my original color scheme would not work (you can see orange and bright green on the side, which I tried before the sand green).
I had half of the big cylinder added (you can see the slots left for the additional details) and another naked half on the right side. And my collection of boxes on the table is growing. It’s only getting worse after that.

See ? More boxes (and pieces) scattered all around. And a hammer, too. I at this point mostly finished the big cylinder (or so I thought, some reinforcements were necessary), started the smaller cylinder, and realised white pieces were running out. I also still haven’t touch the ring yet, as I wanted to stay focused on one bit.

Mostly done with the cylinders at the point (you can even see the start of the smallest one on the right side). Agin the boxes grow ominously.
Since it was time to start the ring, I created a replica of a sixth of it. Given that there were twelve sections, I wanted to be sure of the design before starting to build them all, starting with the facade. It took some fiddling around (you can see these aren’t symmetrical, as I was trying out different designs). Really, if you have this kind of things to do, try to make it in a vacuum first, you’ll gain a lot of time later, once the prototype has every problem answered (mine were mostly the curve, and the link between each plates (solved with mod 1*2 black plates).

See ? After the prototype was done, I simply built all of the facades and attached them (you can see my 1*4 curved pieces were all missing at the time though).
I kept the prototype on the side, because I’ll still need it later. I also am missing half of the ring (the part above, since there is only a structure below), because I was not sure of how everything would fit, and I waited until these parts were assembled before making it, in case adjustments were needed.

Here is the top part ! And all the hangars done, too. It took me a surprising amount of time to do all twelve of them…

Huge progress ! There is no more room on the table for the boxes, but you can see them…on the floor, on the left…Lot was done, from the bottom cylinder now finished along with its ring, the covering pieces of the big ring (except the internal faces), the hat of the station, and a huge reinforcement for the six arms, which was done separately). At this point, except for a few details, the station itself is finished.

And there is a picture taken moments before disaster. The station is done (ignoring the transitions between cylinders) the arm…supposedly, too.
Sadly, the arm wasn’t, in fact, finished. If you read the first post, you will notice it isn’t as bulky, and isn’t attached on baseplates yet.
Well, guess what ? When I finally tried to see if the arm would hold onto the station, it broke. Rather, two pieces broke, then the rest came down, and so did the station, which shattered on the floor below. Luckily for me, the main cylinder was so dense it practically completely survived. Most of the hangars of the rings only broke section per section, so it only took a few hours to get it back together, but much more time to make the arm solid. And now, it can hold the station for ten hours without flinching ! So, here is a lesson. If something you do fails when you do it with your heart, let the rage flow through you and build it back out of spite. It works* !
*don’t hold me accountable for any failure using that method
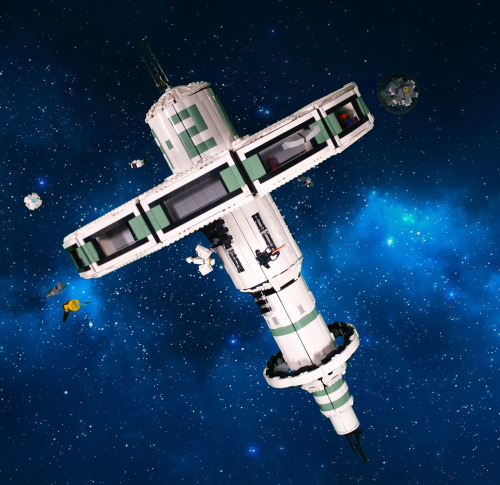
✨Trade Space Station !✨
[1/4] >Next>
Finally...More than 60 hours of work, I can present my masterpiece. I have been working and planning this project for a long time. Given the sheer amount of things to talk about, I will split all of my rambling in (at least) four posts : one about the concepts, ideas, and general aspect (you're here !); one about the technical side of things; one depicting how the project evolved (using pictures taken during the construction); and one dealing with all the smaller details, ships, and such.
Enough with planning, though. Explanations, other images and more explanations below the cut !
(less) edited picture of the build :

So. You might see, now that I got rid of all that pesky editing (or most of it) that there is a big arm holding the thing in place. It's easily a fifth of all the work of this build, because I absolutely wanted to hold this thing at an angle, and it's heavy, at around 15 kilograms (33 pounds). I'll talk about the technical difficulties of that in a later post, but it was important for it to be solid, because the station was the central piece of my second ever (very small) lego exhibition. AND it allowed me to meet the recruiter of a much larger exhibit. Long story short, in a month, I'm presenting this piece again (just before my exams, whoops-).
Anyway. Not only is it heavy, but it's also quite tall and wide. Around a meter at the highest point (tilted or not), while the diameter of the main ring is at around 0.75m. Quite a difficult thing to move around. Or is it ? Well, yes and no.

Here are all the main components (excluding the holding arm), when I move the piece around. Of course, all the ships are detachable (it allows me to move them around from one day to the other), but the dome carrying the antenna can also be removed, and then, the entire ring can be disconnected (that, too, was quite a challenge).
Removing the ring obviously makes it waaay easier to transport, because a single wooden plank can then be used (again, except for the arm, but that thing was made to be sturdy, so it can be transported with less care); and , once the dome is removed, I can just let the central cylinder stand upside-down (useful for storage). The only trouble I found with this system is that I once connected the ring the wrong way around, meaning everything in the small hangars was upside down. Quite an embarrassing moment.
Speaking of the hangars, I initially wanted to keep them all empty, to store ships inside, but it didn't really offer this piece the sparkle of life. Setting up these small decors inside most of them, with colors contrasting with the general theme of the build, was actually a really good addition.
The colour scheme as it is now is not exactly the one I had planned at the start of the project. I originally planned on using bright light orange (bricklink colour name) instead of sand green, but I found out that this colour was tough to find in large quantities, and I already had quite a bunch of the sand green, so this tragic decision was made. I think it would have offered a more vibrant colour to the build (resembling a Subnautica default palette, which I enjoy quite a lot), but in hindsight, the green works really well, appart from a small detail I'll expand on in a minute.
What's really funny for this project is that, when it started, I actually only wanted a nice way of showcasing all the little space ships that I tend to make whenever I have access to a small amount of cool pieces. Then came a long time where I only daydreamed about it and planned how I would want it to go, and only when I had a clear vision did I start the actual building process. So, taking all that into account, you can probably double the amount of time I spiritually spent on this project.
What I knew is that I wanted to get this huge ring held by beams to the station's body, which made the build both more interesting and more complicated that it would have been. But the challenge was appealing.
At first, the main body was completely flat and white, but I soon had to add texture, both because it was becoming ugly and because the 2*2 white curved slopes were starting to diminish fast. The first modifications I did were to add the sand green curved slopes instead to create stipes, then letters : the big A-2 you can easily spot. With the few bits of lore that I have created for this piece, you have to imagine that there are hundreds of these stations spread in the galaxy, which can be easily described through 3 criteria : the Letter, the Number, and the Colour. That would mean that, if you wanted to meet with someone at the exemplar I made, you would say something along the lines of 'Meet you at Sand Green A2'.
Texture-wise, the other element of the largest cylinder is the exposed bits of machinery, very classic in sci-fi, I know, but it does work well in this context. The second cylinder has much less textures, with only a few grates, and some 2*1 ingot pieces (because they look cool); but it also has its own, smaller ring (diameter slightly larger than the largest cylinder's).
Then come the smaller cylinders, which don't have much texture, except in their transition from one to another (barely visible in any of the pictures, but it exist).
Overall, I'm also really happy of how round it looks, given that circles are not my speciality.

Here is a completely unedited picture of the support arm (Lewa for scale), with a nice counterweight which might be necessary to hold the entire thing in place (it may not be, but I'm not trying to remove it. Bad idea.).
As you might notice, my studio is not a shelf anymore. I built something new from scratch with a green screen, because I thought it would make my editing job easier. And it would have, if I didn't use sand green in my build. Anyway, I'm keeping this for a few days, to snap some pictures of the MOCs which don't fit in my shelve (and are not green, meaning editing will be easier.
Here is the 'studio' from an outside point of view :

I know it's quite a mess outside of my clean perimeter, but I do as I can. You can see one light in the foreground, but there is also one (less visible in the background), symmetrical to the first one, and a third one behind and above the camera (outside of the picture).
You may also notice a lot of sorting boxes. Sorting pieces can greatly improve your productivity, if you label all your box correctly. Covered by the greenscreen is essentially a shelf full of these sorting boxes, labelled by colour and piece type, and it was really practical. Anyway. Thank you for reading until this point, I guess ? If you survived through all this rambling, you probably deserve something...
I mean- Have these pictures I took during the exhibition, I guess...


(You can notice that these are two different days because of the ships’ placement).
✨Small spaceships !✨
Assault ship (A-1)


Simple but not too bad in detail for a thing that small. Some light-grey highlights have been under to avoid a completely not textured look. The transparent piece also seems better with peg, when compared to a tile. Not sure of why, but l'm not gonna complain, as long as it works. While it's hard to tell with this scale, this is not just a small thing for 1-2 pilots, it's actually quite large (consider a 2×1 as a container (with the large ship above as a scale) so it's quite large. Not LARGE large, but still enough space to fit a lot of stuff; and since the engines are outside of the main hull, no space wasted !
Personal ship (P-1)


Pretty classic shape, with some obvious Star Wars inspiration. I tried adding a little bit of color (hence the single blue piece but I'd need to get some specialised pieces to add some proper colors. So I took the liberty to add some silver pieces, instead, which looks alright. I'm not entirely sure about the scale of that one, to be honest. It looks like a 1 pilot ship, but it would be a little too big if I consider it in the scale I've set - which I do.
So, l've added numbers to identify them, which should be a good idea in the long run, because there's gonna be so many of these ! And I'm bad at names, too. So this seems like a good idea. Suggestions are obviously welcome if you happen to have any. Please help me-
On a more fun not, I’ve received all the transparent bars I’ll need to make sure these ships are flying all around, and if it’s one bar per ship, I’ll need a whole lot more ships.

✨Cargo starship ! ✨
A 'little' part of a larger idea I’m developing~
Right under the cut, closeups and some explanations !
Tiny container carrier :


It’s small, it’s adorable, and I still haven’t figured to how the container will be properly held, so the entire system underneath is improvised and will be subject to changes, hopefully.
Cargo closeups :


Lot more to say about this ! Firstly, that the support I gave it is very unstable, but that should be fixed later.
I was playing around with the idea of a small ship with six rows of container in an hexagon, and ended using a combination of 3-branched crossed around a technic axe to do that. Then, one thing following an other, I needed up with two sections connected by one of these large rings like you see in some movies for gravitational purposes. The entirety of this piece, at the exception of the very beginning of it, it held by a single long technic axe. Obviously, large transparent-blue rods to make reactor trails and truncated cones as the reactor bases. The ring is held by rods, too, with an upside down tread — getting them to have a proper circular shape was a complicated journey.
The colourful containers were another fun thing to do : firstly, getting all the right pieces and make the pattern not too regular. And to pretend they’re all connected by nothing, they’re only partially connected, and 'held' by an electromagnetic field figured by the transparent blue pieces on each side of the container rows, which would then be picked by the small container carrier above.
And now, the most important thing : the reason of why I absolutely needed to make this cargo, instead of anything else. It’s quite simple, actually. I needed to get the scale of these containers. Because. Because I had this idea to make a large, large trading spare station with a ring around a large axis, which would be the perfect excuse to make an awful lot of small spaceships. And for that, I needed something for scale, and since it’s a trading station, a container was my best bet. So I have a plan, which I’ll elaborate on probably next week, along a batch of my small ships.