
269 posts
Latest Posts by arttuti - Page 4


THANK YOU! ANON!
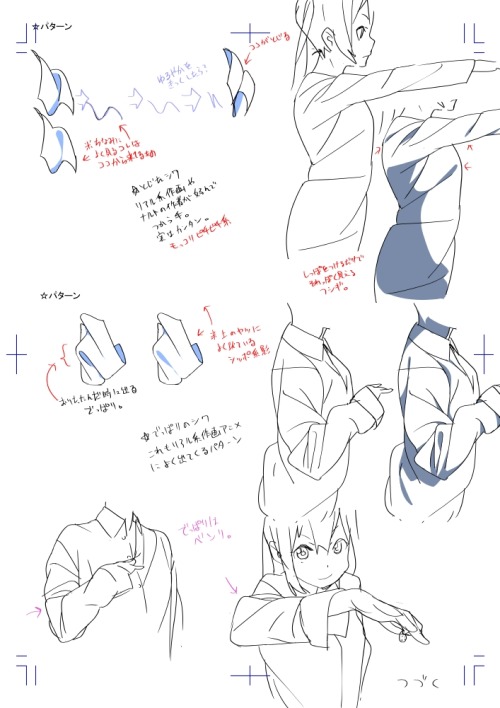
I stopped the coloring of the shirt here cause I guess you get the basic idea. If you wanna see more of the coloring and the brush I use you can look HERE! Also you can see how not just folds but shading can define a form HERE!
I hope this helps! I’m so bad with words and explaining things (/)//(/)

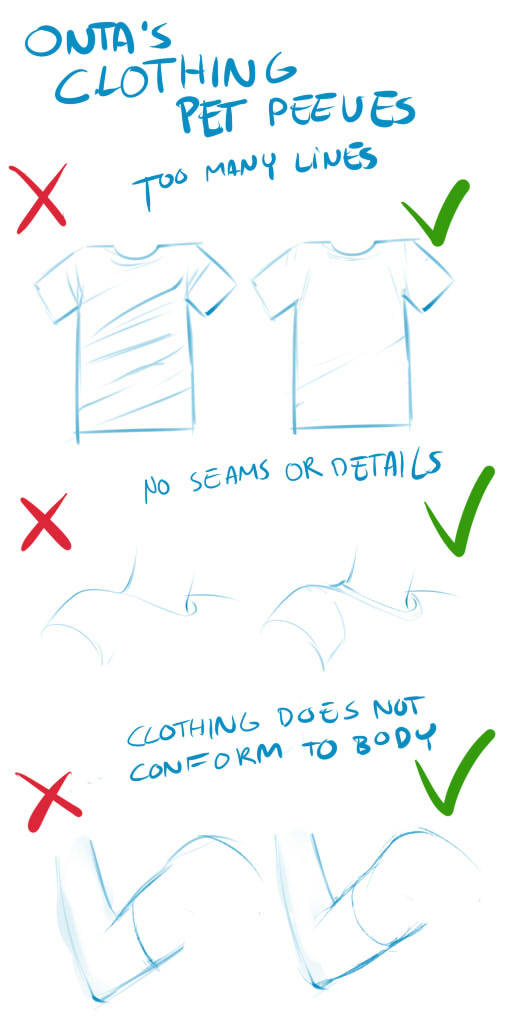
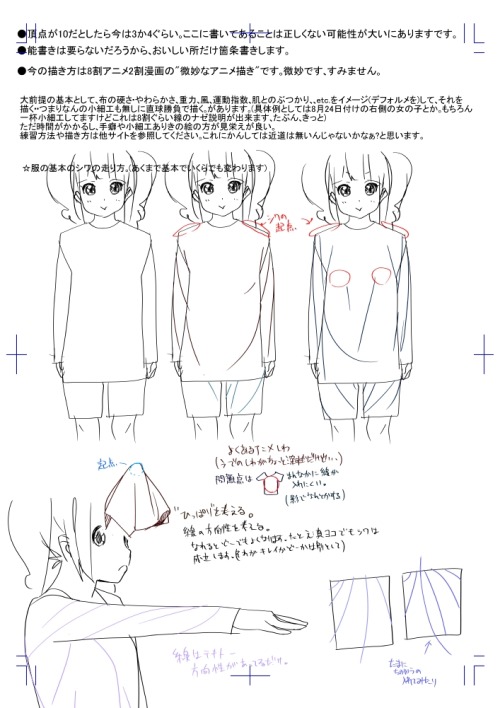
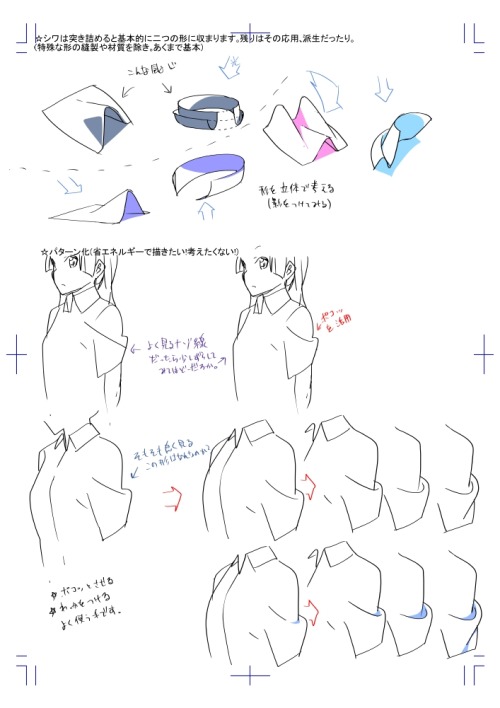
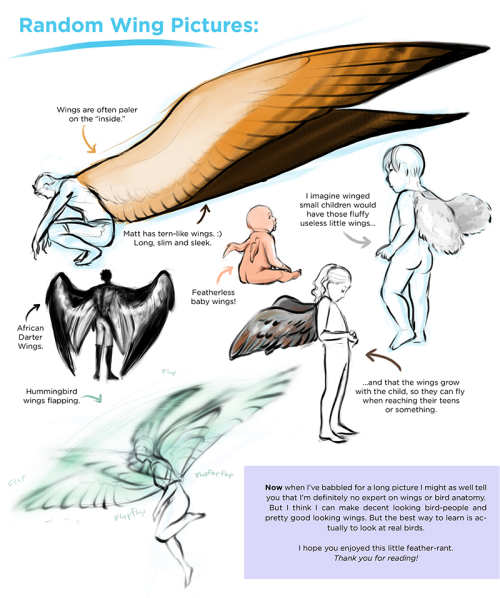
Finally I got around to this. =ヮ=
Since there are so many different possibilities, this one was hard to make.
It’s hard to want to show a little bit of everything, but keep the sheet small as well orz.
Sorry there is only one shaded example lol (shading folds is a different story I think)
Clothing Tutorials,Tips and Guides
In order to make interesting designs of clothing, look around the web about outfit design, keep your mind with fresh ideas so then you can draw nice outfits on your characters.
Remember to keep in mind color theory when designing an outfit too, keep it balanced unless you are aiming for a sparkledog, then go nuts with the colors.

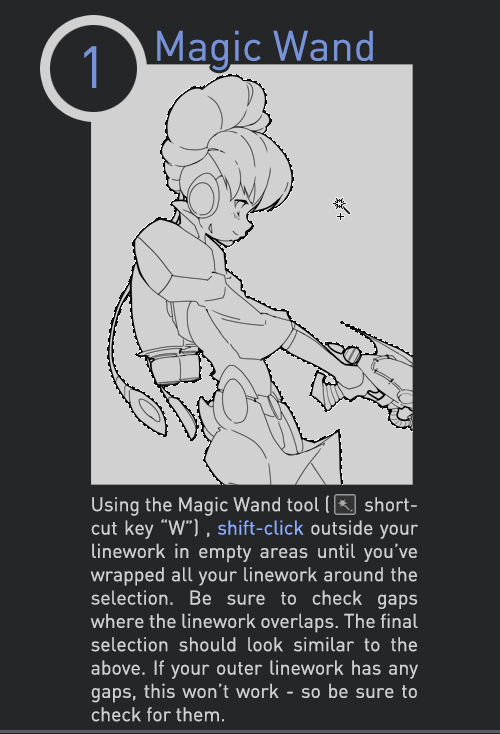
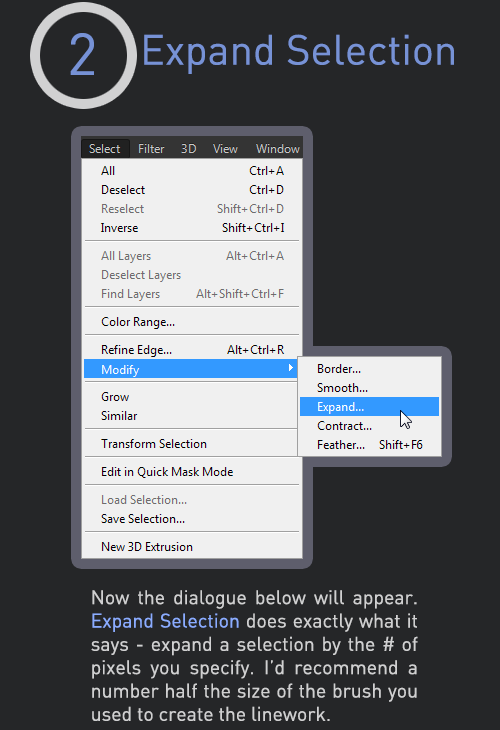
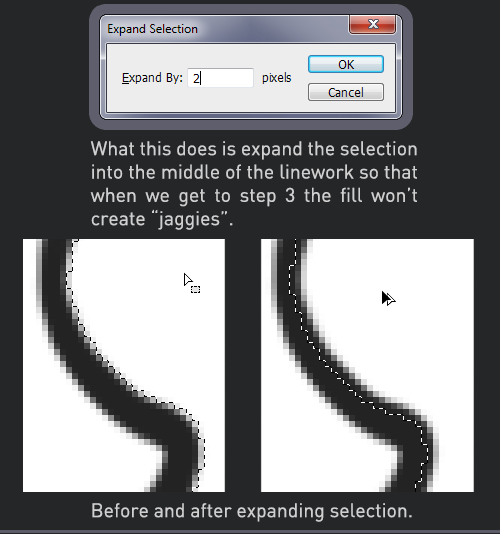

Late last year I wanted to start a series of short tutorials called Tip Jar, as a way of saying thanks to my fans and giving back to my patrons. This is the first of the series I have made, showing my technique on quickly filling in lineart so you can get to painting without coloring outside the lines faster.
Someday I hope to turn these into video tutorials when I have the income and the time, but for now I hope that I will be able to share useful tips in this infographic format.
Full tutorial image
Support me on Patreon
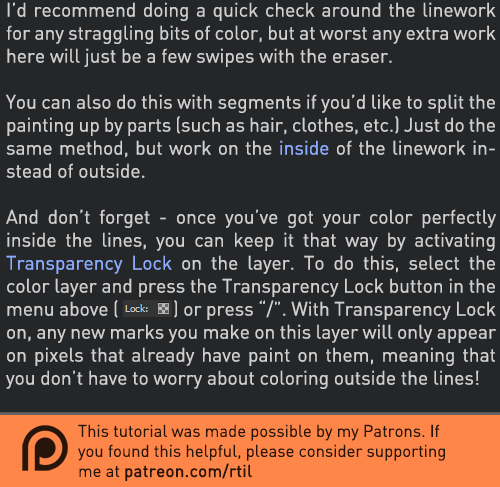
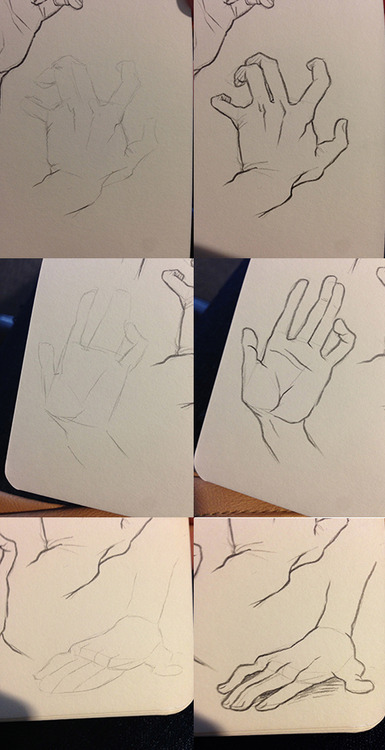
hi! you draw really nice hands, could you give some tips/make a tutorial?
sure!! this is quick and i dont have much of a method so?
i kinda start out with a box shape for the palm and make some tic marks to plan out where the fingers go
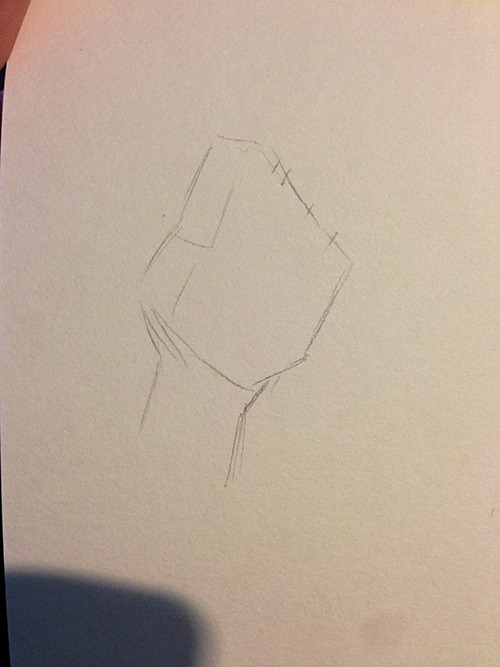
then box out some fingers
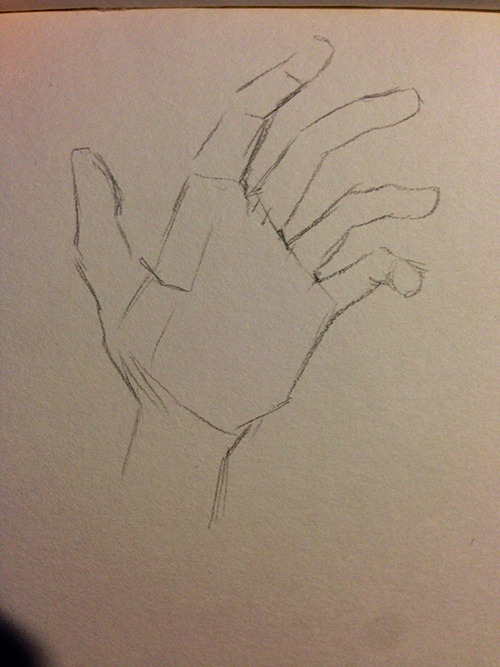
and darken out the details!
here’s some more examples too!! i always like to exaggerate the position of the thumb and pinky to make the pose of the hand more interesting?? give it more character? it’s a hand
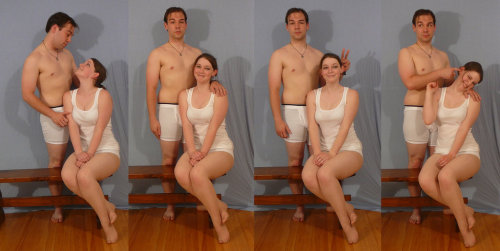
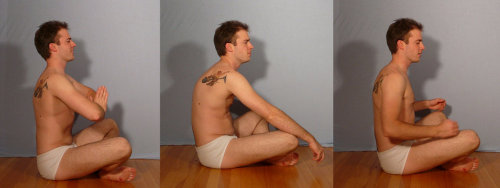
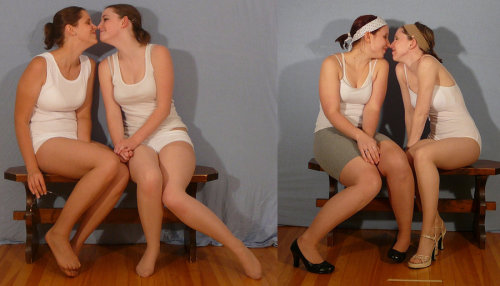
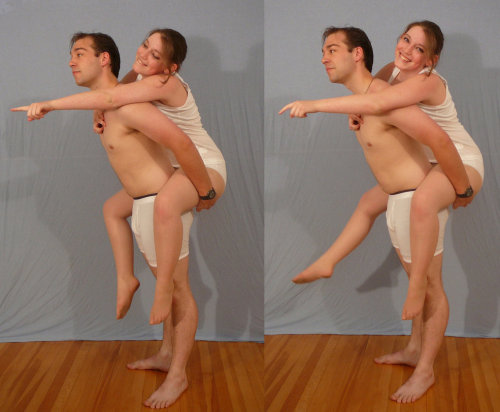
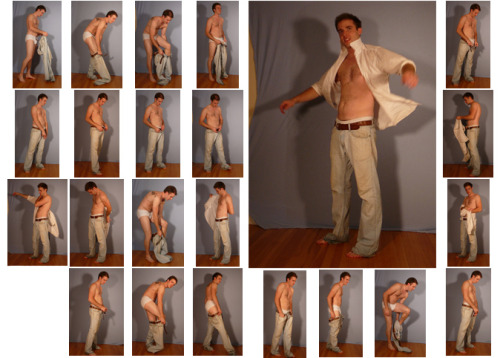
SenshiStock’s gallery consists of millions of pictures that are free to use as reference.
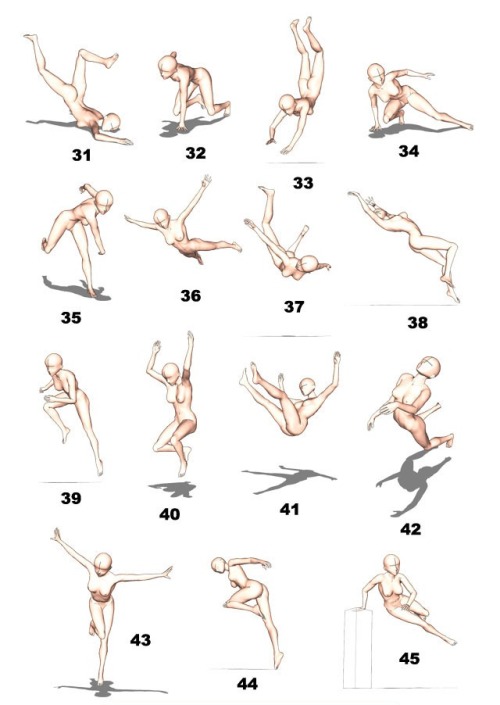
General Drawing Poses Sit and Kneel Dramatic and Reaching Drawing Poses Magic and Hogwarts Drawing Poses Staff Weapon Pose Reference Hammer, Axe and Bat Pose Reference Sword Weapon Drawing Reference Small Bladed Weapon Pose Reference Gun Weapon Pose Reference Bow and Arrow Archery Stock Foreshortening and Perspective Poses Dynamic Flying Falling Action Poses Deafeated or Laying Drawing Poses Magic Crystal Magical Girl Wand Weapon Transformations and Dance Cards Back Pose Reference Pin Up Inspired Poses for Drawing Performances Poses Life in General Poses Fights and Fighting Pose Reference Leaning Poses Classic Sailor Senshi Poses Wings Sailor Moon Villains Pairs Romance or Couples Pose Reference All the Male Stock Hanging Stock Drawing Reference Three or More Groups Instruments Mirrors Whip Technobabble


Hey friends!
Sorry for the late TUTOR TUESDAY, but here it is! Today is on clothing folds and was a recommendation from @kitemist, thanks! If you have any recommendations you’d like to see send ‘em in here or my personal! Hopefully I can expand on clothes more soon! Keep practicing, have fun, and I’ll see you next week!


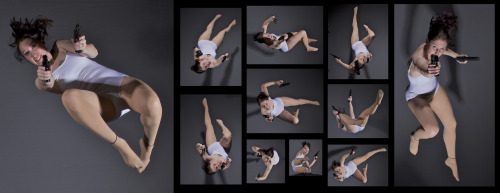
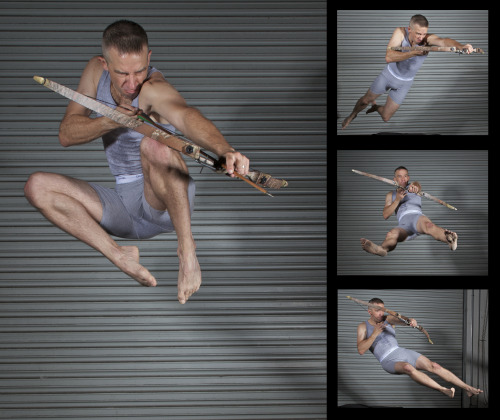
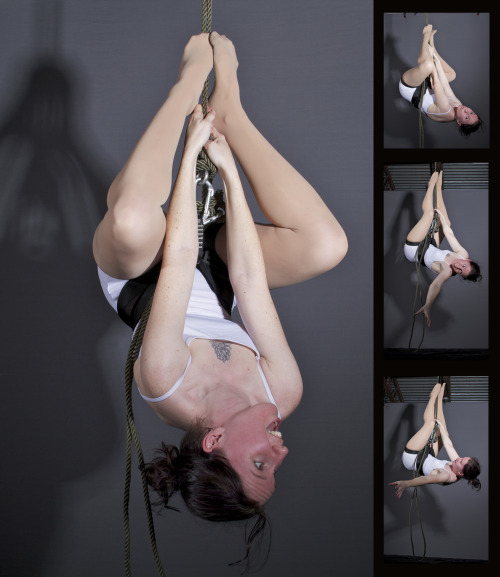
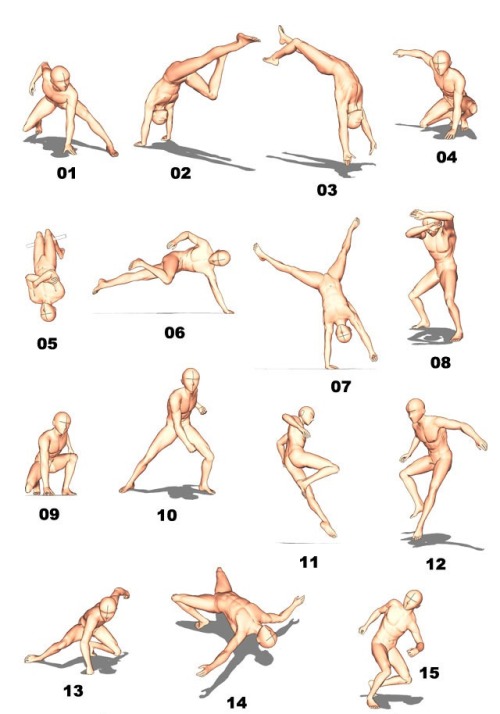
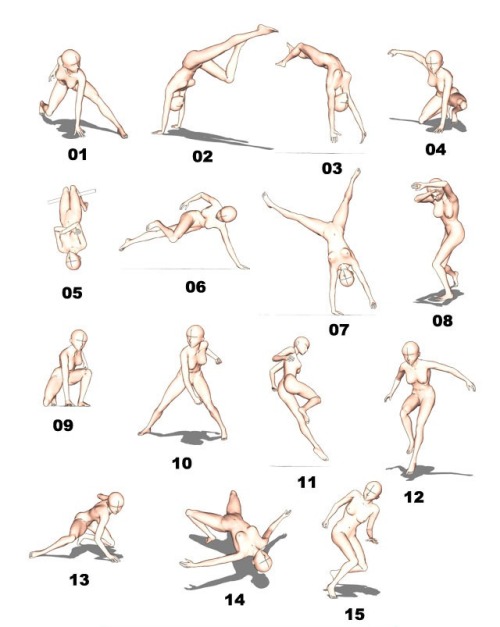
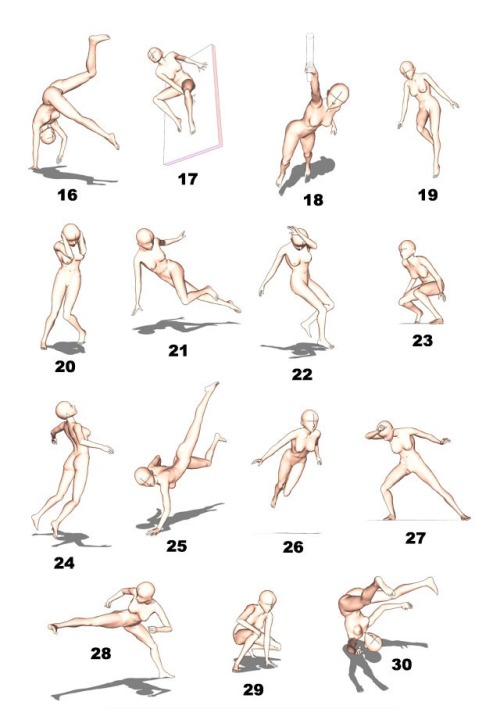
Artist Resource: Bodies in Motion
I came across this site that (if you subscribe) offers high-res frame by frame photos of people jumping, flipping, kicking, dancing, etc, so you can easily analyze each position the body goes through to complete each movement. I think this can be an excellent resource for gesture drawing and reference for all manner of artmaking. It is $49 a year for the basic plan, and that gets you access to the high-res photos and a few other features.
https://www.bodiesinmotion.photo/


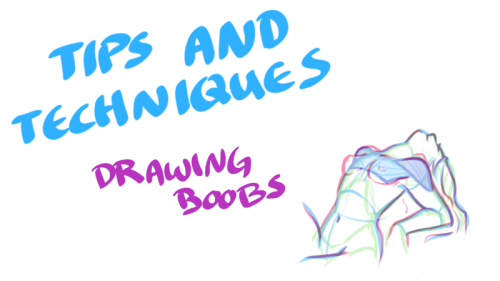
Just when you thought you knew everything about boobs… NSFW?


My darling friend Chizzi mentioned that there are a lot of booby tutorials out there are just predrawn boobs with the artist going HEY LOOK! HERE ARE SOME BOOBS! but not many that actually talk about the anatomical structure, and where to put the lines. I was like, “Hey, I can probably whip something up.“ And so I spent my thanksgiving making this.
Proportions probably aren’t exact, but I did my best. I also didn’t explore the various body types, but perhaps I could do a separate tutorial someday. I hope you find this tutorial useful :)
All photo references used in the tutorial were found on The Drawing Script. Credits to each photo belong to their respective owners.

I made a boob tutorial which was nice because I love drawing boobs. Remember the best way to learn how to draw anything is by using reference, so utilise websites like line of action and sketchdaily ~~
Have fun! xx

A couple people have asked me how I shade hair when I draw it, so I made this short tutorial! This isn’t to say there’s a “right” or “wrong” way to shade hair, this is just showing my process for doing it. If you have any questions, feel free to message me!
quick proportion tips
- eyeballs are an eyeball width apart - ears align with the top of your brows to the bottom of your nose, and are the center-point of a profile view - lip corners line up to the center of each eye - hands are roughly the size of your face - feet are the same size as your forearm - elbows are aligned with your belly-button - your hands reach down mid-length of your thighs - both upper and lower legs (individually) are roughly the same size as your torso (this is all rough estimates for proportion! feel free to add more to help others)


So here is that tutorial thingy i promised.
All of it is pretty basic stuff, no secret ingredients in there, still, i hope the way it’s put together is somehow comprehensible.


Comic Pages Storyboard Tutorial
OKAY SO! @biazerod asked me a little help on storyboarding and i decided to make this tutorial…i’m not a professionist. so don’t take these as golden rules…just advices! and as always sorry for the english FIRST THING FIRST! the storyboard part is the most important phase in a comic page ! you can spend an entire day storyboarding! because it’s the structure, the essence of the page! here’s some tips : 1- a page can start from 1 panel/frame (called splash page!) until how many f*cking panels you can fit ! (some pages , especially in french comics/bd can reach 24 panels/frames!) Exaple of splash pages:


(these are from the green lantern,DC and the newest Thor ,marvel ) Splash pages are a priority of American comics, you rarely can find them in french Bd ! they represent a scene of impact! a fight! a revelation! be careful! use it only one if two times on a range of 50 pages! cuz it cut the narration! instead in french bd you find this :


first one is from Blacksad 2# and second one is from Atar Gull see how high the number of the frames is?? the number of frames is very important in a page because it decide the narration time! :D also it all depends on the kind of ‘’direction’’ you want to use on your comic! so be really careful when you decide the number of the frame! LET’S PASS ON THE CREATION! 1- when you have a page that contains more than 3 Frames ALWAYS. ALWAYS HAVE AN ESTABLISHING SHOT!

the establishing shot is fundamental! BECAUSE READERS CAN UNDERSTAND WHERE THE CHARACTERS ARE! DON’T DO A COMIC PAGE FULL OF FACES !

DON’T DO THIS! LET THE CHARACTER BREATH! LET THE READER BREATH! PLAY WITH YOUR CAMERA! YOU HAVE THE POWER! in a comic page, is important to put the camera far away from the character most of the time! play with the different shots!

(found this on google) WATCH MOVIES AND TV SHOWS. lot of them can help you so much you have no idea! a comic artist and a director do the same job when creating a story 2- Candy eye this is a tricky trick that can help you with the audience! when a character is saying something important or you have to introduce them , USE THE CANDY EYE DUDE.

the candy eye is , basically, a bust shot where you show the character,their features , usually with a cool or a funny expression ( or of course it depends from the situation) and believe me WORKS 10/10 with the audience ;) 3- HIGHLIGHTS THE IMPORTANT SCENE IN THE PAGE!

FINAL TIPS: - when you’re doing dinamic poses try and try again! the first one isn’t always the best! -USE REFERENCES. -A STORYBOARD PAGE CAN REQUIRE EVEN 4 HRS IF NOT AN ENTIRE DAY IF NOT AN ENTIRE WEEK. REMEMBER THAT THE STORYBOARD IS THE ESSENCE. AND THE REST IS DECORATION. - IMAGINE THE SEQUENCE! NOT THE SINGLE PAGES. THINK IN SEQUENCES! imagine what would happen after the page you are creating! connect the various pages NOT THE SINGLES FRAMES ! YOU’RE CREATING A STORY! NOT A SINGLE ILLUSTRATION! -AGAIN DON’T DO PAGE OF FACES. most important thing:

if the page you’re creating it stresses you! STOP. continue it when you are in a better mood ,dude. our job requires lot of time and effort, but it should be the job we love. so don’t stress yourself and keep calm. hope this is useful. don’t take this as golden rules, this is just the way i work :)


Anonymous said: Thanks for your tutorials, they are so simple to understand even for someone quite dumb about arts (me)! If you’ll have time and mood, can you, please, create tutorial for making lineart. I’m fairy bad at that.
Thank you! That’s really great to hear that! :D If you browse my gallery you’ll notice that lineart isn’t something I use often (so that’s why I digged in my old drawings a bit to get some examples u_u) Anyway, I think there are more competent and skillful people out there whom you can ask about it but this is what I do. Just study other artists’ art, it’s helpful. Try to use different brushes and see what works best. Also things I think are important: ⁎ use bigger canvas (mistakes are less visible) ⁎ don’t use smal brushes with smooth but very defined edges because the lines will seem very jerky and ragged ⁎ vary thickness of your lines to make everything more dynamic but try to make it natural (it’s a little bit like calligraphy) ⁎ practice! lines will be smooth and flowy if you make your hand confident: - draw traditionaly - excercise with drawing straight lines and curves - make quick, long strokes instead of drawing short lines (they’ll look sketchy) or doing painfully precise, slow moves - don’t zoom in too much - turn off the stabiliser (at least sometimes)) (Aaaand… you can always use vector drawing tools as a last resort :))


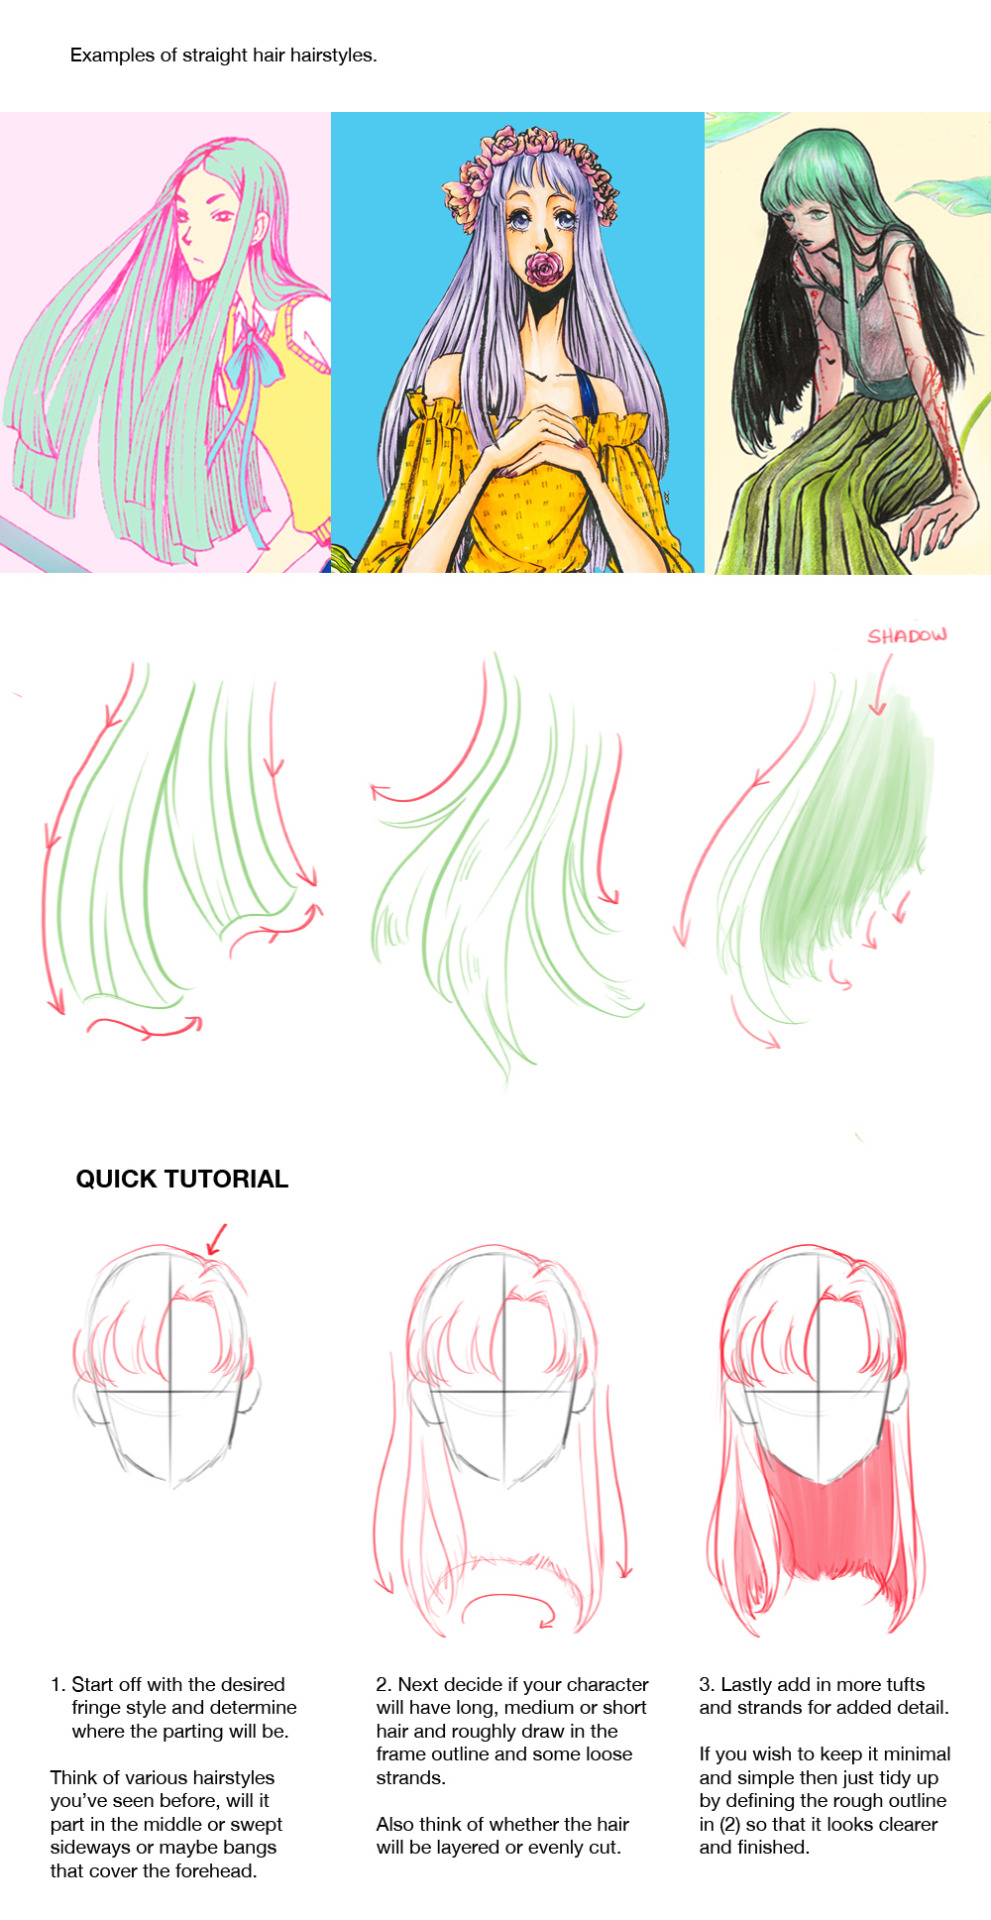


How to Draw : Hairstyles Pt. 2
Finally sat down and completed part 2 of the hair tutorial. Here I discuss how to draw hairstyles for female characters, although I think it can be applied for male characters as well. I mean..hair is hair xD I didn’t cover how to draw hairstyles that are tied or braided or styled in a special way as I thought the post would be way too long. So I’ll be saving that for another day. If you have any questions just drop me a message or leave a reply and I’ll do my best to get back to you. Hope everyone has fun learning to draw hair as much as I did putting this together :D And I just want to say a big thank you to all of those who checked out part 1. I’ll leave a link in case anyone needs it How to Draw : Hairstyles Pt. 1
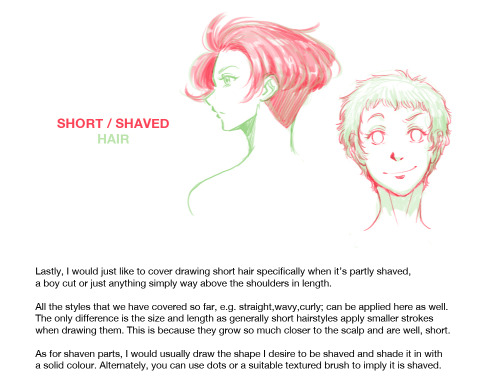
Hey!!!! Your art is AMAZING!!!!! I love your style!!!! ( ^∇^). Your art is really soft and inspiring. And the way you draw hair is SO FLUFFY!!! I LOVE IT!! Do you maybe have any advise for me on how to draw hair, for all hair that doesn't go in one direction (like Mihashi's hair) HAVE AN AWESOME DAY! o(^▽^)o


so there u go anon hope this was helpful! Thank you for your sweet words and have a nice day too! ^^
I share my secret tips on how I draw detailed illustrations effortlessly! P-please check it out…!