Maybe It’s Just Me, But I Think A Significant Part Of Career Planning And Goal Setting In Medicine
Maybe it’s just me, but I think a significant part of career planning and goal setting in medicine is developing the ability to acknowledge that you can have an interest in many things (which is a good thing, it keeps you keen and motivated) but you become conscious of the fact that that doesn’t necessarily mean you want to/can/should aim for a career in that area, if you know what I mean? And that realisation that you now have an idea of where you want your career to go is what ends up motivating you once you get past that initial ‘everything in medicine is exciting’ phase. At the beginning of med school/clinics, you think to yourself “woah, I’m interested in so many things - neuro, cardio, infectious diseases, general surgery, anaesthetics - I wish there was a path that would combine everything!” and yeah there are generalists and all that but (at least personally) sometimes you think about it all and you realise that there are aspects of medicine that you are happy to keep as just a ‘personal interest’, and others which you just can’t let go of. For example, I am fairly committed to paeds (I mean, I haven’t graduated yet but I’m 99% certain I want to work in paeds) but I also have special interests in psychiatry and anaesthetics/intensive care medicine - but over the years I’ve come to realise that just because I’m particularly interested in it does not mean I’m now ‘destined’ to be a psychiatrist or an anaesthetist, nor do I think an academic interest in neurological research would make me a good neurologist. When it comes down to it, even the basic divisions like medicine/surgery/GP can feel confusing when you’re 95% set on medical but have a lingering interest in ENT or neurosurgery - and I’ve talked to a couple different people who have interpreted this lingering interest as a sign that they need to somehow combine all their interests into one impossible career. When you’re younger and in school it feels like you have so many routes and can keep up with every single little thing you’re interested in, and everything seems so pressured, when in reality I think the path is a little clearer than some people would have us believe? As intelligent, curious people, it’s only natural to feel keen on learning about so many different things, but I think we all have to recognise that not everything is a 'sign’ - sometimes you are just interested in interesting things.
More Posts from Marathon-notasprint and Others
For anyone who thinks all studyblrs are perfect, just a reminder that I failed my first year of med school. I’m trying to turn it around though!

Hello everyone! I asked you if you wanted me to do this post and many of you seemed really surprised that I actually have 19 subjects. Welcome to Croatia, people haha.
So, first I’m going to tell you more about how it works in my school. I’m going to one of Croatia’s many Gimnazija’s (in my case opća gimnazija) [opcha gimnazia]. It is a school where you learn a very good amount of general information. I’m in the 3rd year (or as you would say junior year) What classes am I taking? Croatian, English, German, Music education, Art education, Psychology, Logic, Sociology, History, Geography, Mathematics, Physics, Chemistry, Biology, PE, Religion, Information technology (an elective subject that every student has to take (from opća gimnazija)), and I have 2 additional subjects which are different in learning (and very very optional) DSD (for German diploma) and advanced Physics.
One class lasts for 45 minutes with a 5 minute break, a day has around 6-7 classes, with a big break after the 2nd period for 15 minutes (some schools have up to half an hour). My school has two shifts of students (this year the 3rd and 2nd year are together, and the 1st and 4th year). The first shift: 7:10 am-1:05 pm, and the second: 1:15 pm- 7:10 pm. One week you are the first, the other week you are the second shift, so you have to be really good at organising your time. We have two different schedules.
Here’s an example of my schedule for one day:
1. Math 2. Math 3. Psychology 4. Physics 5. German 6. Chemistry 7. Biology 8. DSD
You of course have to have a notebook for each subject and a textbook (and maybe a workbook if required)
I eventually come home by 3 pm and start with my homework and studying.
Okay, now how I organize my time and my tips.
Pay attention in class and take notes.
This has saved me a ton of times. I always learn a lot more when someone explains it to me the first time and taking notes is a must. If you want, you can always rewrite notes, but for me, the best way is to just re-read them 2-3 times when you get home or the day before you have your next class. You will always follow up with your class and studying for an exam won’t be that hard.
Do your homework as soon as you get home.
I always do it as soon as I can because that way I won’t push it aside and forget about it. Also, doing it immediately helped me to have more time to study something else.
Get a bullet journal.
This is important because writing down your tasks helps a lot when getting them done and with organization. I also like to keep track of my exams, my grades, my habits and important dates. What helps is making a study schedule in your bujo. Here’s how you can do it.
Revise every subject the day before.
As I said before with notes, reading a few pages of your textbook or notebook hleps keeping up with your subjets. Doing that for every 19 subjects seems impossible but if I take 20 minutes for a subject I have tommorow that’s 2,5-3 hours which works. If I really don’t have that time I revise on the bus, or when I arrive in school.
Set priorities.
When I have an english essay for tommorow and a math exam, I will learn more for my math exam. I do this because I have set priorities for those subjects. I maybe have already an A in engish and a B in math, so of course I’m going to learn for something harder. Another example is that I’m going to need the math later because I’m going to work as a math teacher and not as an english teacher when I finish uni.
Weekends can save you. Holidays are your best friend.
All that work that I have set aside I can do on weekends and I can study more for the following week.
Doing your summer/winter work is really important for not getting stuck in that pile of work.
Find your best study place, and your speciall style of studying.
Not all of us can study in our bed, or at a desk. Not all of us learn by re-writing everyting. Finding what works best for you can save you so much time.
Here 2 helpfull links:
- types of studying
- learning styles
You don’t have to be a perfect student.
Accepting that I don’t have to be a straight A student but doing my work as if I am helped me achieve my goals. You have to do your best in order to achieve what you dream of. But, if being a perfect student means that you have no social life, or that your health is in danger it’s not a good option.
Thank you so much for reading and hope that helps some of you. Do you want to see a what’s in my backpack and my daily study routine?
xoxo, V. ❤

Ladies and gentlemen, new guest post on the blog
5 Proved Tips for Witing a Fresh Book Review
“Do you know how to write a fresh book review? You may have already faced with this unordinary task but we have some tips for you to do it at your best. Some basic things you should know is that a book review is intended to describe, analyze and evaluate. It also should…” Read More>>
The author of the post is http://youreasystudy.tumblr.com/!
Organising a Notebook:
I was looking at methods of keeping notebooks organised and I came across a really interesting blog post (source) that I want to share with you all. All of the pictures in this post come directly from the original blog post.
Make your entry into your notebook. In the example photographs, they have recorded a Chinese recipe.

Go to the back of the notebook and add a tag or title, e.g. “Chinese” on the left edge of the page.

Go back to the first page where the entry was, and on the same line number as you wrote “Chinese” make a black mark on the edge. You make this mark so that even when the notebook is closed, the mark is visible. After repeating this for various recipes, you now have various tags visible on the notebooks edge.

If you ever wanted to find a Chinese recipe, you simply look at the index, locate the label, and look along the visible edge which has been tagged as Chinese. Then just flick to each marked page.

You’re not limited to one tag per page. You could tag a page 2 or 3 times. So if you jot down a chicken stir fry you could tag it as “Chicken” and “Chinese”.
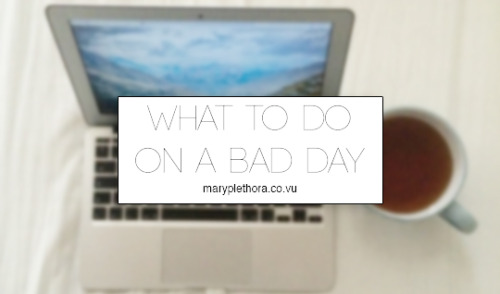
My exams are rapidly approaching (just 9 days left!!) and amongst all the study tips posts that are popping up, I wanted to do a post about those days when things don’t go as planned. Be it that you walk out of an exam and feel like you bombed it, or that you get back a disappointing score. We all know the feeling. So here are some things that I like to do to make the day suck a little less!
Have some chocolate (light/dark/milk, hot/cold/whatever as preferred)
Have a bath, or a long shower
Go for a walk or a jog, preferably surrounded by nature
Find someone/something to cuddle
Even if you have things to do, give yourself a break
Tidy your room/flat/whatever to get a fresh perspective
Open all windows and air out your room
If you have things that need to be done, make a to do list and sort your brain out
Organise your clutter/notes/room/whatever
Do come colouring in a colouring book (these are awesome)
Try your hand at painting, even if you’re terrible at it
Make yourself some tea
Bake something (and eat it without feeling guilty afterwards)
Light a nice-smelling candle
Spend time with the positive forces in your life, be it parents, friends or pets
Watch your favourite movie (preferably with someone who loves it as much as you)
Go on spotify, pandora, soundcloud, 8tracks or wherever and look for new music
If you find some really good music, have a dance party
Put on your favourite outfit (+ makeup look if you’re into that)
Paint your nails, shave, moisturize, wash your face and pamper yourself
Check out universityandme‘s “You are a force of nature” tag
If you need someone to talk to, send me an ask, either here or on my main blog, saturdaystudying
🌠Guide to Study Guides
Hi, so I make study guides when I revise as referenced to in this post/ask here. So in this post I’m gonna try and show you guys how I go about making a study guide like I did for sociology or philosophy, both of which are shown in that link there. This is my method so it probably is really complicated and stuff, I know for sure that my guides are overly “fancy” and whatnot, but it makes me happy and I guess the extra effort does pay off, at least aesthetically.

Okay, yes, let’s begin…
1. Visit colourlovers.com to choose a colour scheme for your guide!
I’ve provided the link to the most loved palette page which is where I choose my colour scheme. In Word, you change your colour scheme by choosing Page Layout > Colour > Create New Theme Colours and you go from there!! I basically started making my own colour schemes after I went through all the ones already provided by Word, but to be honest you can start with those since they’re really nice too. I recommend: Apex, Composite, Foundry, Metro, Module, Slipstream and Solstice.
If you do want to make your own colour scheme, you should get ready to do some fiddling around because I still don’t get this really. Making a colour scheme on Word requires at least 10 colours, that’s okay because on colourlovers, palettes are usually made up of 5 so just choose 2 that you think suit each other :) After this you need to input the hex codes manually into the popup window of “Create New Theme Colours” starting from Text/Background - Dark 2 to Accent 6. The hex codes are provided by individually clicking on the colours.

So that’s what one of my self-made colour schemes look like, you should be aware that Word usually randomises these? I don’t really know how it works but basically sometimes the colours won’t necessarily be in that order when you go to select it to specifically colour a word, if that’s the case you’ll just have to fiddle and change it around to choose your preferred colour in the scheme. Also not all the colours will go into the textbox options so be aware of that too!
2. Font shopping
Next if I haven’t updated the font collection for a while I’ll go to dafont.com because I just…really like jazzy fonts. From here I’ll either check out “All The New Fonts” (option is at the bottom of the front page) or go to the menu titled Script, and check out Handwritten, Fancy or Various. Here are some links to asks about fonts that I’ve used in my shown study guides or just fonts I like in general!! 1 and 2.
Okay so as you can see in the Disney Princess Document/Sociology Study Guide I used at least five fonts, I usually average around 4? Once downloaded choosing fonts that you like for your guide is basically a trial and error process, I choose any fonts that I like or haven’t recently used or just recently downloaded that I want to try out and I match them with what I think would look nice! Here I’ll show you why I use around four or more fonts:

In order to make the process of typing up your guide with these fonts easier, highlight one, so for example the Big Title, right click > Styles > Save Selection as New Quick Style…and it’ll be available to you in the Quick Styles menu underneath a heading like Style1. After this to easily change a font to that particular font, just highlight, go to Quick Styles, choose that particular font and bam! I try to make my fonts match, so if one is bold, I aim for at least a thick-ish font in the rest of my choices. Now to go through what they’re for.
So obviously the Big Title is for your BIG TITLE that could be your subject or your main topic, so if it was sociology (like in the first pic) I would use it for Key Concepts and Methods, I might later reuse the font for another BIG TOPIC, but really…it’s your choice.
The Subtitle is what I would use for well…your subtitle, so following my first pic it would be the subtitle of Positivism versus Interpretivism…Three Key Concepts, etc. The heading is therefore for the headings under the subtitle (this is only if you’re making a guide for something that is like intensely sectioned, like sociology), so I’d use that font for where it says Reliability etc.

It just brings something extra on top of all the later colour you’ll probably use, although I only use it for like a set theme, so dates, names etc. and only either a word or a phrase, if it gets too long it’ll just mess up the format of your sentence.
3. Okay, so you’re happily typing away but now you wanna add the speech bubbles, you wanna add the textboxes and the Disney princesses! Don’t worry my friend, I got you.
Basically I add textboxes or speech bubbles for 2 reasons, either to highlight a particular point or differentiate a piece of information from the rest OR to fill up space because of some particular study guide pet peeves.
Pet peeve, when a particular sentence ends like this:

I know it might seem like a bit much, but to be honest, it throws the whole format of a block of text if a bit of it ends with like this huge expanse of space. So in this instance I either will insert a photo or I’ll try and delete a word or add a word until I’m satisfied. THIS IS JUST ME, IF YOU DON’T CARE OBVIOUSLY IT DOESN’T MATTER 👌
You can insert speech bubbles by going to Insert > Shapes > Callouts (you’ll find it there) and textboxes by going to Insert > Textbox > Draw Textbox (I draw mine since I don’t tend to use the ones provided by Word. With the speech bubbles they actually act as textboxes, but I’ve found that using it in that way takes up a lot of space as in your words won’t necessarily take up the whole of the speech bubble so it simply expands and it’s all messy. Therefore, I put a textbox on the top of it, make the background and outline transparent and type there to save space.
Here are some examples of when I’ve used photos or speech bubbles to fill up space or solve the annoying sentence problem.


I generally tend to have themes around what photos I use, so for example my sociology guide was largely based on Disney/Cartoon Network depending on how I felt and I’d use particular photos to emphasise a point and make it more entertaining I guess… As you can see the speech bubbles with LSP are for filler purposes but also to differentiate information, it just adds something extra really. Also because I continuously indent my guides (since I type with bullet points) as they get further and further in they’ll leave gaps that can be filled with photos, seen here with what I’ve done with LSP. Also with the photos that I choose, I search for the ones with a grey, checkered background which means that they’ll be transparent, allowing me to put them in front of a textbox or just makes overall design easier, it means that I can have the Gangreen Gang in front of that textbox like that :)
4. Final step, going over your guide when it’s done.
I then go through the guide again and highlight, underline, italicise, bold, colour etc. particular points of a sentence/paragraph that I want to remember! I do this in order of the colour scheme that appears in the menu when you click to change the colour of a font, so I’ll highlight particular words for a portion of a paragraph before changing, achieving a sort of a rainbow effect, like so:

These are from my history study guide, where I made front covers (which I don’t usually do…I feel like all my guides really depend on how I feel and my subject). This is what they looked like if you wanted an idea for something you could do too!!

Um..so that’s pretty much it! I’ve tried to make this as extensive and as in-depth as I can, I’m sorry it ended up SO LONG, I’ve never made a post this long before so I’m really sorry. I would put it under a read more but I feel like the font on my blog is too tiny for when it’s redirected and I’d much rather not have everyone straining their eyes. If you guys have any more questions, please feel free to ask. If you want any more examples or screen shots of my guides, just hit up my ask box!! Sorry for this taking so long and being so long once again and I really hope it helps you all in at least some way!
***As an addition, those washi tapes you see are digital washi tapes which you can get just by googling! I use the free ones which only require a lil’ searching for. Also please tag me in whatever study guides you make and upload, I’d love to see them!!
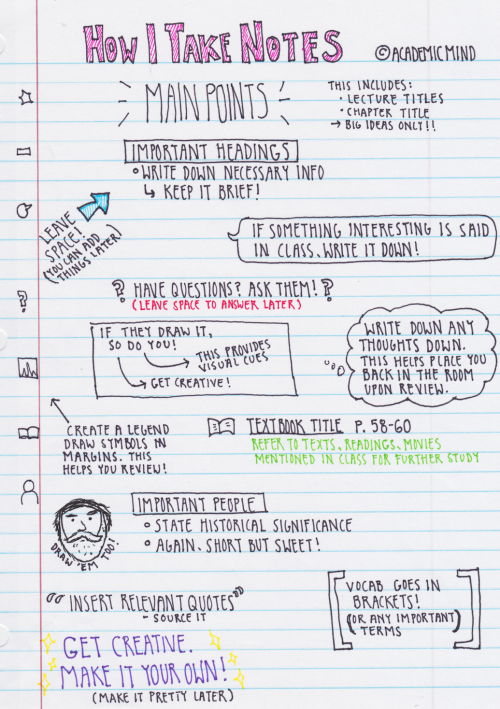
Some of you have requested that I show you my note taking technique. This is in no way a proven technique, but it really works for me and many of my professors have applauded my structure. So try it, and if you like it and it works for you, great! If not, I commend you on having a more structured system! These are my general rules when I take notes:
1. Leave space. A lot of space. While going through previous notes, whether it be right after class or a month later, I always found that I had information that I wanted to add, and cramped pages never allowed for that. Plus, it’s a bit less daunting on the eyes when there is some room between ideas. I do realize that this is not very eco-friendly, but hey!
2. Use the margins in a smart way. I have developed a “legend” of symbols to draw in the margins so that when I need a quick scan of what pages in the textbooks I referenced or vocab, I can find what I need easily. It might not seem useful on this one page, but when you have a whole 3″ binder full of notes, it’s a blessing.
3. Write on one side of the page. Again, not a eco-friendly option. However, I’m sure there are those of you (my past self included) who have wished you just had another page to write down book notes or additional thoughts without having to get a fresh paper. This solves that!
4. Make it pretty later. I know this page is visually appealing, but keep in mind that I was in my nice warm room by myself and listening to music while writing this. My notes straight out of class aren’t color coded and they definitely don’t have cute little decorations on them; just get the information down, worry about aesthetics later.
5. Put yourself in the classroom. You might think: “but I’m physically in the room what the hell are you talking about”. The concept is weird but it works. I always try everything I can to make sure I place as many visual cues in my notes as I can so that when I look back on them later I remember exactly where I was and what was happening. Are you not paying attention and thinking of food? Write it down. Did someone fart? Write it down. Placing yourself in the room is the most beneficial thing you can do for future you.
6. Keep it short. I can’t tell you how many times I freaked out when I first got to college because I was trying to write everything down. I was certain I was going to miss something. WELL HAVE I GOT NEWS FOR YOU. You aren’t going to miss anything if you keep your bullets to a minimum of one sentence. It’s proven that short phrases in your own words help memory better than full sentences that the professor gives you.
Finally, make it yours. This is a system that works for me because my brain is weird and can’t take notes the Cornell or outline way. The most important thing to learn in school is your own flow of things. Experiment, be creative! I hope I have helped those of you who aren’t traditional learners realize that there isn’t just one way to process information. If any of you have any questions or need specific examples, let me know! (I realize there is a typo on this but hey don’t worry about it) 🙈

eEEYYYYY the studyblr community has some amazing note taking methods and so i wanted to put a bunch of them in one place :]
flashcards:
fc: cute language ones
fc: biochemistry paths
fc: disease summaries
fc: pretty biology ones
fc: the leitner methods
fc: ap us history ones
fc: o chem + color code
alternative 2 flashcards
sticky notes:
printing on sticky notes
take notes from textbook
plot summaries [literature]
many ways to use post its
english reading summaries
character maps 4 english
outlines:
color coded + neat
cornell + color code
digital cornell notes
learn from mistakes
super duper cute
outline with onenote
the margin method
in class / lectures:
for all classes + color
spaced out + pretty
for all classes / hw
advice @ infographic
2 notebook method
organized + colors
reference sidebar
method infographic
specific classes:
sciences + maths
history methods
learning types
sketchnotes:
introduction to it
cute symbols to use
+adorable symbols
+insp @ nice symbols
how to draw ribbon
illustrating ur notes
over the top amazing:
homemade textbook
digital study guides [1]
revision study guide
mini moleskine guide
digital study guides
handwritten studying
masterposts!!!
productive summers
starting a study blog
time managements
succeed @ school
ap world history
web resources
ap psychology
bullet journals
ace ur exams
stress reliefs
annotations
essay writin
printables
sat help
+more
hope this helped u all with taking notes!!!!!! xoxo sareena

There are three major approaches to note taking, each of which will be outlined and described in this post:
Outlining:
Outlining is an effective way to capture the hierarchical relationships between ideas. In a history class, you might write the name of an important leader, and under it the key events they were involved in. Outlining is a great way to take notes from books, because the author has usually organized the material in a fairly effective way, and you can go from start to end of a chapter and simply reproduce the same structure in your notes. Place major points farthest to the left. Indent each more specific point farther to the right.
The advantage of this is that level of importance is indicated by distance away from left margin.
For lectures, outlining has limitations. The relationship between ideas isn’t always hierarchical, and the instructor might jump around a lot.
Requires more thought for accurate, understandable organization and, therefore, cannot be used during lectures that move too quickly.
Mind-mapping:
For lectures, a mind-map might be a more appropriate way of keeping track of the relationships between ideas.
In the centre of a blank sheet of paper, you write the lecture’s main topic. As new sub-topics are introduced, you draw a branch outward from the centre and write the sub-topic along the branch. Then each point under that heading gets its own, smaller branch off the main one. When another new sub-topic is mentioned, you draw a new main branch from the centre.
The thing is, if a point should go under the first heading but you’re on the fourth heading, you can easily just draw it in on the first branch. Likewise, if a point connects to two different ideas, you can connect it to two different branches.
If you want to neaten things up later, you can re-draw the map or type it up using a program like FreeMind, a free mind-mapping program.
If you want to make your mind-maps memorable, and visually appealing, consider using different colours, and incorporating images/diagrams.
Mind maps can be used for just about anything in your degree! A mind map can help you:
Outline your ideas on a subject
Organise your thoughts
Visualise a whole concept
Take and review notes
Plan an essay
Revise for your exams
Here are some advantages and disadvantages to mindmaps:
Mindmaps are adaptable - they can be used for lectures; note-making from books; essay plans etc. as well as less structured tasks.
They are easy to add ideas later, at any time.
They can help you focus on the links and relationships between ideas so you don’t just have disconnected facts.
They can be personalised with pictures and symbols to make things more memorable.
They are a useful tool for condensing lots of information – e.g. a whole topic into a mind map poster, to aid revision.
You can’t incorporate large chunks of text.
You have to stick to the rules of mind mapping to get the optimum benefit from the tool.
Creating the map may take time. However, this will help you to review or recall information and will check your understanding.
When you’ve personalised your map, it can be difficult for others to understand.
Cornell Notes:
About a quarter of the way from the bottom of a sheet of paper, draw a line across the width of the page. Draw another line from that line to the top, about 2 inches (5 cm) from the right-hand edge of the sheet. You’ve divided your page into three sections. In the largest section, you take notes normally — you can outline or mind-map or whatever.
After the lecture, write a series of “cues” into the skinny column on the right, questions about the material you’ve just taken notes on. This will help you process the information from the lecture or reading. In the bottom section, write a short summary of the material you’ve covered.
Typing Your Notes:
Set up folders for each topic. Create these folders before lectures/class and save your notes into the correct ones. It will keep all of your notes organised and easy to find. You might want to have different folders for lecture and reading notes. Develop a system which is intuitive for you.
Know the program. Choose which program you’re going to use to take your notes. There are lots of options available, including Microsoft Office. If you can’t afford Office, then you can look into (illegal) free downloads of it. If you have Office, you could also use Onenote. Alternatives include free programmes like Evernote which allow you to access your notes from anywhere on any device.
Get a template (M Office only). On Microsoft word, you can download different templates. See if there is a template that you can use for taking your notes. Alternatively, you can create your own template by adjusting the margins, font, size, etc. and saving your preferences. If you don’t want to use a template, you can just use the default settings.
Name the notes. Make sure that you name the notes so that you know what’s inside. On Microsoft word, when saving documents you can add tags. Then you can search these tags for any documents with that specific tag. I’ve found this to be a really useful organisational tool.
Do you need anything to take your notes? If you’re using a tablet, you can buy Bluetooth keyboards which will connect and can be quicker than typing on the screen. You can also buy a stylus which will let you write like you would with a normal pen; some devices also have the option to convert your handwriting to typed notes.
Get to know your keyboard. If you’re using a keyboard, then I suggest looking at this website which will teach you how to touch type.
Become familiar with keyboard shortcuts. Especially for things like bold, italicise, underline, highlight.
Downloads. If the teacher/lecturer puts up any material for the lecture download it. These are typically powerpoint slides. When I take notes next year, I will download these and split screen between word and powerpoint. Then I’ll be able to copy and paste material and diagrams straight from the actual powerpoint, speeding up my process.
Back up. Please, back up your notes on google docs. If your computer crashes you will have a backup of your notes that will be essential to studying! Again, for the people in the back, back up your notes!
Creating your notes. Use the technology to your advantage.
Use bold/highlight/italic. Make your heading and subheadings stand out from the rest of your text.
Use bullet points.
You can even make sub bullet points (like this) using the tab key to follow your line of thought/reason.
Highlight the important things; you could even use different colours for different things. E.g. yellow for important dates, blue for important quotes.
Develop an annotation style. For example, sometimes you might fall behind a bit, and miss a detail. When this happens to me I insert a series of dots into my notes, like this (……..) and I know that means I missed something so I can return to the recordings to find out what I missed. You could use question marks (?) to indicate something that confuses you that you need to do more reading on. There are lots of different symbols so you can develop your own system.
This also works with words. If you have certain words which you’re typing a lot then you can make them shorter and easier to type. For example, the word “participants” comes up a lot in my course, but I use “ps” because it’s shorter and quicker to type.
Choosing between typing and handwriting:
Handwriting Notes:
Is creative; colour/ highlight/draw
Can help memory
Lots of experience using the technique
Can revent distraction
Same format as exams
Lots of paper; bulky
No back up
Environmenta
Difficult to transport
Can be a slow, ling progress
Typing Notes:
Quick; can keep up with teacher
Easy to transport; all ntoes on a single memory stick
Can create back up copes
Can be printed to have a digital and paper copy
Paper doesn’t have to be used; environmentall friendly
Add coliur/highlithg/etc.
Easily shared with other people
Different fonts can make it easier for people with dyslexia
Laptop may be too heavy to take to class
Not everyone has a laptop; expensive
Battery life might not be a suitable for a full day of classes
Can be less memorable


-
 nelascafe reblogged this · 5 years ago
 -
 windcrinkledbooks liked this · 5 years ago
 -
 ladygrinningsoulxx liked this · 5 years ago
 -
 x-rstudies-x liked this · 5 years ago
 -
 abbiej45 liked this · 5 years ago
 -
 youngchaoscolor liked this · 6 years ago
 -
 medicalsearchengine-blog liked this · 6 years ago
 -
 futuredrh-blog liked this · 6 years ago
 -
wberchie liked this · 7 years ago
-
 paureus reblogged this · 7 years ago
 -
 dxrkenedpxrxdise liked this · 7 years ago
 -
 skatermaink liked this · 7 years ago
 -
 boosterjuiced liked this · 7 years ago
 -
 bi-meatloaf liked this · 7 years ago
 -
 destructive-typhoon liked this · 7 years ago
 -
 medschoolcrisis reblogged this · 7 years ago
 -
 spacefleetings reblogged this · 7 years ago
 -
spacefleetings liked this · 7 years ago
-
 videtur-existentia liked this · 7 years ago
 -
 girlypink-and-glitter liked this · 7 years ago
 -
 fangirlingeverythingnow reblogged this · 7 years ago
 -
 timetorechargeyourlife liked this · 7 years ago
 -
 yellowwallsbluesky liked this · 7 years ago
 -
 princechanggu liked this · 7 years ago
 -
 dxmedstudent reblogged this · 7 years ago
 -
dxmedstudent liked this · 7 years ago
-
 in-sonderland liked this · 7 years ago
 -
 catintellect liked this · 7 years ago
 -
 chemstudyign liked this · 7 years ago
 -
 eliast0r liked this · 7 years ago
 -
 pearlmuststudy liked this · 7 years ago
 -
 prettylittledancer liked this · 7 years ago
 -
 magnoliamed liked this · 7 years ago
 -
 love-cats-and-girls-blog liked this · 7 years ago
 -
 frikyu reblogged this · 7 years ago
 -
 balancedasshole55-blog liked this · 7 years ago
 -
 zigball liked this · 7 years ago
 -
 monk3ydizziness reblogged this · 7 years ago