
Sylwester | i will mostly post sketches, because i'm too lazy to end them
196 posts
Latest Posts by nastysynth - Page 4
art cheats
hello i am here today to not lose track of the art cheats i have discovered over the years. what i call art cheat is actually a cool filter/coloring style/way to shade/etc. that singlehandedly makes art like 20 times better
80’s anime style
glitch effect
glow effects
adding colors to grayscale paintings
foreshortening ( coil )
foreshortening ( perspective )
clipping group (lines)
clipping group (colors)
dramatic lighting ( GOOD )
shading metal
lighting faces
that is all for today, do stay tuned as i am always hunting for cool shit like this
if you don’t mind me asking, how do you colour your art? like, step by step? your art looks really lovely


I made a tutorial!! :> this time I used my laptop instead of my phone so I can show what my actual art style looks like!
I tried to put as much detail in the pictures as I could about my process, but if you have any questions, then let me know and I’ll answer to the best of my ability!!! :D


people have asked me how i draw eyes so i made an extremely slap-dash eye tutorial! this is simply about how i draw a simple neutral eye, nothing to do with expressions (that’s a whole other thing).
start with the horizontal guide on the face, to help place the eyes. put circles where the eyes will go!
adjust the circles into diamond shapes– i got this idea from sinix design on youtube, it’s very helpful and easier to see where the lids should end than with a circle.
draw the top lid/lash lines, leaving a bit of space at the top of the diamond. keep each eye in time with each other– drawing one whole eye first makes it harder to match the other one.
then the bottom lids. i usually try to do all the lid shapes with a single curved stroke each. keep it simple pals!
irises & pupils. sometimes i’ll draw filled-in black circles for the irises, to help figure out where to place them naturally!
lid creases, use the leftover diamond at the top as a loose guide for where to place them. remember that the lid curves around the eyeball.
make adjustments! things don’t always come out perfect immediately. i usually have to thicken the lash line (i like mine quite thick), move the bottom lid up or down, and sometimes resize a whole eye (easier on computer than traditional, i know!). if you’re on a computer make sure to flip your canvas often so you can see these little things ❤
and to practice, just doodle a lot of small eyes! keeping them small makes them easier and faster to finish, so you can focus on your strokes and playing around with shapes, tilt, lid space, all that. don’t worry about making the irises perfect circles/ovals or any of that, just try to capture the character. have fun!


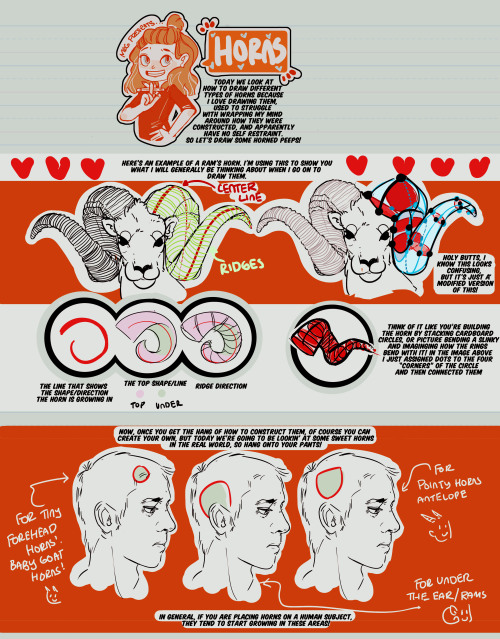
Hey friends!
It’s Meg for this week’s TUTOR TUESDAY! Today we take a little look at hopefully some exercises that will help with drawing horns! So go draw some peeps with horns, my dudes. If you have any recs send ‘em in here or my personal. Keep practicing, have fun, and I’ll see you next week!
hi! i love your art, it's so pretty ♥ and you draw feet really well, do you have any tips?
thank you a lot anon!! ( /)w(\) here, i made a few notes about the steps i follow while drawing feet:

^ that’s assuming you’re not drawing from a low perspective, as if the camera was on the floor or something like that!


SORRY MY HANDWRITING SUCKS and i’m not really good at explaining things bc i don’t really follow a guide and stuff so yeah BUT I HOPE IT WAS HELPFUL TO YOU!!


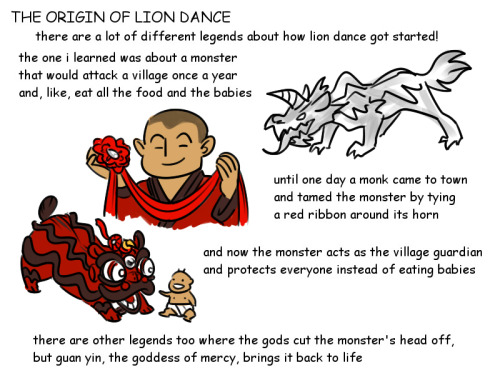


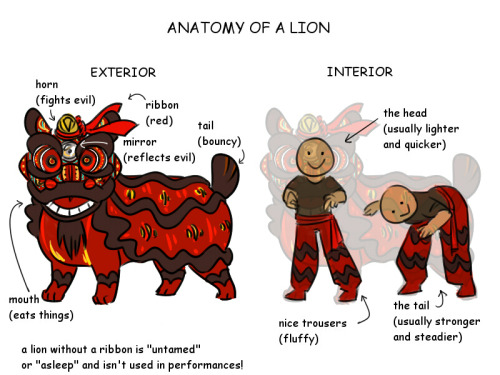
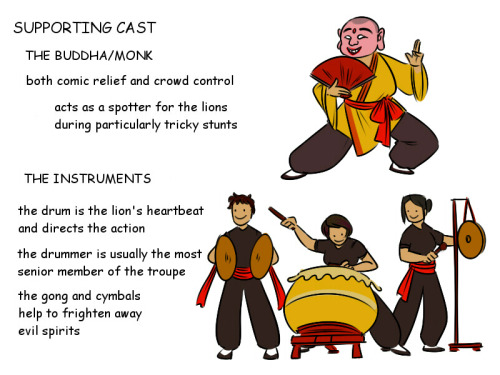
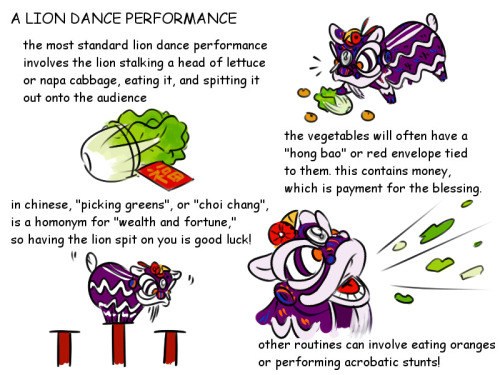


so quite a lot of people expressed interest in a guide to lion dance! and since the lunar new year is coming up in a couple weeks, which means everyone’s exposure to lions is probably going to increase, i figured i’d go ahead and make it! right click + open in new tab to fullview, etc etc, i hope it’s helpful, although if you only take one thing away from this powerpoint, it’s this: lions are not dragons
disclaimer: i learned fut san style at an american university, and the senior members of the troupe were almost all from hong kong and taiwan, so most of my knowledge is drawn from what they taught me. lion dance varies widely depending on the style and the country of origin, and many schools do things differently! this is just an attempt to establish a baseline and give you a really basic intro to one of my favorite art forms. :)
![Patreon: [patreon.com/lunaartgallery]](https://64.media.tumblr.com/6dd76e17df224b3826e5866282b6cd57/6ab8034c06b9e862-5e/s500x750/25f94543a8524d030c9cff0e9a9786daa2174e4c.png)
![Patreon: [patreon.com/lunaartgallery]](https://64.media.tumblr.com/ec25543ee78d89a38f34fc59a6e126ec/6ab8034c06b9e862-fb/s500x750/cffc02b6e72d78c6ec0e718591773a8126fa8e8b.png)
![Patreon: [patreon.com/lunaartgallery]](https://64.media.tumblr.com/1716c74ce43b8492822be5cdd59a5361/6ab8034c06b9e862-eb/s500x750/a15ed68ec5e79800e2c4084a7dce932388788006.png)
![Patreon: [patreon.com/lunaartgallery]](https://64.media.tumblr.com/7cd552c8503df33edca0d09509f91dbc/6ab8034c06b9e862-3b/s500x750/5351cb62cc31e8805197148e8b20b496b1015ef9.png)
![Patreon: [patreon.com/lunaartgallery]](https://64.media.tumblr.com/5976e680b65f566912194b7509bbc3f5/6ab8034c06b9e862-65/s500x750/1f99cfdfee09332c1dd4a1a3824f7c83dcd4f917.png)
Patreon: [patreon.com/lunaartgallery]
My last drawing tutorial was back in 2017, whoa, welp it looks like my drawing skills have gotten better. Since I have some more spare time, I will be doing new/updated art tutorials revisiting some of my previous topics.
I’ll post the tips publicly but my reference material and examples will be Patreon exclusive. If you like these tips and want to see more, support my Patreon! It allows me to focus on more material like this and I would really appreciate it .
Thanks! ——-—— Devi: [deviantart.com/miss-noidentity] Twitter: [@LunaArt_Gallery] Instagram: [@lunaartgallerys]


How i shade !


It only takes a couple of lines to go from one eye style to the other so I'm always stuck between them cause I love both so much
Do you have any tips for drawing in the Pokemon style??
These are just some rough notes. I don’t draw that often in the pokemon style so these are a little more basic than I could give on other styles.
For colouring advice, this is a great resource to use: https://tunnaa-unnaa.tumblr.com/post/162328103349 It goes through the styles of different pokemon artists.
Hi, I'm sorry if this has been asked before, but I adore your arcana style cgs and I was wondering if you had any tips for replicating the arcana style?
m, this is a bit tricky to answer because I’m not confident enough in how I draw the style to make any sort of guide. But in trying to replicate it, I kind of noticed some things?
Note: I like to learn styles through deconstruction and looking at processes. I recommend watching the CG timelapse at 0.25x speed here (x) and looking at some of the CG process/concept art here (x)
Please forgive the rambliness of this under the cut. These are just the notes I make to myself when I try and figure out a style.
Czytaj dalej
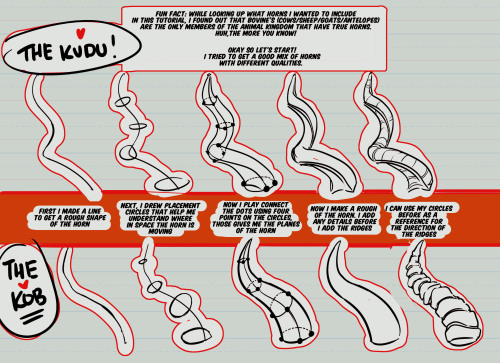
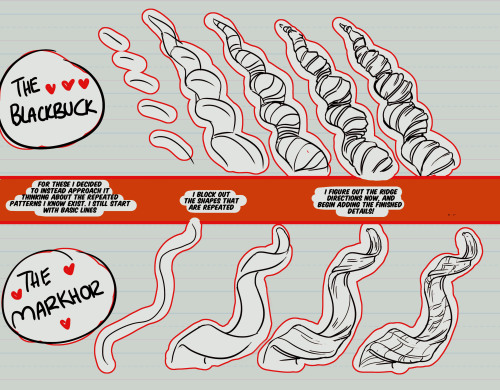
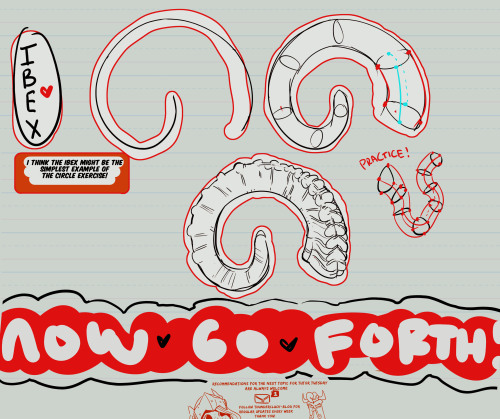
Do you happen to have any tips for drawing horns?
Hi, Anon! I’ll definitely try my best. Horns are a little tricky since they’re so subjective and the styles/textures vary so drastically.
Mostly I’m going to be talking about texture here and I’ll try to keep it simple since they’re time consuming to draw.
Smooth horns are great and easy, can come in any and all shapes, but if you want to add more interest and character to the horns, it all comes down to how you texture them. Here’s a simple smooth horn. It’s okay, it’s basic, but it works and will especially work better once it’s colored if it has a sheen or a matte look.

You can add simple lines to it to give it a bit more interest, but you can take it farther than just the cylinder look like drawn here. The lines give it the easy, quick illusion of being more dimensional, but it’s not the most interesting or dynamic.

You can play with the lines however you like to give the horns more uniqueness, such as a line down the center to sort of pinch it inwards. Still more dynamic than the smooth horn, but more interesting than the rounded one.

You can leave the lines as they are for an easier horn, or take it a step farther and use them as guides to texture them. This is where it gets fun, but time consuming. Definitely look up references of what you want to go for if you’re not sure. I highly recommend Ram, Ibex or Antelope references, Antelope being my favorite. They have so much texture to them in the forum of smaller and larger ridges, so here’s a horn based loosely (artistic liberties taken) off a mix of Ram and Antelope.
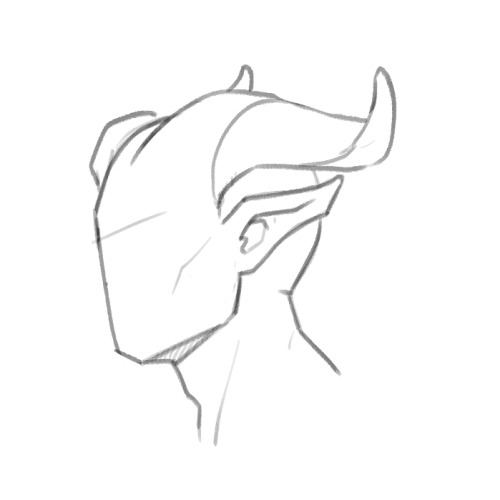

Getting into plates which are my favorite, there’s little to reference off of. Here’s a more dynamic, spiky look with plates using the guide lines as a base to get an ideal direction you want the horn to shape into.

Just take your guide lines and then extend outward. Add as little or as much wear, tear and damage as you want. Horns can get dry and crack, they can take a hit and break, age can cause grooves, your imagination’s the limit.

Outside of plates, you can look up any horned animal to get ideas for texture, anything from steer to deer and elk (if you want to get more into the antlered look), or mix and match textures from a few horn styles you like. Hope this helps! Sorry I can’t go more in depth, but I tried to explain it as best as I know how. Good luck with your horns!

color blob effect in clip studio paint


hey! >this post< got a some attention and i saw a tag asking for the tutorial, so i decided to go through with it. here’s that tutorial!
tutorial below the cut!
Czytaj dalej
Custom brush tutorial kinda??
Heres how you can make pixel brushes in Clip Studio Paint
first make a little pixel pattern and made sure that the background layer is transparent.

then you want to select edit -> register material -> image. this i remember from trying it before

next name it and choose a place for it to go among the others. doesnt matter where really. also check the texture box.

next to make the brush choose whatever brush that youd like to give it that has the properties you want and copy it. i just chose the standard oil brush. go to the copied brushes settings and click texture

click where it says none and find the brush that you made. after you click it change the setting to this

for me the texture works for subtract, multiply and compare. dont really know the differences between them all or form the others but for what i wanted those three seemed to work.
i did this for a bunch of different pixel patterns and brushes and got some cool effects! check it out!

i appreciate all the help and suggestions yall gave me!

maybe once i figure them out some more i could offer stylized commissions with them :V
3D/RGB Split Effect Tutorial

Hello! this is an effect I see in a lot of artworks and that I use a lot, I tend to see new/younger digital artists (even others who are more experienced) asking me and others quite often how to do it but there doesn’t seem to be many tutorials for how to do it, especially not for Clip Studio Paint. I’m going to try to keep this simple as possible, cause it confuses tf out of me and i only just now learned how to do it in CSP lol
*This can also be/is usually done in Photoshop, but not everyone has photoshop, and there are already tutorials for it I think! Do what u gotta do!
Czytaj dalej
Custom brush tutorial kinda??
Heres how you can make pixel brushes in Clip Studio Paint
first make a little pixel pattern and made sure that the background layer is transparent.
then you want to select edit -> register material -> image. this i remember from trying it before
next name it and choose a place for it to go among the others. doesnt matter where really. also check the texture box.
next to make the brush choose whatever brush that youd like to give it that has the properties you want and copy it. i just chose the standard oil brush. go to the copied brushes settings and click texture
click where it says none and find the brush that you made. after you click it change the setting to this
for me the texture works for subtract, multiply and compare. dont really know the differences between them all or form the others but for what i wanted those three seemed to work.
i did this for a bunch of different pixel patterns and brushes and got some cool effects! check it out!
i appreciate all the help and suggestions yall gave me!
maybe once i figure them out some more i could offer stylized commissions with them :V

Do you have any advice for maintaining a celebrity's likeness in a drawing without compromising your art style? When I try to draw real people they look completely different from how they should be and my art style ends up totally skewed as well. Thanks in advance!
This is a tough skill to develop! but with some hard work and research you’ll be able to do it!!!
My recommendation is to study professional caricature! Even if the end goal isn’t to do exaggerated crazy portraits of the the celebrity, studying the art form can help you learn to apply those concepts more subtly in your own style!
The key element of caricature is studying a persons face and looking for what makes them unique or different from the ‘standard’ anatomical face model, eg how do their proportions stray away form the ‘rules’.
once you take note of these things experiment by exaggerating them in different ways through quick thumbnail sketches

thumbnails by Court Jones for Proko.com
They might not look like the person right away but keep experimenting! trial and error is your friend!!!
(for more info on Caricature the Proko youtube channel has a whole in depth series by Court Jones the artist above! I Highly recommend checking it out and the other lecture series the channel!)
Once you have done this research you can apply it to your style and design the celebrity just like the design team on Netflix’s BoJack Horseman designed Character actress Margo Martindale! She and many other celebrity cameo’s on the show look like themselves but also like they belong in the world of the show!

The final thought I want to leave you with is: don’t worry too much about art style or let it get in the way of learning new ways to draw. There is a lot of pressure on the internet to find your own unique art style and have everything be consistent all the time but this thinking can actually get in the way of your artistic growth if you focus on it too much or to early.
I Personally dont care about consistency at all in my art, I design the style of the drawing based on the project (eg. am I going to animate this character, is it an illustration, what age group am I targeting? what Genre? if you want to see examples of this I have plenty on my instagram)
I have a lot of feelings on the topic of art styles but I dont want this post to be essay length or take me a week to write so please watch this video by Kesh on youtube about it : Stop Trying to Find Your Art Style He talks about this issue way more clearly and concisely then I ever could!
Hope this Helps!!!
-Mod Todd (ko-fi)

All colours are relative.
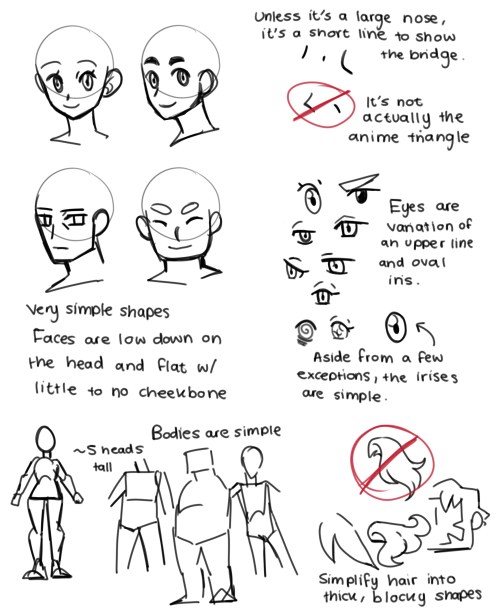
Could you do one on how to draw facial features? Lihow do draw nose? How do draw eyes? How do draw lips/mouths? Esp at different angles


this is a more holistic look at drawing faces in perspective
each individual feature could really be its own tutorial
hope this helped!
Art tips for facial features?
I would love to help but you need to be bit more specific. “facial features” can mean a lot of stuff.
Most vague tip i can give is uh - silhouette, shapes and proportions: silhouette helps block out unique features, geometric shapes can aid with structure and keeping the same face consistent between drawings, and proportions convey characteristics like age easily to the viewer.


Oof those action shots are 👌👌👌
Action shots like this one need a lot of planning. Let’s have a look about how I made this scene!

MAIN ACTION LINE:
The important aspect is the flow. You have to find a way to make the action easy to understand. I chose the main poses, but all of them are following a base action line. This line can have different shapes and curves, but I chose one that follows left to right , then down: occidental reading flow.
But it’s not over yet!

SECONDARY ACTION LINES:
Okay these bad boys make the « oh wow this is fluid » effect. Each characters have their own motion trail, based by the main action line. It mostly affects the elements like the capes, the hair and the particles in that case.

*GASP*
YES, I’m shook too. Battle drawings are so fun to make!
Comic where the fight scene is: Wanted part 17


It was about time I shared my art tutorials from Patreon.
Hey got any tips of drawing in the cr style?
Well first off, study the sprite sheets of the characters. They can all be found on the Cookie Run wiki.To draw in a style it helps to study the style too and figure out the elements of how the characters are put together. For Cookie Run it goes hand in hand with my style because a lot of it is very Geometric. Even with cookies who are oddly shaped.

I talked about this with my Discord once about how basic shapes can really go into making the character design solid and this seems to largely be the basis of how CR renders it’s characters.

Even characters build like Purple Yam and Milk Cookie use this more basic geometry when building the foundation of the character. It all comes down to a more simplistic style based on shapes.

That being said, When I build characters I use basic shapes to do it. That’s why a lot of my earlier drawings of the CR OCs look so different compared to now, because back then I was learning it. The easiest way to do it is to try drawing a CR character, build them as you see them, and then adapt that into how you draw.

And obviously cookies aren’t all the same shape! Shapes really can go into how people will interpret your character and their personality! So don’t be afraid to think outside of the box and look at different shapes for different characters!
That’s about as many tips as I have for now, but that’s the fundamentals over how I go about it.
Hi! regarding your latest post, may I know which brushes and program did you use for it? Thanxx


I used Clip Studio Paint, the Rough brush is a standard brush in the program. Rough 2 is a variation of Rough (settings above), and Rough 3 is the same as Rough 2 + an extra marble texture. Hope that was helpful :)
Custom brush tutorial kinda??
Heres how you can make pixel brushes in Clip Studio Paint
first make a little pixel pattern and made sure that the background layer is transparent.
then you want to select edit -> register material -> image. this i remember from trying it before
next name it and choose a place for it to go among the others. doesnt matter where really. also check the texture box.
next to make the brush choose whatever brush that youd like to give it that has the properties you want and copy it. i just chose the standard oil brush. go to the copied brushes settings and click texture
click where it says none and find the brush that you made. after you click it change the setting to this
for me the texture works for subtract, multiply and compare. dont really know the differences between them all or form the others but for what i wanted those three seemed to work.
i did this for a bunch of different pixel patterns and brushes and got some cool effects! check it out!
i appreciate all the help and suggestions yall gave me!
maybe once i figure them out some more i could offer stylized commissions with them :V
i have an arty question. what program do you us, how do you shade? i'm actually in love with your art style and i was wondering for some time if you could give away any tips :) i just started digtal art and i can't draw as good as i do on paper so anything is helpful
Oooh buddy, I LOVE making tutorials and explaining my way of drawing so prepare for a long (and hopefully helpful) post! >:D
Ok so first of all: I use Clip Studio paint pro and a simple Bamboo Manga Tablet from Wacom. (I’ve been using this tablet for 8 years now and it still works perfectly fine and never gave me any trouble!~ It has a great pen pressure, setting it up is very easy and it’s not super expensive)
I tried many different art programs and Clip Studio (back then it was called mangastudio 5) is still my absolute favorite. It provides you with everything you need as an artist, is very easy to understand and not as overpriced as other programs (I’m looking at you photoshop). So if you don’t have a lot of money (like me, I’m fucking poor X’D) and still want something of quality I’d definitely recommend it.
Time for the brushes:

My main brush for outlines and sketches

My absolute fav brush for shading (Opacity is around 40%)
The 2 brushes that are displayed up here are part of a set that you can download for free on this page. I love them for their rough look and they fit my sketchy art style perfectly. Sadly I can’t find the original set anymore but I made screenshots of their names:

I cannot stress this enough but you should always download new brushes and try them out. And this page is perfect for that (nearly all of them are free)! Using new brushes and combining different ones can give your art so much more personality.
But just a quick tip. I know that the range of brushes is gigantic and can be quite overwhelming. So download everything that might interest you, try them all out and only keep as little as possible! Having too many brushes will confuse you and you’ll spend more time searching through them than drawing. I’ve downloaded over 400 and only kept around 20. I only use 2 of them for my drawings and the rest is for manga backgrounds and action lines.
Now for the drawing itself:

I’m a quick artist and I care more about speed than quality. I always hated making multiple sketches so I’ll just draw the outlines
-

and fix them up without a previous sketch or making a new layer. That’s why most of my drawings look very rough and don’t have a clean look. (but I like that~)
-

For the color, I just fill in the entire picture with a neutral looking color and use the bucket tool to remove every unwanted color around the drawing. That way you won’t have any white pixelated edges inside your drawing and can add other colors quickly (again, with the bucket) without having to draw every single color per hand. Saves time and looks fine.
-

For shading (in this case his skin) I’ll combine the skin color with the color that I’ll use for shading inside this net. That way I can choose from multiple options to find the perfect color. ~
-

At first I’ll add rough shadows with dark red (Opacity 60%)
-

And then smooth them out with a lighter red. (Opacity 40%)
-

Now I’ll quickly add the last details and a few white spots on his hair and skin to give him a more realistic look
-

And you’re done! :D This took me about 15 minutes. But remember, you don’t have to be super quick. Draw at your own speed and use the style that’s the most fun for you! If you want to draw carefully with multiple layers and have clear outlines with many details then do it! Every person is different :D The most important thing is that you have fun!~

doctors hate him. one simple trick for more lifelike expressions

If everything is prioritized, nothing is prioritized.