
Sylwester | i will mostly post sketches, because i'm too lazy to end them
196 posts
Latest Posts by nastysynth - Page 5
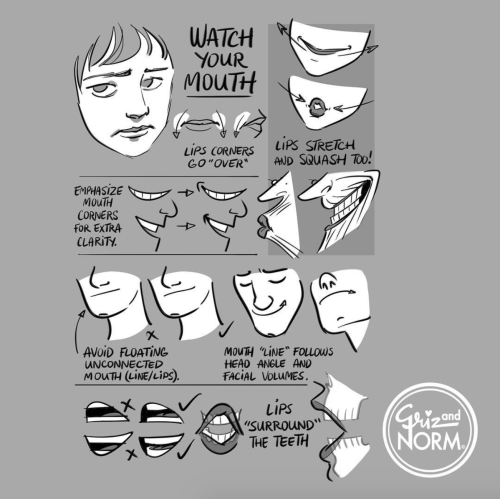
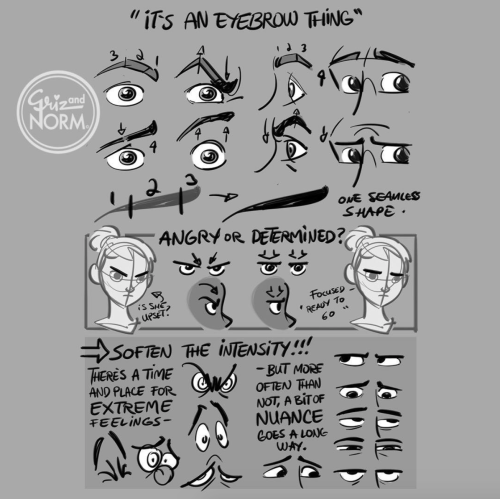
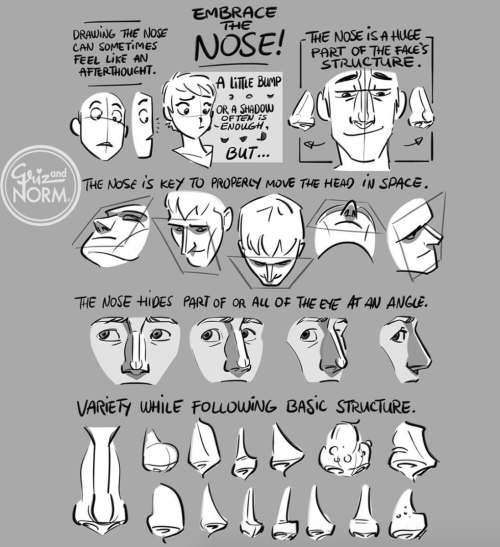
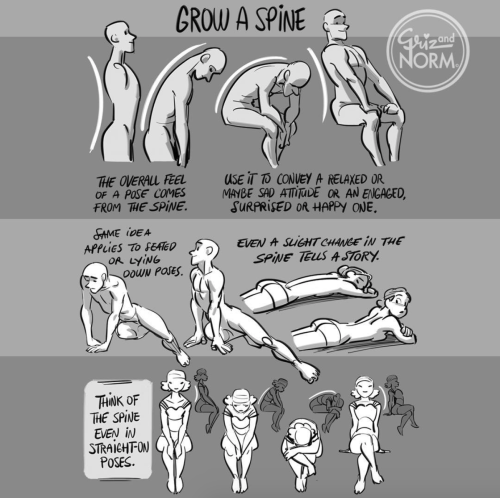
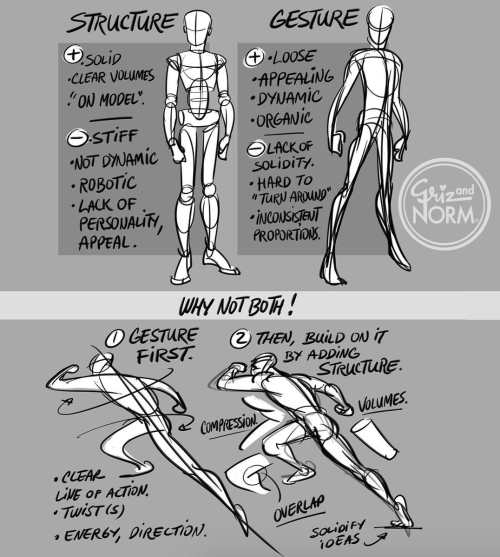
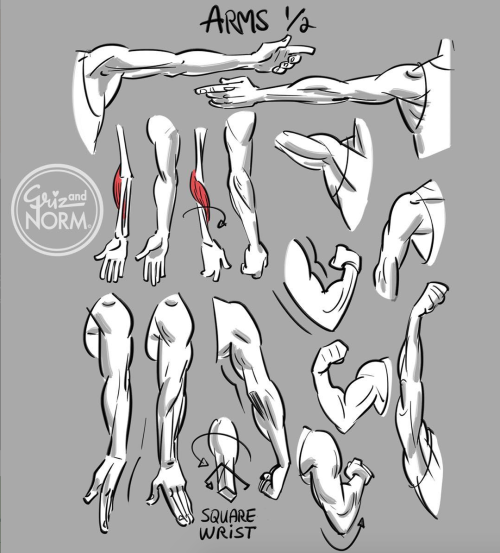
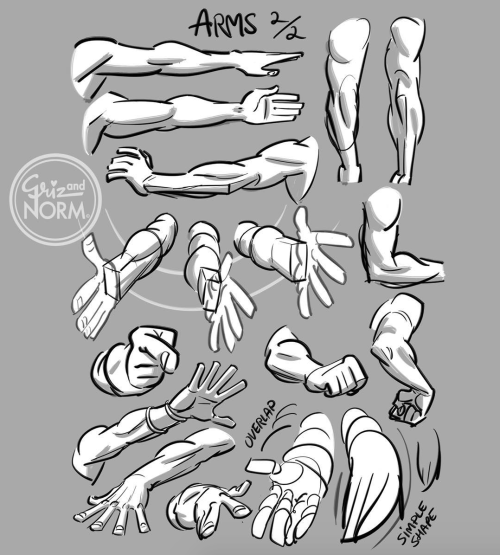
Art tutorials by Disney artists Griz and Norm Lemay
Could you do one on how to draw facial features? Lihow do draw nose? How do draw eyes? How do draw lips/mouths? Esp at different angles


this is a more holistic look at drawing faces in perspective
each individual feature could really be its own tutorial
hope this helped!


new video is up
How to “Stained Glass”, Part 1: Lineart
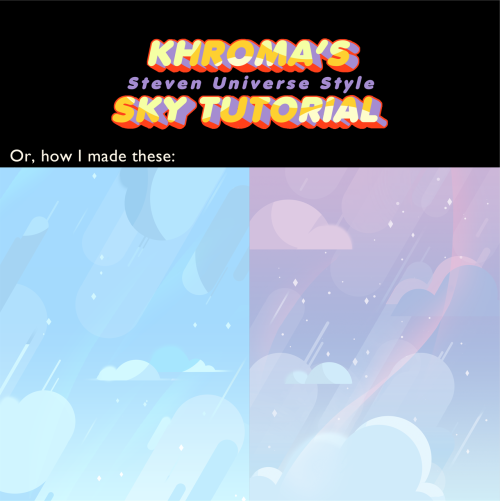
Since I was asked how I do my stained glass look, I’m making this little tutorial to give y'all some pointers, so you too can make art that looks like this:

Broken up into two parts: Lineart and Coloring
Part two will follow soon!
[Read more for lenght also my first language is not english, but I hope everything is understandable!]
Czytaj dalej
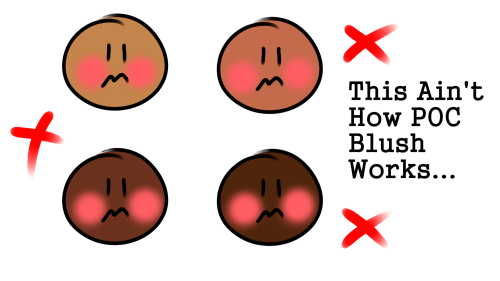
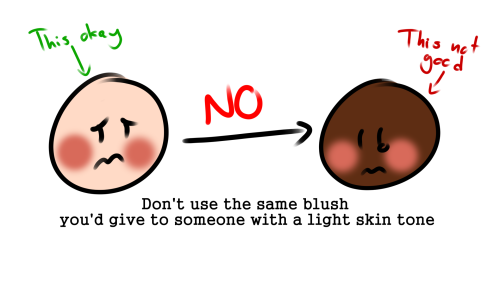
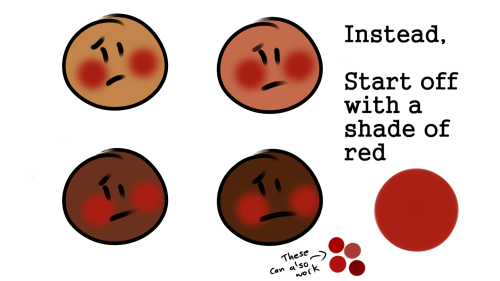

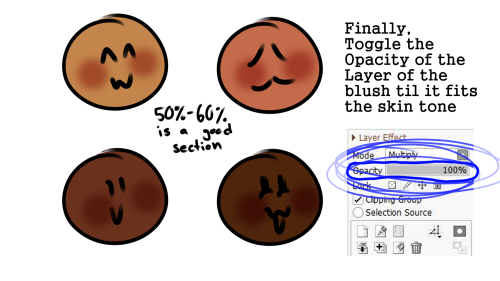
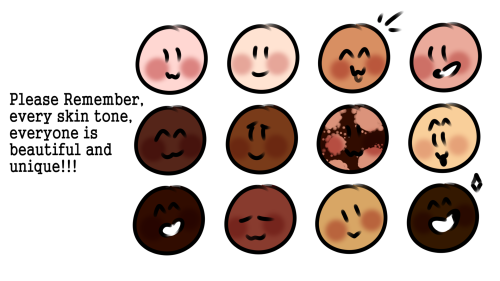
POC blush tutorial
Feel free to repost, but please credit me
Hey got any tips of drawing in the cr style?
Well first off, study the sprite sheets of the characters. They can all be found on the Cookie Run wiki.To draw in a style it helps to study the style too and figure out the elements of how the characters are put together. For Cookie Run it goes hand in hand with my style because a lot of it is very Geometric. Even with cookies who are oddly shaped.

I talked about this with my Discord once about how basic shapes can really go into making the character design solid and this seems to largely be the basis of how CR renders it’s characters.

Even characters build like Purple Yam and Milk Cookie use this more basic geometry when building the foundation of the character. It all comes down to a more simplistic style based on shapes.

That being said, When I build characters I use basic shapes to do it. That’s why a lot of my earlier drawings of the CR OCs look so different compared to now, because back then I was learning it. The easiest way to do it is to try drawing a CR character, build them as you see them, and then adapt that into how you draw.

And obviously cookies aren’t all the same shape! Shapes really can go into how people will interpret your character and their personality! So don’t be afraid to think outside of the box and look at different shapes for different characters!
That’s about as many tips as I have for now, but that’s the fundamentals over how I go about it.
Art tips for facial features?
I would love to help but you need to be bit more specific. “facial features” can mean a lot of stuff.
Most vague tip i can give is uh - silhouette, shapes and proportions: silhouette helps block out unique features, geometric shapes can aid with structure and keeping the same face consistent between drawings, and proportions convey characteristics like age easily to the viewer.


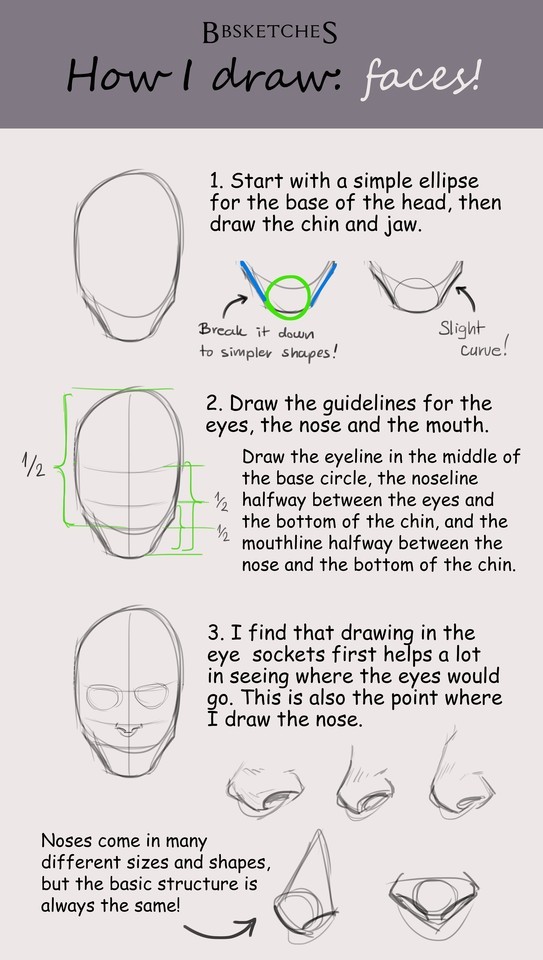

Face tutorial for Anon!
I wasn’t sure whether you meant heads or facial expressions, so here’s a very basic head tutorial! Of course not all faces are the same so proportions and the size of ears/eyes/noses etc. can vary! Feel free to explore and play with them to create unique and interesting characters! I hope this is somewhat helpful, and let me know if you’d like a tutorial on expressions as well!


some puppies studies ( ͡° ͜ʖ ͡°) 🐶 | Instagram
(Edited) + more studies lkdafña
i literally love how your color and shade if it’s ok do you have any tips on digital coloring? you don’t have to answer this if you don’t feel like it :) thanks!!
hello friend!! i have a tutorial i made on twitter a while ago which is more or less how i make my colours more interesting. i still use the technique and in general it’s just a lot of colour adjustment nothing too special LOL here!!


A basic tutorial on how I do ghoul skin for anon!! I wanted to include how to do fat/veins and stuff underneath the skin, but this tut is already long enough so I just stayed with the basics! Sorry if this is a bit messy, but I hope it helps!

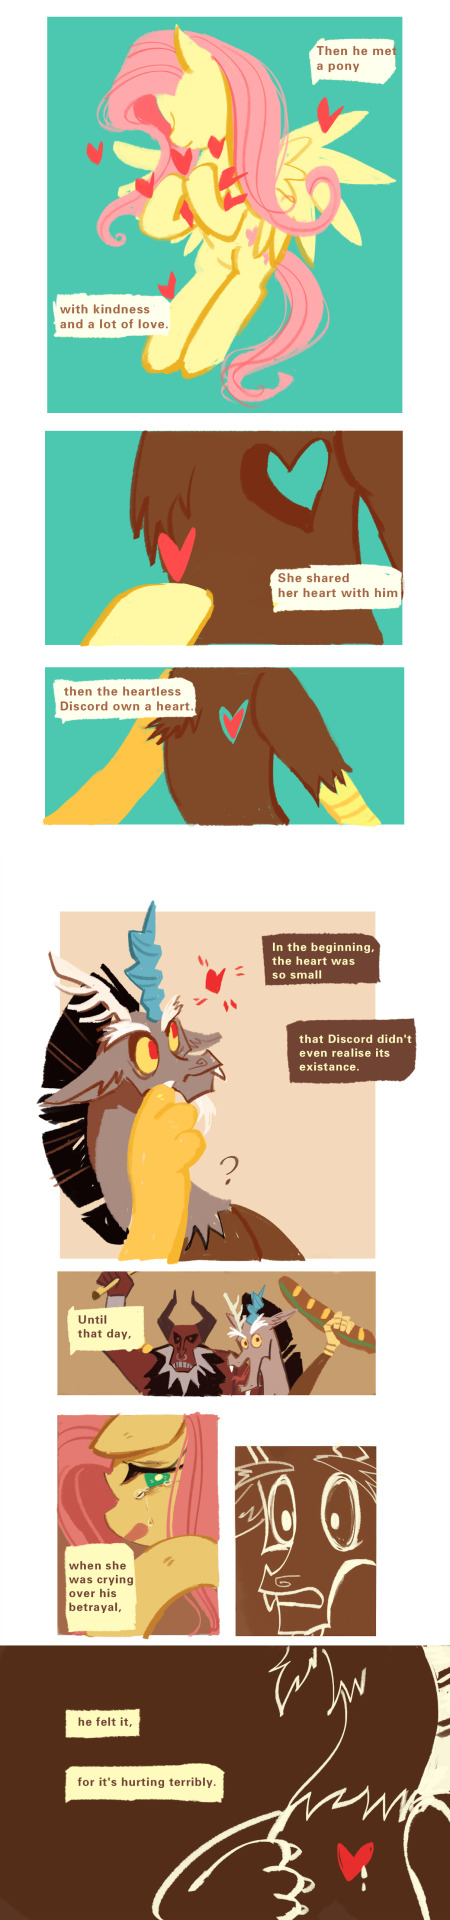

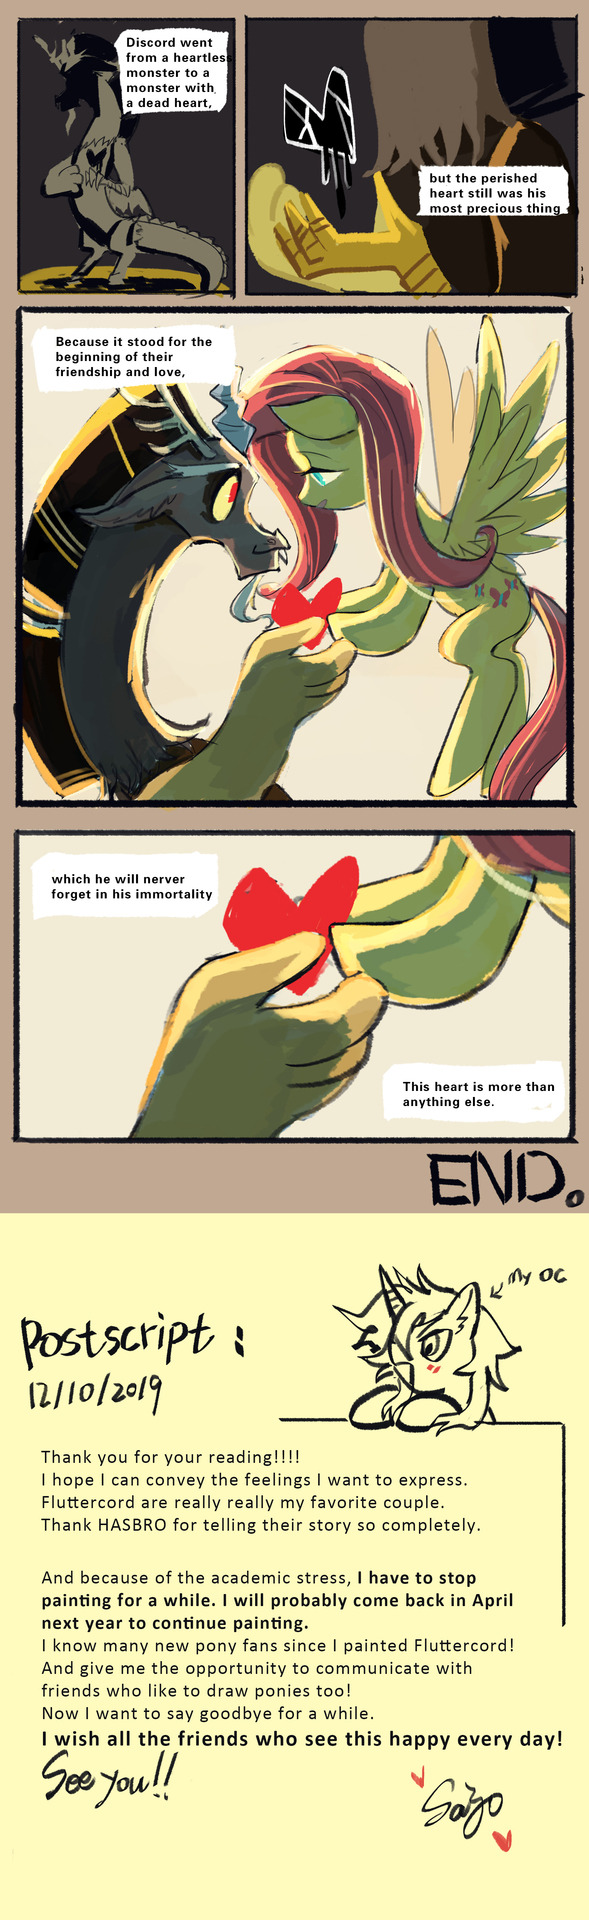
FLUTTERCORD COMIC: <<HEART>>
I’m glad that I can finish this on time.
Season 9 is over, but I know their stories will not stop.
I love them forever.It’s like I know they’ll always love each other.
And now I have to stop updating for study.
I’ll be back in April next year to continue drawing. See U!!!!!

My best friend and I were talking sigma anatomy (since idk how to draw him) so I doodled over this for future reference, red is her and blue is me
i literally love how your color and shade if it’s ok do you have any tips on digital coloring? you don’t have to answer this if you don’t feel like it :) thanks!!
hello friend!! i have a tutorial i made on twitter a while ago which is more or less how i make my colours more interesting. i still use the technique and in general it’s just a lot of colour adjustment nothing too special LOL here!!
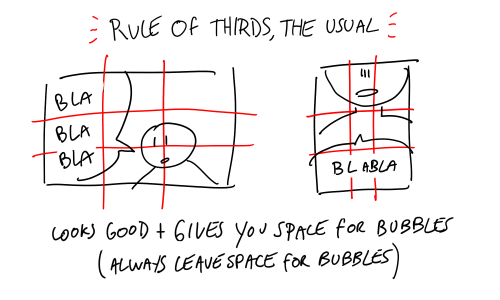
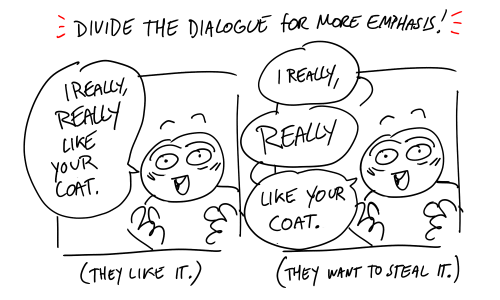
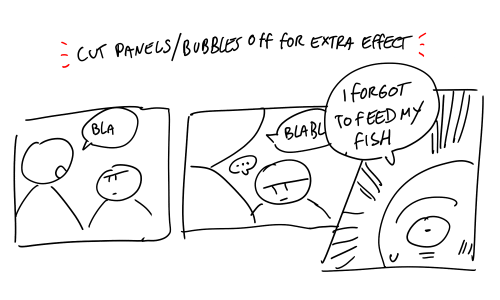
I know you probably get these asks a lot, but I've really been trying to try drawing comic pages. I really admire how free and flowing your style is! I've seen your little tutorials and tips and idk what's wrong but I just can't seem to wrap my head around panel composition? Like I do wonderful painting comps, but I can't seem to break out. Do you have any resources or help to get started?
thank you very much!!!!! im just using this ask as an excuse to draw random comic tips i hope thats okay and that you’ll get something out of it
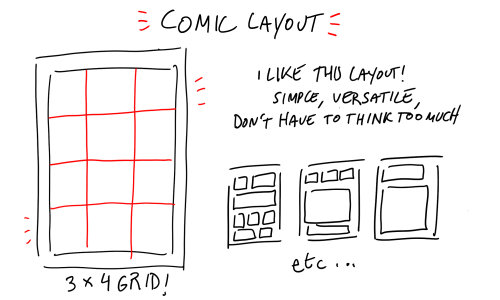

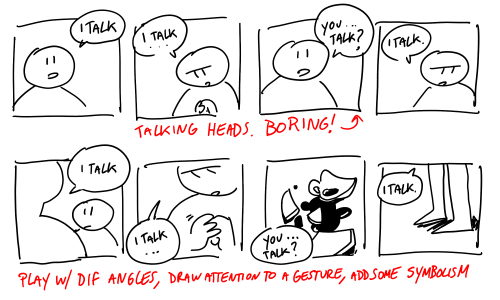
did that help…


@qlaude is so nice & wonderful and asked if i’d share some anatomy tips so how could i refuse!!! this is all stuff that’s still pretty new to me, so it’s really just an explanation of my current learning process. hope it all makes sense though!
Hi mani ! I started to draw recently and not very sure of my talent I want to improve ,got any tips for me ? Have a lovely day ❤💕
Hello~ and thank you, wish you a wonderful day, dear 🌟
I wanna preface this by saying I’m self-taught, so I probably lack so much of the basics, heh. Everything I say here is based on my personal experience!
Love that you’re eager 💪🔥
It’s a fairly wide range, art is, I don’t know what you want to accomplish in it or what to say to guide you in specific terms, but since you came to me I’ll assume that drawing characters is in your list of interest at least, and I’ll gladly give you general pointers to how to go about it— like in your thought process indulging in drawing.
The first and the most important thing about drawing for me is to enjoy it. If you don’t, it’s frustration, and that probably will not encourage you to get better or have you tolerate the tedious parts of it, heh. Enjoy what you do right now, and never worry because the next one will be always better just simply because of practice, e.x. you’d be training your hands to do certain strokes easier and faster and overall shape your ability. I like to show you my first character, the first masterpiece I considered and still it’s counts as one— I enjoyed the fudge of it, I remember how I was proudly making his eyes mixture of lilac and blue.
Medo, the linker of fairies, 14 years apart from newest in 2018

Don’t be intimidated to do what you really want no matter how hard it looks, if you like it enough you’ll be always on the search for a way to execute. Again, by continuance practice, you automatically train yourself and get better at it, rather than just setting it on a stool and considering it above your abilities. It’s as simple as if you don’t start doing it, you won’t get anywhere with it.
Use tons of reference of things you like, don’t be afraid to, you need a base to start. And please be wary of credit rights and so on.
You can draw anywhere, take as long as you like. You don’t have to set a limitation of time and place to do it, I know I have always done so and it never helped me to do much, but if you function in reverse, set yourself a time and prepare the place to do so, set the mood 🌟
Remember that you don’t need to know how to draw everything to make art. That being said; the more you know the better you can deliver the image and form it the way you wanted. So it’s all about choosing what you want to make, really.
Don’t be discouraged by other people’s views of your piece if you did not expect it, if anything they can be a fresher set of eyes that may spot something you have never noticed (Such as me and not noticing drawing Sev in heels, heh). And remember there’s a massive difference between constructive criticism and rudeness when you find yourself confronted with a situation using the term criticism to justify rudeness. Either way, it lies with you to give it real weight, try to always take from them what inspires you to be better💛
Your art process is yours, not the others’. What works for some might not work for others, and there are always other ways to do it and much to explore and find out. You can have a comfort zone and you can step outside it whenever it suits you.
Now to the actual art advice, I can split them into three broad sections: A good structure, need to learn and observe body’s and shape’s anatomy. Understand basic color theories and how to choose what harmonise with each other. And lastly, inspiration! And you can find all your needs in the endless art tutorials online.
Here are random simple artistic tips about characters that I do:
• Try to distinguish your character with basic shapes for their facial features. Example; Juicy has an oval face, square nose, narrow eyes. Severus has a sort of a triangle face and a triangle nose as well. Albus has a square face and a broken arrow nose, and so one. The same goes for the rest of the body parts.

• Color, hot with cold background, cold with hot background! I made an old post about it here. It gives an easy satisfying look to your piece if you try and include the character with the background.

• Just go wild cuz honestly 57% of the time I don’t know what I’m doing, hehehe
I’m sorry if that’s not the thorough answer you looking for and I hope this helps you in any way.

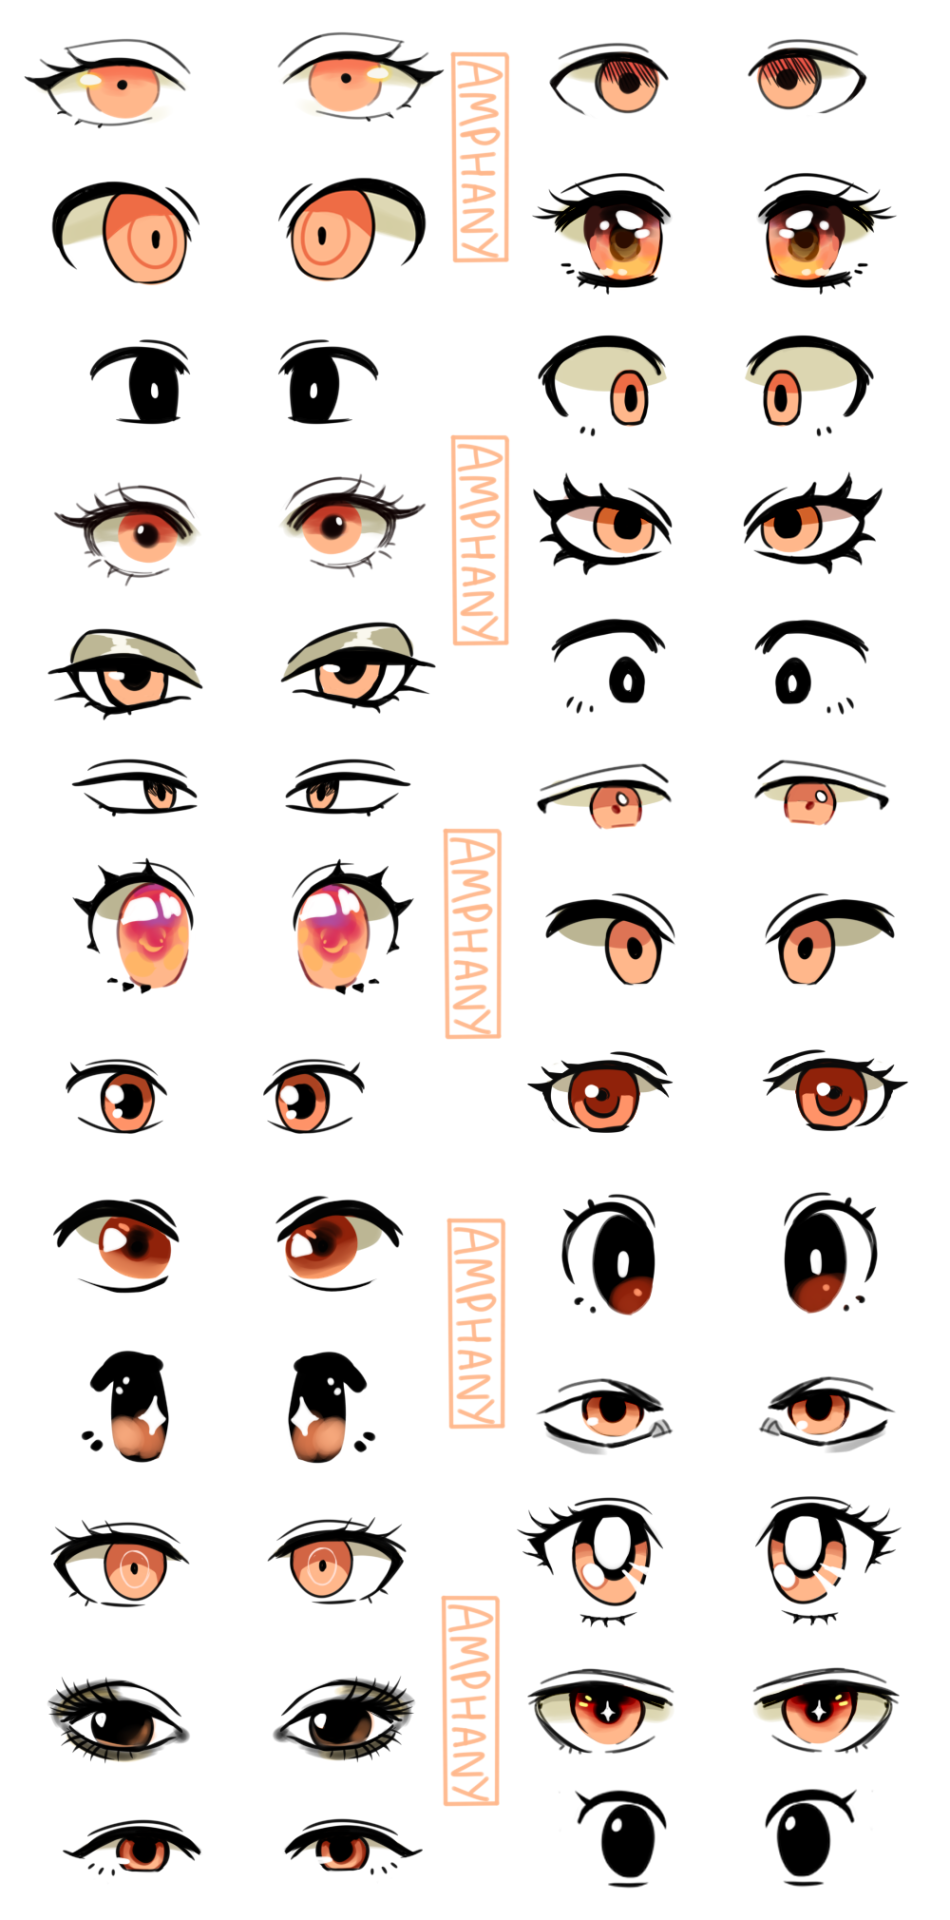
I made a tutorial! I hope it is helpful. Some of the styles of eyes are from Studio Ghibli,Sailor Moon, Pokemon, Dangan Ronpa, Fire Emblem, Ace Attorney.
Please ask me if you have any questions! <3


I would like to make a new bunch of tutorials… I wish I could carry out my intention. Incidentally, It’s going to be “How to draw poses by using gesture drawing method ”,
How do you draw noses?
I’m not sure what specific part you’re wondering about, so here’s a run-through of my process from sketching to painting!
1) The first thing I do is simplify the nose into a few basic shapes to get a prism-like block, like so:

2) I can now easily draw the prism shape in three-dimensional space depending on the angle and rotation of the head.

3) Using the guidelines/planes I can draw a proper nose in any angle! There aren’t many tricks or shortcuts for this step, unfortunately (other than practicing lots). I recommend using references, they’re always helpful :)
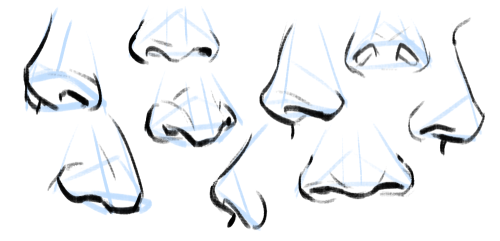
4) Really important to note: all noses vary greatly, especially from different ethnicities! A high-bridge “aristocratic” sort of nose or a ski-slope button nose might be accurate for some people, but definitely not everyone. Compare differences in size, width, a hooked or button nose tip, high or low nose bridge, and so on:

5) Then I paint! I have a skin tone tutorial here, if it helps. Take note of the lighting, skin tone, etc. Here are some things I keep in mind:
For pale skin tones, the nose sometimes has a redder colouration than the rest of the face because of increased blood flow.
The nose also usually has highlights (due to oil). These are located on the tip of the nose, the nostril groove, and where the base of the nose meets the flat area of skin around it!

Hope this helps! In the end, all stylistic choices are completely up to you. Art’s subjective, so feel free to draw any noses you want :)


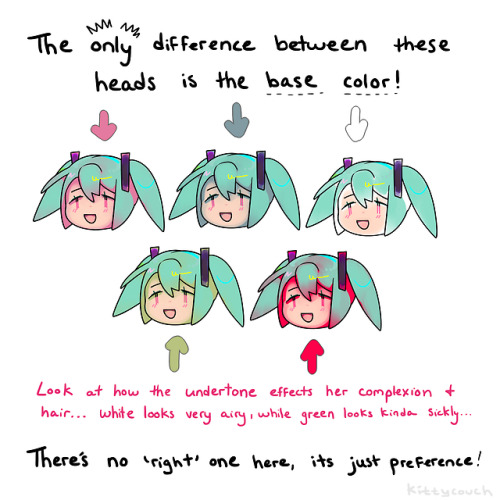

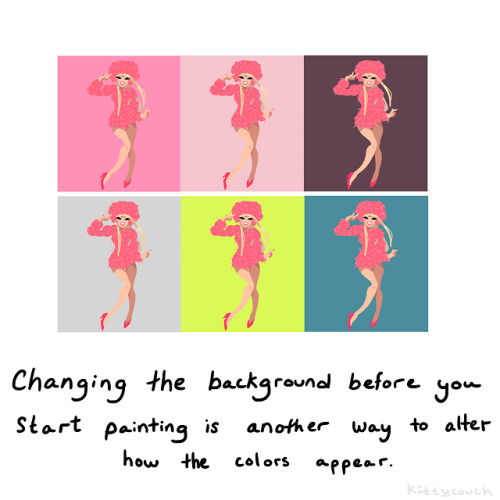
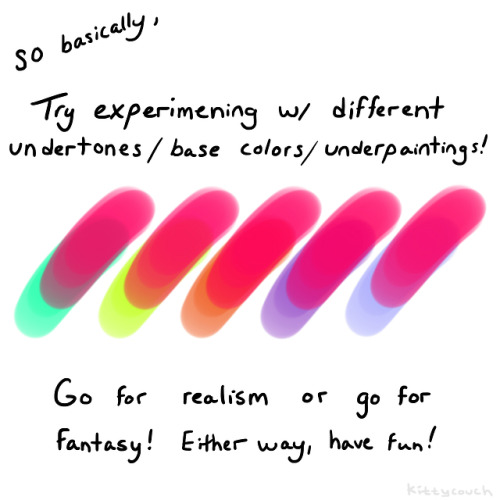
No one asked but here’s a brief tutorial on digital underpainting and how it can add some extra flavor to your art!
(I got asked this a couple times so just to clarify: I used “overlay” in the second slide… but the rest of these examples are JUST painted on, no effects! Try playing with the opacity on your pencil/water/brush tool to allow the base color to show through!)
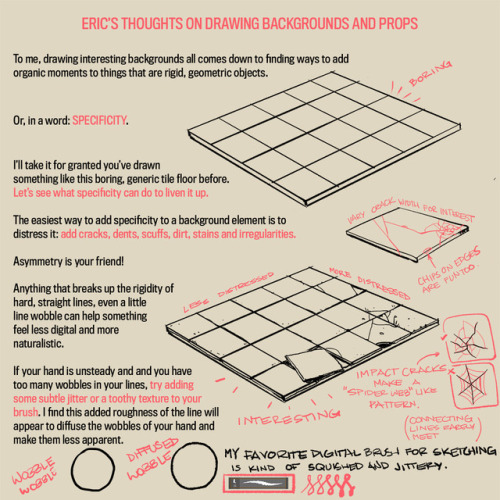
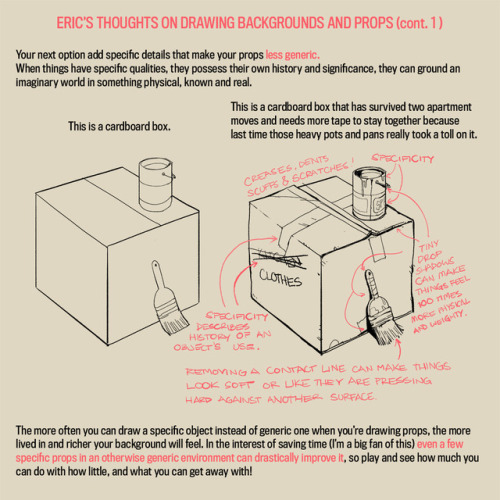
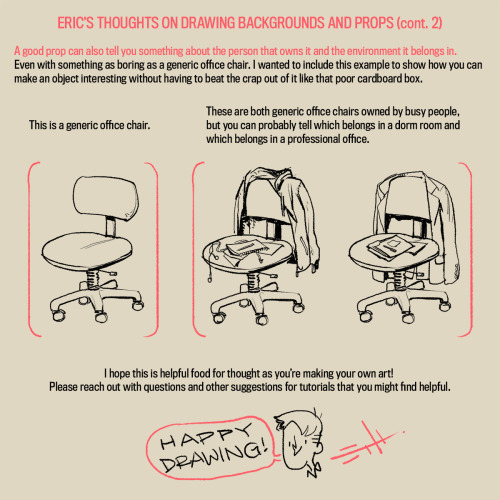
A long time ago an anon asked my thoughts about drawing backgrounds, so I finally got around to putting this together. It’s more prop-centric, but it still represents my philosophy to backgrounds.
I’ll try to do something more about drawing actual background spaces in the future! Please let me know what you think, if anything is unclear, or if you have suggestions for other tutorials you might find helpful!
Hey sorry to bother, tumblr mobile is hot garbage and I was looking for something specific you posted a while back. It was a post with some tips for drawing I think outfits, and I honestly only remember a bit I think you said basically pick where you want more details to be focused?? With example like simple top+detailed bottom and vice versa. Sorry if that's a weird or bothersome ask? U don't gotta answer obv. Maybe I imagined the post or smth. I was just wondering if by chance u could reblog
i couldnt find it either but i think you might mean this stuff


enjoy
How to learn the cyrillic alphabet
The different alphabet often terrifies people who want to study Russian or Bulgarian or whatever language uses this alphabet, and sometimes even makes people choose not to study the language after all.
I know how you feel, it terrified me too when I started studying Bulgarian. But what if I told you that it actually is very easy to learn?
In this post, I’m going to show you how I managed to learn the alphabet in just a day. And trust me, this isn’t one of those impossible “clickbaits” like be fluent in language x in only 3 months. No, learning the cyrillic alphabet in just a day is very realistic.
STEP 1: DOWNLOAD THE CYRILLIC KEYBOARD ON YOUR SMARTPHONE
The very first thing you should do, is downloading the cyrillic keyboard on your smartphone. Why on your phone and not your computer, you ask? Well, the letters on the keyboard of your computer won’t magically change once you’ve set your keyboard to the cyrillic alphabet. You’ll see the cyrillic letters on your screen, but not on the actual keyboard, which makes it harder to use. On your smartphone, you do see the cyrillics on the keyboard, which makes it way easier to learn and use.

The Bulgarian keyboard on an iPhone
STEP 2: GET A CHEAT SHEET AND START MEMORIZING THE ALPHABET
I didn’t use any textbooks or websites to learn the cyrillic alphabet. The only thing I used, was a cheat sheet with the sounds of all the letters.

begin with the letters that are the same as the latin alphabet: a, c, e, k …
once I knew those letters, I memorized the letters that appear in the latin alphabet too, but have a different pronunciation: в, р, у, х …
The last step was to memorize the new letters: я, д, ъ, ц …
STEP 3: READ
Once I memorized the entire alphabet, I started reading a bit. I just went to a random wikipedia page and changed the language to Bulgarian (if you’re learning Russian, it’s better to set it in Russian instead). And then I just tried to read it out loud.
You won’t understand a single word of it, and don’t be afraid, that’s normal. You’re just there to practice reading the alphabet, not to actually gain knowledge on the topic you’re reading.
Don’t expect yourself to read as fluent as in your target language or basically any language that uses the latin alphabet. It will go rather slowly, but that’s normal. When you were 6 and just had learned the latin alphabet, you were a slow reader too. Don’t let this terrify you.
STEP 4: WRITING NAMES
When I was tired of reading, I started writing the names of friends, family members, classmates… and most importantly: my own name. By doing that, you practice your writing skills in the cyrillic alphabet.
I do have to warn you, though: not all names can be written in cyrillic. I noticed that especially French names and names with a W in sometimes can’t be written in the cyrillic alphabet.
Another tip I can give you, is looking for easy words in your target language (like good morning, hello, friend etc.) and trying to write these down. You can for example listen to the first Youtube video of Russianpod101 and try writing the words they are saying down. Afterwards, you can correct them, something you cannot do with the names.
STEP 5: EXERCISE DAILY
The last and probably most important step, is to exercise daily. If you’re going to learn it in 1 day but then stop looking at it for a week, be sure you’ll have forgotten nearly everything. It’s important to repeat at least one of these steps on a daily base.
Good luck with your studies!! If you ever need help, don’t hesitate to contact me! 😄
Hello!! This may be a weird question but I too am heavily interested in birds but unlike you, I cannot draw them as well. :,^( If it's not too much work (if it is just ignore this, i don't mind), do you know of any good references or sources to learn more about birds from facts to anatomy? I know this is a pretty wide range so again, I totally understand if you can't! I just thought it was worth an ask. Thank you so much!!
i don’t really have any specific reference places but here’s some things i do.
drawing birds is arguably one of the hardest animals because of their feathers. unlike fat and fur that folds to the body in a way that’s usually readable to whats underneath, feathers sort of create a ‘bubble’ around the body which makes a lot of body parts indistinguishable to where one ends and another begins. so its important to always think in terms of skeletal anatomy:

birds are dinosaurs and therefore reptiles. looking at birds this way, it’s a lot easier to see their evolution.

with that in mind, say we wanna draw this dude. owls are pretty tough because their outward appearances are so deceiving.

we’ve got a neutral pose, feathers are generously surrounding most of the body so its no sweat, we don’t really know whats going on. but we can hide it. but now we want to make him move and look cool. without really knowing whats going on we might get stuck on something like this:

its always kind of stiff and frustratingly unrealistic. mostly this is because we just don’t have enough knowledge of the skeletal structure to work with. eyeballing anatomy on our first drawing might get something like the left, more than anything people aren’t generous enough with leginess of birds:

owls do indeed have regular proportioned necks with the rest of their bodies. and their skulls are like that of any other stereotypical raptor under their mask of feathers (minus their freaky eye sockets and ears)) they can open their mouths wide just like a hawk or eagle can. it’s important to remember that birds with large wingspans do not magically lose their length when hidden. they are just conveniently folded in against their bodies.
knowing this we can try again. suddenly things seem to click in place more and have a believable-ness to them.

the rule of thumb for most birds is they have less body mass and more leg/neck than one thinks. they are lanky dinosaurs.


when we are looking at this:

we are seeing this:

with that rule, drawing birds becomes a lot less confusing. with practice you might just eyeball their feathered appearances but if not, going back to skeletal/muscle structure gives the base you need to draw convincing birds.

when it comes to specific body parts, the most challenging part for me personally have always been feet. birds with super twiggy feet are easier because one line per toe is easy to get away with. but when you get to birds with meatier feet, especially raptors, it gets difficult. my way of getting around this is to think of the actual ‘feet’ last. drawing each separate toe first gets confusing because you just find yourself trying to get them to each fit evenly together at the base of the foot. one always seems kind of skinnier or fatter than the others in my experiences, and by the time you correct it the gesture gets muddled and lost.

so i just skip that part until later, i draw talon first.

perhaps this is very unorthodox, but just like artists might square in the hands first on a human before working out the arms, i square in the talons to know where i want them before worrying how they go on exactly.

that way we have a clear gesture captured, and in my experience it is much more readable.
thats’ really all i can think of now in terms of my techniques, i hope this helps :V


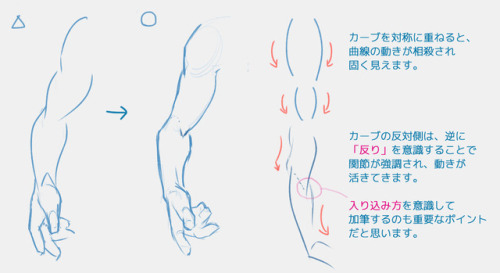
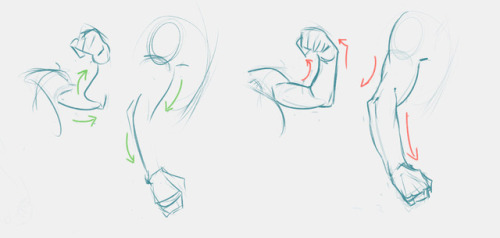
The Back and Spine
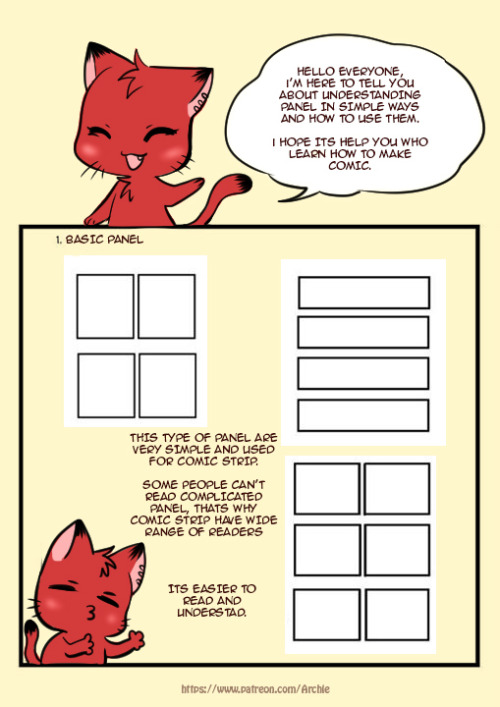
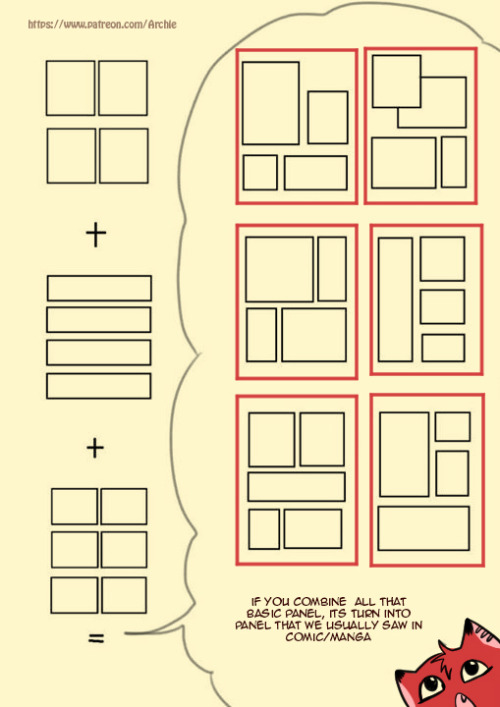
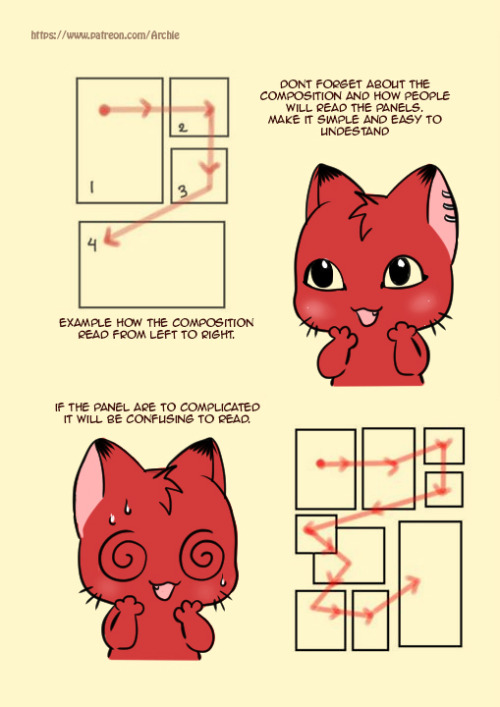

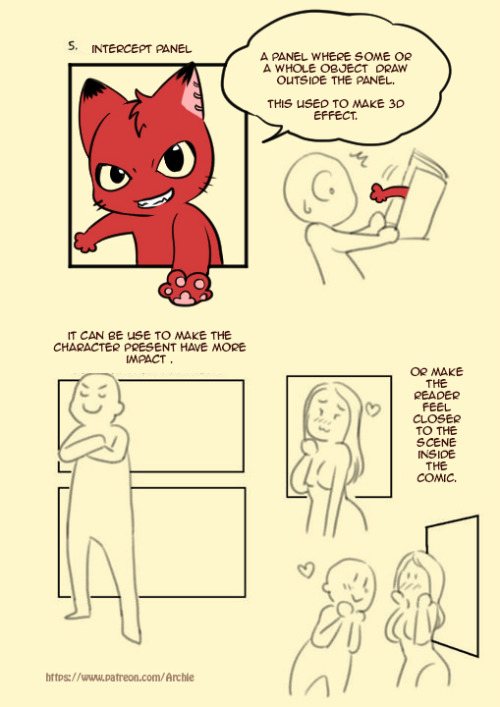
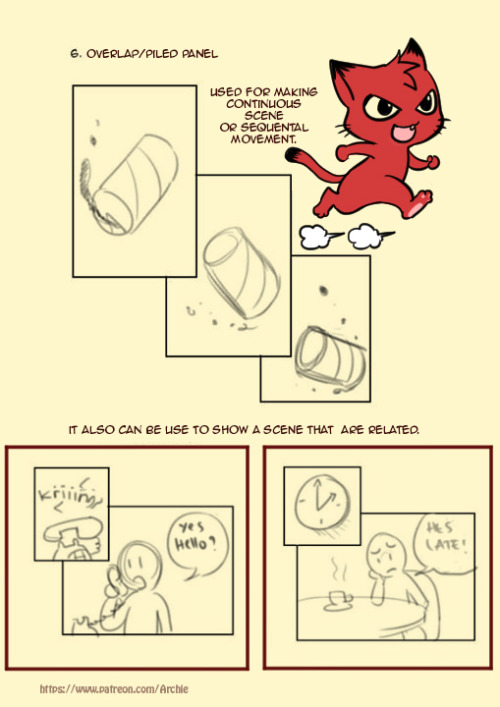
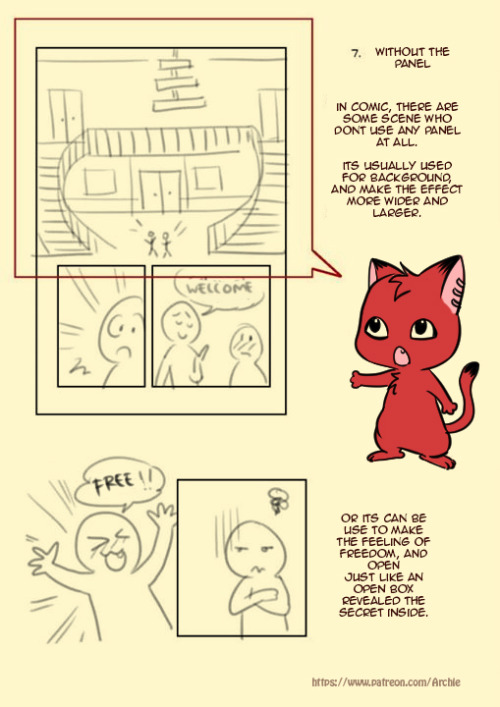
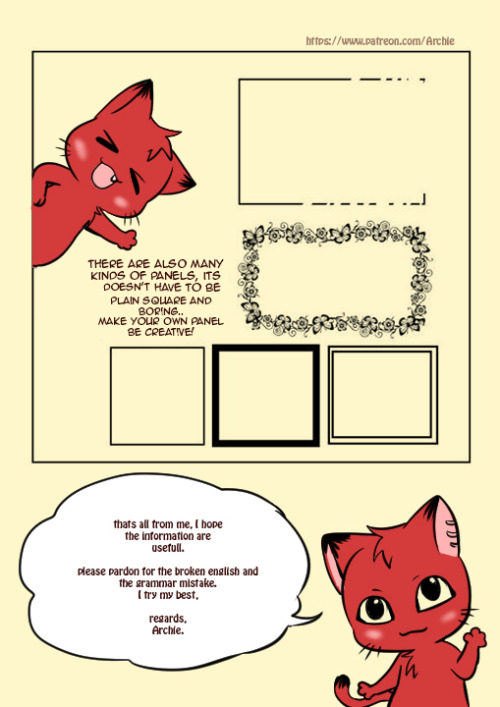
Simple Comic Panel Tutorial
please kindly visit my Gallery
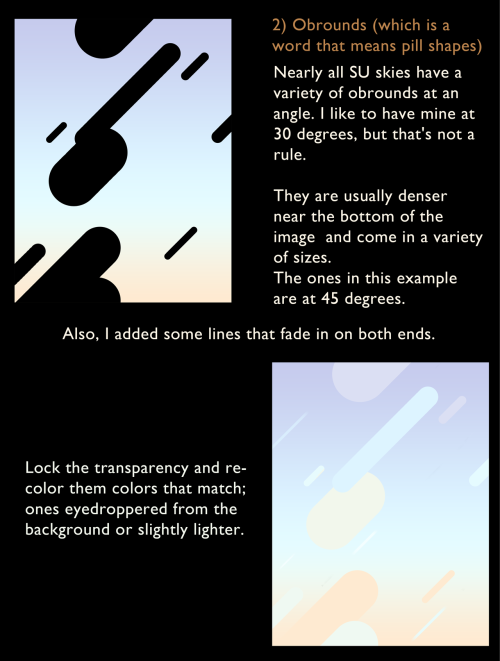
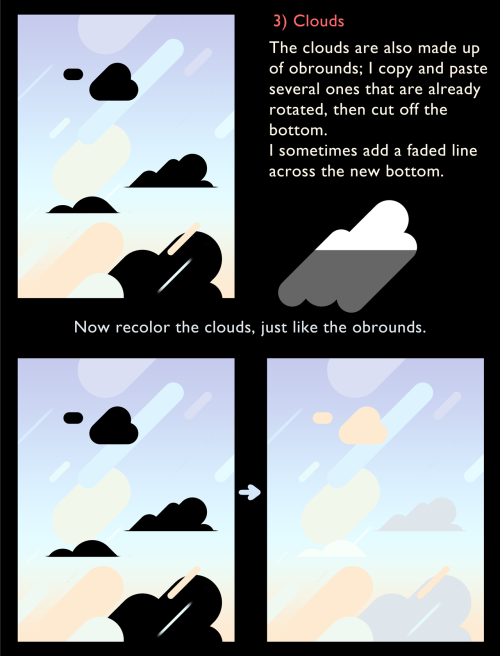
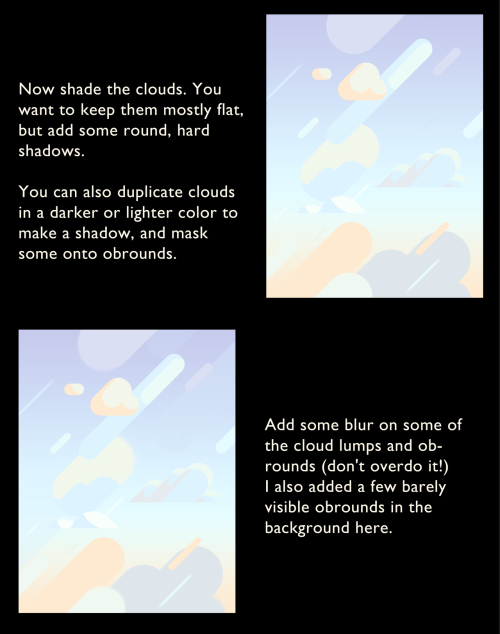
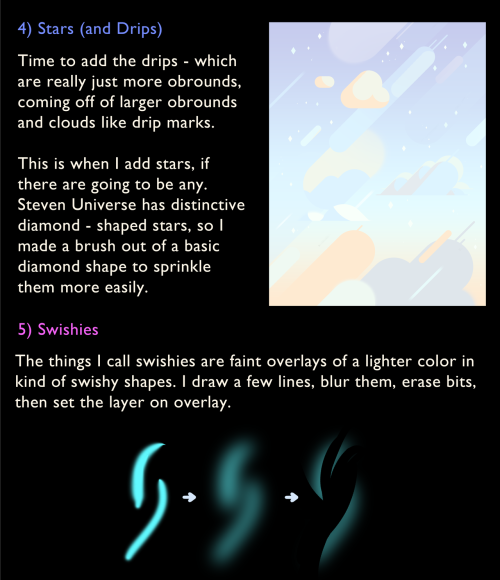
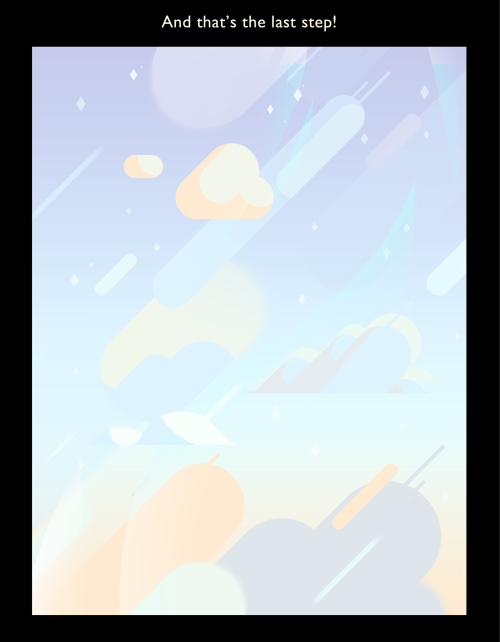
In conclusion, obrounds.
Sorry for the long post (I think it’s most legible in this format but yikes it’s long)
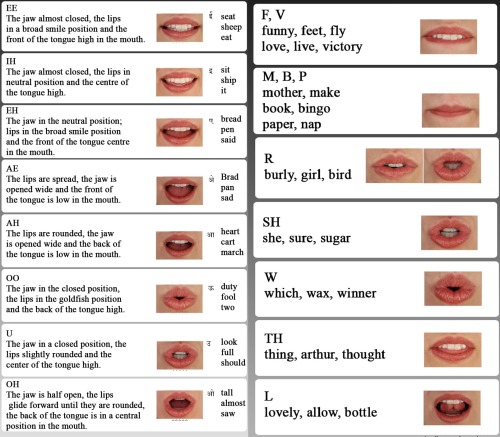
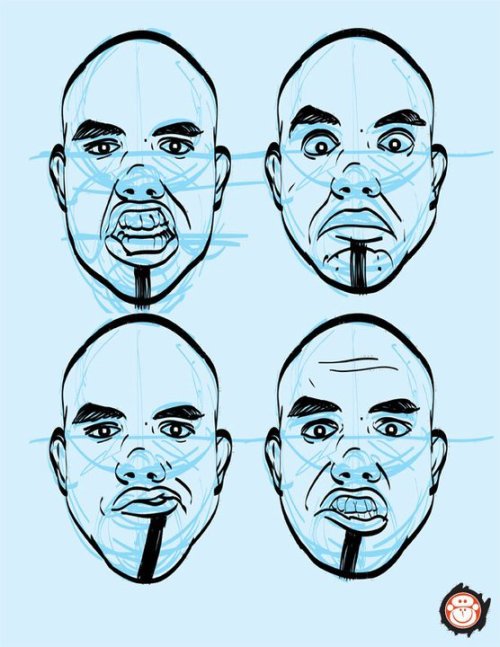
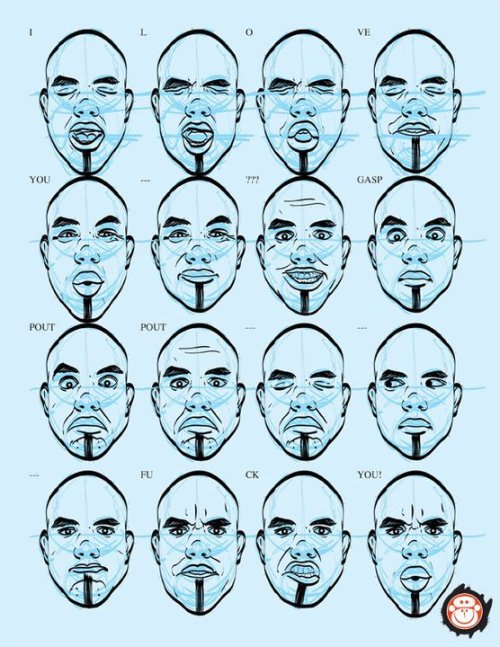
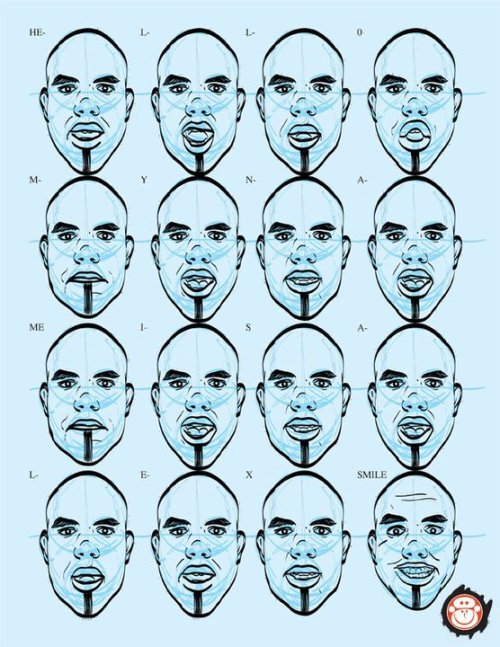
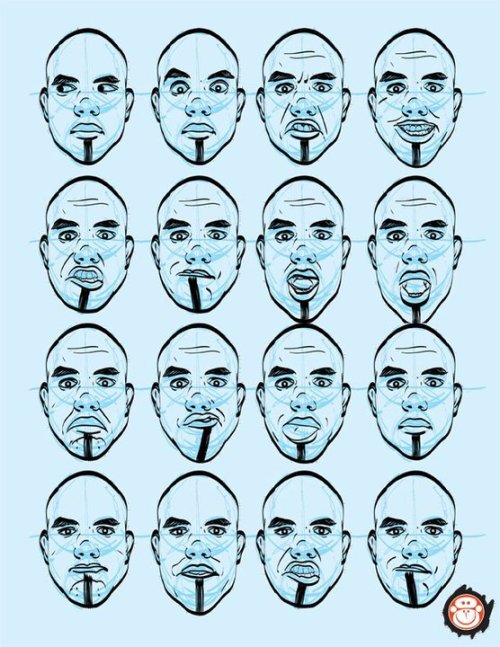
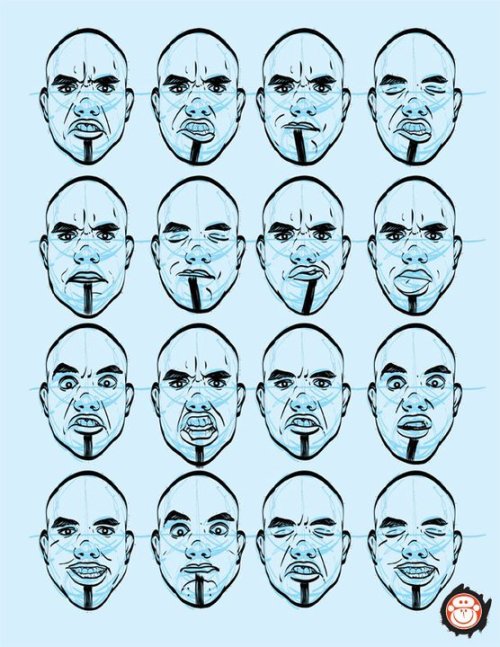
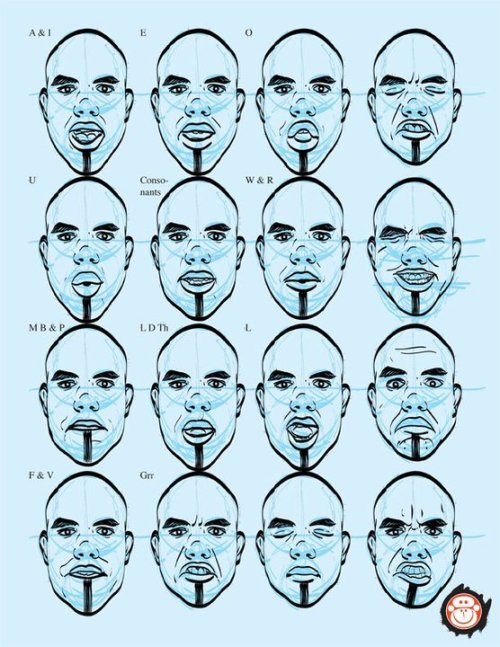
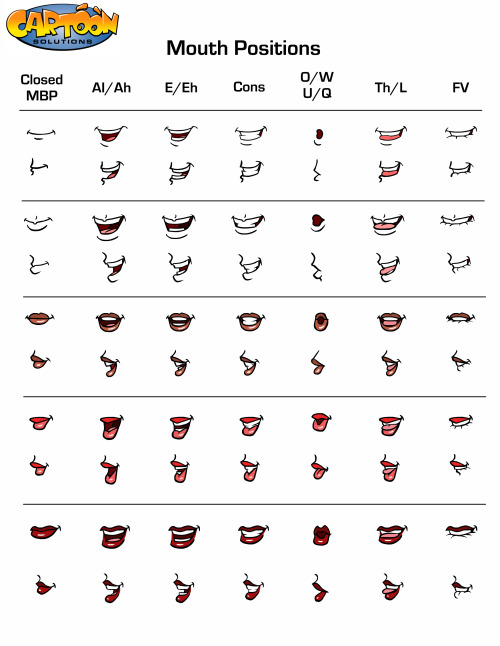
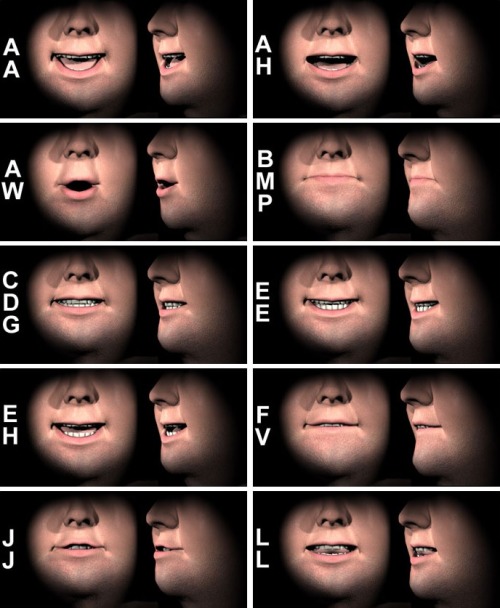
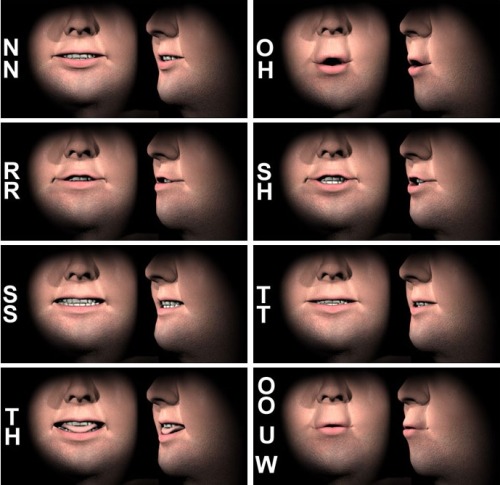
Lip Sync Tutorial Top Image Row 2 - 4 Row 5 Bottom Row
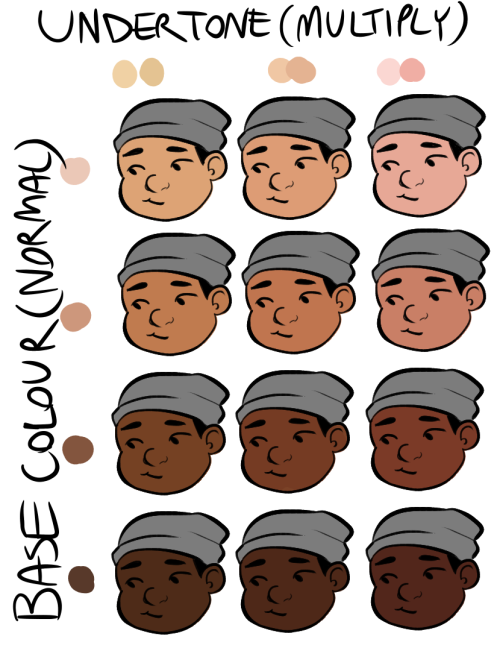
So, you’re planning on drawing characters with certain undertones but you sure don’t want to make some racist yellowface/redface mess. This subject has been touched on a few times, but I figured I’d give my tips to digital artists out there.
Here’s another really quick tutorial from me:
Start with your base colour on a Normal layer.
Open a new layer ontop of it.
On that new layer, use a very pale yellow, orange, pink (or if you want a cool blueish undertone use a slightly purplish light pink) to cover your base skintone with.
Set that new layer to Multiply, and you’re done.
Note: Multiply layers make the colours of the layer underneath it darker, if you’re drawing someone super pale, mess around with an even lighter colour or change the opacity on the layer. Don’t change the layer to Screen or Luminosity, it’ll completely wash out your image.
The undertones in dark skin are a little richer in colour (in fact most yellow undertones in brown skin are more of a golden undertone), so you can make that Multiply colour that’s a darker pastel yellow or red or what have you.
You can also use this trick to show a blush on any skintone as well!

(Though, with blushing, you can’t really blush with dark skin, but if that’s what you want to go for anyways, this trick looks way more natural than random pink circles or lines on top)
And if you want more references on undertones on real people, beauty blogs man. They’re the way to go:
[blog for undertones in pale to light tan skin]
[blog for undertones in tan to dark brown skin]