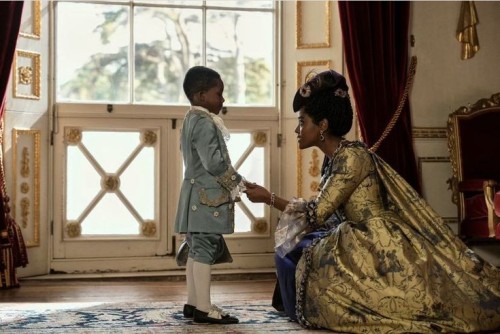
What Is Warding?
Fantasy Guide to Wards and Fostering

I get a lot of asks about wards and recently it's been a FAQ. So here's a quick guide to warding.
What is Warding?
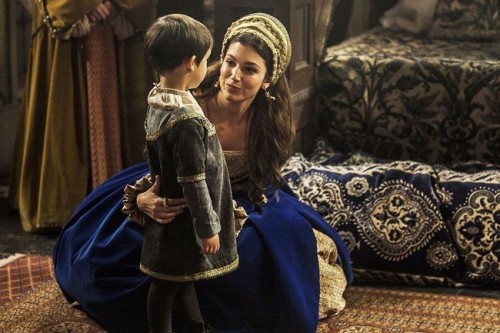
Warding was a tradition in which a noble it royal family would take in a child from another family to their home for the purpose of educating them and preparing them for adulthood or to protect their interests. Warding was seen as a big compliment to the family of the foster child, especially if the family that fosters their child is much higher ranking. However, warding could also be in response to the family's misbehavior and insubordination or in some cases their death. Warding isn't adoption. Warding does not entitle the child to inherit anything. They cannot inherit a place in the succession, they cannot inherit lands or money or titles.
The Ward
The ward was usually a child of a lower ranking family, between the ages of seven to maturity at 16 or so. Wards usually had parents in which case the foster family was charged with the child's physical and educational welfare. The ward could return to their parents at any time either at their insistence or with the blessing of their foster family. Wards were raised alongside the host family's children as well as other wards. They were fed, clothed and educated by their foster family as essentially treated as part of the family. However, wards that come from unfriendly or rebellious families were essentially used as chips for good behaviour. If their parents or kin act up, they could be killed. Wards could also be orphaned. In this case, their foster father would have control their lands and money which is why an overlord would seek to claim warship over a vassal heir to ensure peace. Wards could also be adopted by family.
The Foster Family

The family were nearly always higher ranking and usually had another motive other than charity for taking in the ward. Sometimes the child could be used as collateral against an untrustworthy family or sometimes they were prospective spouses for the family's heirs. It was the responsibility of the foster family to discipline, educate and protect the ward. They would be charged with teaching the ward all the trappings of their position from warfare to statecraft to etiquette.
Wards to Royal families

In some cases, a ward might strike gold and be warded at court by the monarch. Wards would live at court but would be unlikely to be taught the skills by the monarch or Consort personally but would be provided with the best tutors. Wards could be brought in to be companions to the Royal children or in order to ensure their inheritances were not subjected to disputes if they were orphans or again, if their family were likely to commit trouble. Royal wards were always nobility but in some rare and extreme cases they could also be total themselves, usually of displaced and exiled families or as prospective matches to royal children.
Wardship & Women

In some cases, an unmarried woman or a widow could be placed in the protection of an overlord or male relative in order to protective her interests. If a woman was the heir to a grand title or vast fortune and had no father or brother, the monarch or overlord would insist that a male relative or her overlord would take her in lest her claim put her in danger. Usually, it would be up to their host to arrange a match or aid her in brokering one herself.
More Posts from Irolith and Others
Writing Roundup 19.1.2025
First Roundup of 2025 (2025!! seems like waaay too big a number) ‘dumbest version’ finally some writing advice I can get behind My Publishing Journey by Anna Britton Hanging about on Bluesky (a not toxic Twitter alternative) is great because I’m coming across other writers and bloggers! The Rules of Fiction: What They Are and What They’re Not I always like this topic – and here K. M. Weiland…

View On WordPress
Writing a Story from Start to Finish - Guide
I see you guys in the tags and reblogs talking a lot about how you have a desire to write, but have no clue what to write about, or where to even start figuring that out. While starting any project can be incredibly daunting, I wanted to put together a little guide to hopefully make it a bit more accessible. Be warned, this will probably be a long post.
Step 1: Form an idea
All writing begins with this: an idea. Ideas can start as small as an object, or as big as a world or cast of characters. What’s important is that your idea genuinely interests you, and makes you want to explore it more.
There are a million ways to gain inspiration for ideas, but my favourite method is a sort of brainstorm/mind map of all the little and big things you find interesting. Any tropes, characters, places, concepts, objects, animals, other stories, etc. you love—write them down. Then, start connecting the pieces. Each connection is one concept or idea you could explore further.
If this doesn’t work for you, try using some writing prompts or check out 15 ways to spark new ideas.
If you are a planner, proceed to Step 2. If you are a pantser, skip to step 7.
Step 2: Create your Protagonist
Now that you have a sort of concept or inspiration to work off of, you need your main character. There are about as many ways to create characters as there are characters themselves, and each method is going to work better or worse for every writer.
At the barest minimum, all your protagonist needs is a Goal to work towards, a Reason for wanting it, and a Flaw that keeps them from having it right away.
These three things can form a baseline character. Consider what the thing they want, why they want it, and what’s keeping from it says about them as a person.
Rapunzel (from Disney’s Tangled) wants to see the ‘floating lights’ on her birthday. She wants to because she believes she will learn more about herself through seeing them. Her fear over disappointing and disobeying her ‘mother’ keeps her from it.
My favourite character creation technique is actually Here—it takes you through creating character in order to create story.
If that one doesn’t work for you, try this one. It is more focused on defining traits and figuring out the personality of the character first.
Step 3: Your Plot is your Protagonist’s Arc
As stated in the character creation technique I shared in Step 2, character is plot. By that I mean, the character’s journey is the plot of the story. We’re here to see the protagonist transform because of the circumstances incited in the beginning.
So to form a plot, we need to know who the character is at the beginning, and what they need to learn by the end.
Your character’s arc is A but B so C:
A – your character and their flaw
B – The conflict they go through
C – how they change
“Obsessed with success, Jenny Beech works tirelessly to earn the approval of her strict parents and graduate top of her class, but when the new girl in town pulls her into a whole new world of excitement and fun, she must stand up for herself against her impossible standards and learn how to be a teen again.”
This one sentence has everything we need to know about this story and character: “Obsessed with success (character trait/flaw), Jenny Beech works tirelessly to earn the approval of her strict parents and graduate top of her class (goal), but when the new girl in town pulls her into a new world of excitement and fun (conflict), she must stand up for herself against her impossible standards and learn how to be a teen again (change).”
If you have these three things, congratulations! You already have a story. If you’d like, you may begin writing it now (skip to step 8). Or…
Step 4: Theme
I did a whole post on theme you should check out here. Essentially, the big takeaway is that your theme is a lesson to impart to the readers—which means it is not a question, it is an answer.
For the example given above, our theme would likely be something like, “Teens need to balance their additional responsibilities as they mature into young adults with the joy of being young and having fun.” Or, “Friends and a close social network is more important than having the best grades.” Or, “It’s important to take frequent time away from work in order to maintain one’s humanity.” Etc. Etc.
Theme is conveyed through what your characters need to do to succeed (or what they do that causes their failure). If Jenny lets loose and suffers consequences for it in the end, we’re saying that she should have stuck to her studies rather than letting herself have fun. If she lets loose and is rewarded with a greater relationship with herself and her parents, we’re saying that was the correct thing to do.
Step 5: Outlining
Now that we have a plot and a theme, we can outline our story. An outline is like a roadmap of what you’re writing. It can be as specific or broad as you want. My outlines tend to follow this structure, and I improvise the little stuff in between, but if you need to get all your ideas within your outline, that’s good too!
Just make sure your notes make sense to you so when you need to know where to go next, you have a handy tool just for that.
Step 6: Worldbuilding
Worldbuilding is probably where you’ll spend the most time because there’s just so much. However, I also find it one of the most fun parts. The minimal thing you need to know is your world’s normal, and how that normal is disrupted in the inciting incident.
Jenny’s normal is school work and trying to impress her parents. The disruption is the new girl in town.
Rapunzel’s normal is the tower and her hobbies. The disruption is Flynn breaking in.
I did a more in-depth post on worldbuilding here, but the basics is just ask questions, explore consequences, and do plenty of research.
Which brings us to…
Step 7: Research
This can also be done after your first draft, but can’t be skipped entirely. It’s important when trying to convey experiences that may not be wholly your own, or unique perspectives, that you understand the context behind those things in the real world.
Once again, ask questions, talk to people, and remain open to what you find.
Step 8: We can start writing now
Now that you have all your planning ducks in a row (or have a good inspiration to jump from) it’s time to start writing! Either go from the outline you built, or just try out scenes. I have some tips for actually writing the dang thing that I’ll put here:
Let me know how your writing goes, good luck!
Scene Transitions
Transitioning between scenes is something that you’ll have to do a lot. A good scene transition blends seamlessly into the next so we hardly notice it occurring—or it stands out in order to heighten an emotional impact.
I remember teachers saying, “transitions should blend seamlessly” to me in school without ever explaining how to do that, or what it looks like. The good news is, you’ve probably read so many books and consumed so much media that you’re already subconsciously transitioning your scenes. If you’re struggling, though, here’s what to watch out for:
1. The emotion ends off and begins at the same place.
This isn’t necessarily a hard rule, but it certainly helps maintain a sort of flow to the work, and asks a lot less from your readers than putting them through an emotional rollercoaster. This counts whether it’s transitioning from the same POV or different ones.
For example, if your character is being chased by the police and the scene cuts off without knowing what happens to them, the next scene needs to begin in this heightened sense of urgency and anxiety.
However, if your character is being chased by police and dives unnoticed into their hideout, the next scene should begin within this sense of relief. From here, you can take it wherever you want—just maintain a consistency between chapter cuts, POVs, or other time/place skips.
2. Finish what you start
Unless you’re intentionally keeping the audience in the dark about something (which would require at least some acknowledgement that there are answers, they just aren’t being revealed), you should finish what one scene starts.
Say your previous chapter ends off with the character finally reaching the end of the line for the super scary haunted house attraction. The next should probably begin with them getting to enter the house. If it begins the next day, we’ll be so caught up in the missing time and the obvious lack of answers surrounding the haunted house it’ll take us completely out of the scene and make a notable cut.
An example of a story that does this notable cut really well is ‘A Face Like Glass’ by Frances Hardinge, in which nearing the end, Hardinge inserts a page that playfully acknowledges the complete jump in time and space without revealing anything to the readers about why it’s there, leaving them to discover later on what occurred in that space.
I wish I could quote it exactly but I don’t have the book with me. If anyone does, please reblog this with the page! You’ll know the one I’m talking about.
3. Keep it the same
Don’t switch to a new POV in the middle of the story when you’ve never seen it before unless intentionally making a point. Do transition your scenes however you’d like, but maintain consistency throughout the story. That way, if you ever need to make a point, you can break all the rules you’ve followed to really hammer home the impact.
Good luck!
Writing Reference: Parts of a Castle

Arrow slits - Defenders could fire arrows out, but attackers could not shoot in through these narrow holes.
Banners - Showed the symbol of the lord and his king.
Battlements - Defenders standing here could bombard attackers while staying sheltered.
Blacksmith - Skilled metalworkers provided armor, weapons, and other equipment.
Curtain wall - Thick stone walls kept the castle’s inhabitants safe from attack.
Drawbridge - This wooden bridge could be raised to cut off access to the gate.
Dungeon - Prisoners could be locked away underground, with no hope of escape.
Entranceway - A single narrow entrance meant attackers could only approach one at a time.
Gardens - Grew vegetables to eat in case of siege.
Gatehouse - The castle entrance was heavily defended. It was often built as a narrow tunnel with wood or iron gates at either end. Holes in the ceiling (murder holes) could be used to pour boiling oil or water on attackers in the tunnel.
Gatehouse towers - Towers on either side of the gatehouse allowed defenders to rain arrows, stones, or boiling water on anyone attacking.
Great hall - The feasting room, where the lord would hold banquets for his knights and guests.
Lord’s chambers - The lord and his family had private rooms in the strongest part of the castle, known as the solar.
Moat - Cut into the rock and often filled by diverting a nearby stream, the moat kept attackers away from the walls.
Postern gate - A side door acted as an emergency exit in case the castle was ever conquered.
Towers - Circular towers allowed defenders to fire arrows in any direction.
During peacetime, a castle was home to the lord, his family and servants, and guards known as men-at-arms. Many castles were like little villages inside, with kitchens, blacksmiths, gardens, stables, and a chapel. If they were attacked, the people inside had everything they needed to survive until help came.
Source ⚜ Writing Notes & References More References: Medieval Period ⚜ Worldbuilding ⚜ Plot ⚜ Character
if you're feeling powerless right now—and god knows I am—here's a reminder you can donate to the National Network of Abortion Funds, the Trans Law Center, Gaza Soup Kitchen, the Palestine Children's Relief Fund, and hundreds of other charities that will work to mitigate the damage that has been and will continue to be inflicted
life continues. we still have the capacity to do good, important work. that matters
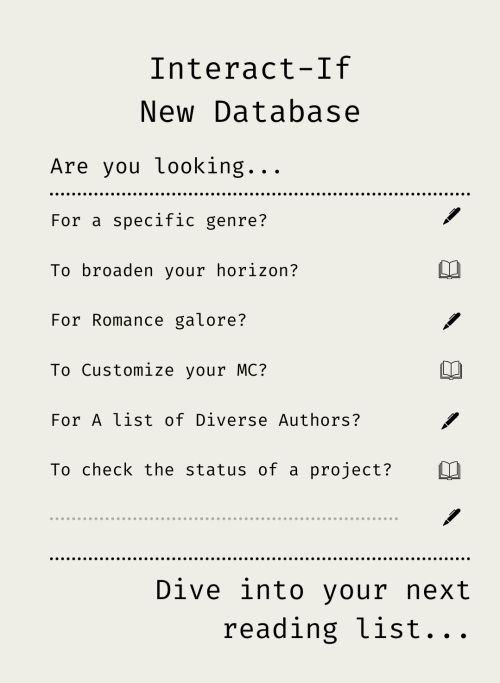
After months of collecting, compiling and formatting, we are finally unveiling our biggest project to date:
INTRODUCING: The Interact-IF Database
In an effort to help readers find games and WIP projects following a certain tag, genre, theme or level of customization, as well as finding diverse authors of a variety of identities, we have created a database of primarily Tumblr-based IF projects!
This list has been put together with the help of the authors of the featured projects, who have provided us with information about their games. It will be updated regularly by the mods of this Tumblr.
Are you a reader looking for your next read?
Head over on to our list [link].
The projects on this database are in compliance with our FAQ and Guidelines. We reserve the right to not include entries sent by authors if their projects do not follow said guidelines.
Are you an IF author/dev wanting to share your project?
• You can fill in this form [link].
Are you the author of one of the projects and found an error?
• Let us know through this form [link].
Do you have questions about our database?
• Head over to our Database FAQ first to see if we provided an answer for it. You can always send us an ask otherwise.
If you are an author of a playable project (WIP or completed), you should also consider adding it to the IFDB, the Interactive Fiction Database.

This was supposed to be up last night but I crashed... and forgot to press post/publish.
The 100 85% Good Twine SugarCube Guide!
NOTE: This is a currently Pre-Release of the Guide. This means it may contains typos, broken links, and wonky formatting. Edit will be made for improvement/corrections, as well as adding more content.
This SugarCube Guide was create as an alternative to the official documentation, providing a comprehensive and wide look of over the use of Twine, particularly the SugarCube format.
The Guide is compartmentalised in (currently) four categories:
The Basics: or the absolute basics to start with SugarCube
The Basics+: adding interactivity, and creating a fully rounded IF game
Intermediate Use: adding more customisation and complex code
Advanced More (incomplete): the most complex macros and APIs
Each category explains a multitude of aspects of the format, tailored to a specific level of the user.
If something is unclear, you found a mistake, you would like more examples in the guide, or would like a feature covered, let me know!
The Guide currently covers all macros (as of SugarCube v.2.36.1*), most functions and methods, and some API. It touches upon the use of HTML, CSS, JavaScript and jQuery. *In case of format update, this Guide will make relevant edits.
The Guides also provides a list of further resources, for the different coding languages.
When completed, this guide will be available in a downloadable form.
THE GUIDE!
smartdraw.com - A cool website I found!
I wanted to do a blueprint of a scene and searched for a free online tool. This website has more than just house plans and mind maps, and I think it could really come in handy if you want to make some settings more approachable.


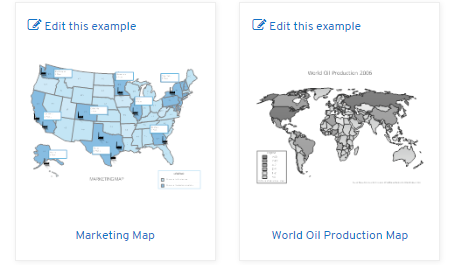
You can choose to start from scratch or use one of the many templates. The latter is probably easier in the beginning, to try out the different ways to arrange and color the objects. After getting used to the interface (it is similar to PowerPoint) you can use the result as a way to plan your scenes or give your readers a visual aid to follow the plot.
The symbols (or rather objects) for the floor plans, timelines, family trees, crime scenes etc. are sorted in many subcategories, e.g. Floor Plans -> Furniture -> Kitchen. No matter which type of diagram you pick, you can also use the objects from the others, so if you want an endoplasmic reticulum in your bathroom blueprint, go for it.

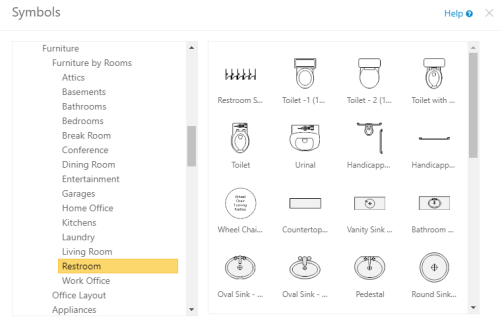
I think that for whump purposes you should especially check out the Crime Scene category for blood, drugs, weapons and so on.
I do have to say that I experienced some bugs and long loading time, but that could just be my ancient computer going wild. Also, the graphics are certainly not the prettiest. As someone who would have had to draw everything themself instead, it's still a great option.
TLDR: It's like Picrew but for locations.
So... I found this and now it keeps coming to mind. You hear about "life-changing writing advice" all the time and usually its really not—but honestly this is it man.
I'm going to try it.

Interactive Fiction - Twine Resource Megalist
This Resource Megalist is intended to centralise the resources for the IF Tumblr community to create Interactive Fiction with Twine. While most will focus on the Twine formats, other useful resources will be included.
I don’t know much about other Interactive Fiction programs or format aside from Twine. Even then, I tend to only use Sugarcube. Though this list may try to cover all Twine formats in its resources, my bias for the SugarCube format will be obvious.
If you have a resource I should include, send it to me and I’ll add it !
Official Twine Links
Official Website : Twinery (you can download Twine or use it online) Official Discord: Twine Games, the creators of Twine and most formats, as well as Twine wizard hang out there to help. Official Reddit: Twine Games, answers Twine related questions too.
Twine Formats
Harlowe: Current version: 3.3.3 Repository, Documentation. Creator: Leon Arnott
SugarCube: Current version 2.36.1 Repository, Documentation. Creator: Thomas M. Edwards/TheMadExile/TME (Patreon - KoFi) also created the Tweego Compiler (all format).
Chapbook: Current version 1.2.2 Repository, Documentation. Creator: Chris Klimas (Patreon), who also created Twine!
Snowman: Current version 2.0.2 Repository, Documentation. Creator: Chris Klimas, but currently maintained by Dan Cox.
Many other formats have been created for Twine, and a non-exhaustive list can be found on this page. Please note that some formats may not be complete or available anymore.
Aside from Tweego, there are also other compilers. A non exhaustive list can be found here.
Forums and Guides
The Twine website has a guide to help with the Twine interface here, as well as Cookbook to help you choose the format you may want to use. The Cookbook includes explanation and tutorials on the ways the different formats operate. There is also the old Twinery Forum where many questions were solved before it closed in 2017 and the Twine Q&A (similar fate). Please note: Due to the Forum closure and the lack of update for the Cookbook, some examples/code may be out of date (though the logic may still be good).
If you are looking for a Forum style-community for help (or discuss Twine), you should go instead to the IntFiction Forum!
Other Guides, Tutorials and Communities
The documentation for each formats may still not be quite easy to get, as it often use very technical description. Below are some guides and tutorials with maybe easier explanations. There might be more (please let me know!).
Guides and Tutorials non-official
YouTube Channels:
Dan Cox
Adam Hammond
Yi Weng
Note: The Twine interface changed in 2022, some aspects of these tutorial may be outdated.
Written Guides:
The 100% Good Twine SugarCube Guide by @manonamora-if (me), includes all SugarCube macros and more.
The Twine Grimoires (Harlowe and SugarCube - focus on visual) by @gcbaccaris (Patreon)
Introduction to Twine (Harlowe 2.1)
Interactive, Nonlinear Stories and Guided Interviews with Twine by the UVic Libraries
Narroscope Chapbook Talk
Kira’s SugarCube Guide (code)
@townofcrosshollow SugarCube Beginner Tutorial & Tutorial 1.02
Guide for ChoiceScript to Sugarcube/Twee Transition by @manonamora-if
Tumblr coders
Below is a list of IF creators using Twine and having created tutorials/answered asks. Please check the creator’s FAQ before sending an ask/contacting them. There might be coders for other formats making tutorials, but I do not know of them.
SugarCube
@manonamora-if : I have #coding support masterlist
@idrellegames also answered a lot of Twine questions over the years (coding asks) (Patreon - Ko-Fi) Note: she does not currently take new coding asks.
@cerberus-writes answered asks here. (Ko-Fi)
@nyehilismwriting has a coding tag. (Patreon - Ko-Fi)
@townofcrosshollow made some tutorials too.
@ramonag-if Tutorials (Patreon - Ko-Fi)
@outoftheblue-if coding/tutorials posts (Ko-Fi)
@larkin-if has started making tutorials (Ko-Fi - Patreon)
Harlowe:
@heart-forge used to answer asks. (Ko-Fi)
Coding Communities
Below you will find Discord servers focused on coding with Twine or Interactive Fiction where you can ask question. I am sure there are others Discords or Forums out there (especially with other languages) !
Decoding Twine Discord - run by multiple IF Creators on Tumblr.
Interact-If Discord - mainly an IF discord, but coding questions can be asked there too.
Fiction Intéractive - similarly to the one above, this one is mainly an IF community but Francophone.
Other Twine Resources
Custom Macro (GitHub + Patreon/Kofi links)
There are A LOT of people who created custom macros for Twine (SugarCube especially).
SugarCube:
Official Add-ons
Akjosch (GitHub) : Modules
Chapel (Website - GitHub - Ko-Fi): Macros.
Cycy (GitHub) Macros. Also created the T3LT extension for VSCode (syntax highlighter and macro checker-ish)
Greyelf (Forum + Forum) : Harlowe style animations + Right-Sidebar
Gwen (GitHub) Macros.
HiEv (Patreon): Macros, Inventory System
Hituro (GitHub - Website): Macros (+ Gordian/Paloma Format)
Hogart (GitHub) Macros.
Maliface (GitHub - Ko-Fi) Macros
Mike Westhad (GitHub) Macros and some StyleSheets
SleepyFool (GitHub) Macros
SjoerdHekking (GitHub - Patreon) Macros.
TME (GitHub) : Language Setting
Harlowe:
Chapel: Audio Library, Macro API
Inventory System
Greyelf (Forum + Forum): CSS styles
Templates (Visual or Code)
Note: I have not tested all of these below.
SugarCube
100% Good Twine Sugarcube Templates by @manonamora-if (3 Visual, 1 Setting Code)
Sugarcube Template & Twine - Sugarcube Template by @nyehilismwriting (Visual)
twine sugarcube template by @cerberus-writes (Visual)
ChoiceScript-like SugarCube template (code for copy-pasting) by brushmen (Visual & Code)
Twine/Sugarcube 2 Template by @innerdemons-if (Visual)
Fallen London Twine Template by thesharkwrites (Visual)
Tutorial: Coding Pronouns and Verbs in Twine SugarCube by Sylveranty (Code)
Twine Template and Twine Template II by @outoftheblue-if (Visual)
Simple Visual Novel Template for Twine by Sun Labyrinth (Visual)
PC98 Layout for Twine by fia glas (Visual)
A Quick Guide to Character Pages by @gamesbyalbie (Code)
Coding Pronouns and Verbs by @sylveranty (Code)
Harlowe:
Twine 2 (Harlowe) CSS Pack #1 by Candy✩Giants (Visual)
Custom Pronouns - Twine Tutorial by chewiethedoggo (Code)
Gender Inclusive Twine 2 Harlowe Code Tutorial by autistmouse (Code)
Harlowe Stylesheet (Github, Visual)
Twine 1:
Twine Texting Project by shindigs (Visual & Code)
Other Twine Resources
Tweego
Tweego Installer from Chapel
Ready-To-Use Tweego Folder + Guide by @manonamora-if
Other
Turning a Twine Game into a Google App
Interact-If Twine Resources Tag (you may find some of the resources above there) : #twine #twine resources #twine templates
Other Coding/IF Resources
Knowing a bit about other coding languages can help you with customising the visual or the gameplay of the project. CSS/HTML are most helpful when understanding templates or how to build/edit the visual size; JavaScript for the gameplay/animation.
W3Schools is more accessible to new users and the explications tend to be easier to understand overall. However, MDN is thought to have the superior code and will let you know more easily if a code/rule is compatible between browsers. Both websites will include explanation for JavaScript, HTML and CSS.
If you want to learn JavaScript, you may want to start on this website.
Accessibility Resources
An important point that should be included is how to make your project accessible (for screen-readers, colour-blind, visual sensitive, etc…). While the way Twine/Tweego compiles the project into an HTML file already takes some of these into account (especially for screen-reader use), but the way one codes may hinder this accessibility.
Colour Contrast Check
ARIA-rules (used by Twine)
Firefox Accessibility Inspector
Game Accessibility Guidelines
Misc Stuff
Codepen is useful to test HTML/CSS/JavaScript. There are also some cool code out there (but edits are required to work on Twine).
Pattern of CYOA Games is more of an IF Planning resource than a coding one, but is always useful to have.
Interact-If has also reblogged some resources (see the Platform Ref Tag Subsection).
~~~~~~~~~~~~
Again, this list is non-exhaustive. I’ve only added what I know/have seen around the internet. If you have Twine resources not included in this post, please let me know so I can add it.
If I have forgotten Patreon/Ko-Fi links for any of the people mentioned above, please let me know ask well!
-
 jupiteronline liked this · 1 month ago
 -
 spiced-autumn-breeze liked this · 1 month ago
 -
 eternalpapercuts liked this · 1 month ago
 -
 theglassesgirl liked this · 1 month ago
 -
 illbeokayadmiringfromafar liked this · 1 month ago
 -
 skippypalooza liked this · 1 month ago
 -
 whateverthought liked this · 1 month ago
 -
 shadowcatgirl09 reblogged this · 1 month ago
 -
 rararamamaaaaa liked this · 1 month ago
 -
 honey-bags liked this · 1 month ago
 -
 summercampgrandma liked this · 1 month ago
 -
 caiahcries liked this · 2 months ago
 -
 my---writing---blog reblogged this · 2 months ago
 -
 edarfly liked this · 2 months ago
 -
 thenightwemet17 liked this · 2 months ago
 -
 kus0mar liked this · 2 months ago
 -
 lacreni liked this · 2 months ago
 -
 dangerousfellowsstuff liked this · 2 months ago
 -
 rhaenyraloversblog liked this · 2 months ago
 -
 luckyicekitsune liked this · 2 months ago
 -
 teal-blue-genesis liked this · 2 months ago
 -
 tiniestapocalypse reblogged this · 3 months ago
 -
 octtavo reblogged this · 3 months ago
 -
 iamcautiouslyoptimistic reblogged this · 3 months ago
 -
iamcautiouslyoptimistic liked this · 3 months ago
-
 ouraniaathenais liked this · 3 months ago
 -
 faeriebullshit liked this · 3 months ago
 -
 teenagetreeherringparty liked this · 3 months ago
 -
 foreverlife98 liked this · 3 months ago
 -
 blurpsiee liked this · 3 months ago
 -
 underworldpomegranate liked this · 3 months ago
 -
 athroneoflightning liked this · 3 months ago
 -
the13thhourglass liked this · 3 months ago
-
 rumpleflumpsky liked this · 3 months ago
 -
 midnight-the-conqueror liked this · 4 months ago
 -
 kirrarae liked this · 4 months ago
 -
 sleeplessduckdragon liked this · 4 months ago
 -
 ptalomaios liked this · 4 months ago
 -
 amazingfandommomarch liked this · 4 months ago
 -
 wynters-writings liked this · 4 months ago
 -
 notanoppossum176 liked this · 4 months ago
 -
 pureaustralianhoney liked this · 4 months ago
 -
 llamaadg liked this · 4 months ago
 -
 winter-writer912 liked this · 4 months ago
 -
 thesaltysagittarious reblogged this · 5 months ago
 -
thesaltysagittarious liked this · 5 months ago
-
 raynethescribe reblogged this · 5 months ago
 -
 asingledropofwinter liked this · 5 months ago
 -
 galaxii-diamond liked this · 5 months ago
 -
 kaylee-hates-kaleleaves reblogged this · 5 months ago
