So You Want To Write A Deaf/HoH Character
So you want to write a deaf/HoH character

Photo © Durgesh Kumar, all rights reserved
Admittedly, this isn’t something I’ve done myself. I’ve never written a deaf or hard of hearing character, but I’ve had people ask in a Discord server I’m in “hey, does anyone have any resources on how to write a character that is deaf or hard of hearing?” and I took the chance to find some resources for them – ones that turned out to be pretty valuable, and that I want to share here.
I love when people include disabilities in their writing, whether visible or invisible. To me, it makes the characters feel more alive and adds another layer of depth to who they are as a person, even though they’re… not real. Adding that aspect to characters gives something for a group of readers to relate to, and can help them feel seen where they might not be seen otherwise.
It can be difficult to write about a disability that you yourself have never experienced, and with the fact that you haven’t experienced said disability is something that can lead to stigmas and stereotypes that aren’t necessarily accurate, especially if you’ve only viewed what outside media has shown you, or what you’ve observed in public settings. Research is so important for topics like this, especially to find resources from people who do experience it on a daily basis, whether it’s something that has developed over time, or something that they were born with.
Without further ado, the resources I’ve discovered.
https://www.tfrohock.com/blog/2016/9/12/writing-deaf-characters - this blog by T. Frohock is very to the point. She begins by saying she doesn’t normally write “how-to’s”, but this one is an exception, and works to provide her own experiences, open about the fact she uses a cochlear implant to hear those around her – or not hear, if she chooses to “turn you off” in her “about” on her blog. She gives a short overview of types of hearing loss, and communication, and also recommends reaching out to an audiologist to learn more about the types of hearing loss. She also gives two links to .org websites if you’re looking for sources. She’s also written two companion pieces to this initial post. The first one is for hearing authors, and the second is about sensitivity readers. I’ve linked both of these in this section, so check them out as well if you’d like a more in-depth look at T. Frohock’s advice.
https://www.sfwa.org/2021/03/23/how-to-write-deaf-or-hard-of-hearing-characters/ - this post by Melanie Ashford on the sfwa website gives a good guide on how to approach deaf/hoh characters. Melanie herself is a hard of hearing author, so her advice is profound and solid, as she is a primary source on how to approach writing these characters. She makes a point in her introduction to say she’s been using hearing aids for 4 years (at the time of posting the article in 2021) and reminds the reader that everyone experiences hearing loss differently, and has different feelings about auditory assistance devices, such as the cochlear implants and how many people in the Deaf community believe them to be controversial and unwanted. She references the social stigma surrounding the Deaf community, and also reminds the reader that deaf characters should be just as well rounded as hearing ones. Though her article isn’t in depth, it’s a great guideline to follow.
https://www.tumblr.com/concerningwolves/168567651639/writing-deaf-characters-speech-is-speech - tumblr user concerningwolves posted this in 2017, and with more than 19,000 likes and nearly 14,000 reblogs, it’s a valuable resource for those who want to write HoH characters. Though a tad aggressive, concerningwolves makes it a point to be, well, to the point and separates their post into two separate posts. I’ve yet to find the second one, and honestly, digging through 7 years of blog posts to find the second one is a little overwhelming, but even this one post is a goldmine of do’s and don’t’s for this particular community.
https://deafaq.tumblr.com/post/190549529559/comprehensive-guide-to-writing-deaf-characters - deafaq on tumblr has a comprehensive guide to writing deaf/HoH characters. This blog in itself is not meant to be for writing help, but they had gotten enough questions about it to make this post back in 2020. Compared to concerningwolves’s tumblr post, this one has less than 2,000 likes but is still full of good and valuable information for the reader.
More Posts from Irolith and Others
What is an Unreliable Narrator? And How to Write One.
An unreliable narrator is a storytelling technique where the narrator's credibility or truthfulness is questionable. The narrator either intentionally or unintentionally provides a distorted or biased account of the events, characters, or situations in the story. This narrative approach can add complexity, suspense, and intrigue to your writing. Here's how you can create an unreliable narrator:
1. Establish a motive: Determine why the narrator is unreliable. It could be due to personal bias, mental instability, deception, or a hidden agenda. Develop their backstory, motivations, and beliefs to understand why they might present a skewed version of events.
2. Use subjective language: Incorporate language and descriptions that reflect the narrator's personal viewpoint and biases. Their opinions, emotions, and interpretations should color their narration, influencing how readers perceive the story.
3. Include contradictions and inconsistencies: Allow the narrator to make contradictory statements or present conflicting information. This creates doubt and keeps the readers engaged as they try to unravel the truth.
4. Reveal information selectively: The unreliable narrator might withhold or reveal information strategically, manipulating the readers' understanding of the story. This can create suspense and surprise as readers discover hidden truths.
5. Showcase unreliable perceptions: Explore how the narrator's perceptions and interpretations of events differ from reality. They may misinterpret actions, misremember details, or even hallucinate. These discrepancies add depth to the character and raise doubts about their reliability.
6. Use other characters as contrasting sources: Introduce other characters who present alternative perspectives or contradict the narrator's version of events. This contrast allows readers to question the reliability of the narrator and form their own interpretations.
7. Employ narrative techniques: Experiment with techniques like foreshadowing, symbolism, or unreliable memory to emphasize the narrator's unreliability. These devices can help blur the line between truth and fiction, leaving readers intrigued and uncertain.
8. Provide hints and clues: Drop subtle hints or clues throughout the story that suggest the narrator's unreliability. This allows readers to piece together the truth gradually and encourages them to engage actively with the narrative.
How To Get Started Making Visual Novels
Wanna make a visual novel? Or maybe you've seen games like Our Life, Blooming Panic, Doki Doki Literature Club, etc. and wanna make something like that? Good news, here's a very basic beginners guide on how to get started in renpy and what you need to know going in! Before you start, I highly recommend looking at my last post about writing a script for renpy just to make it easier on you!
LONG POST AHEAD
Obviously, our first step is downloading it from their website

thankfully, its right on the home page of their site. Follow basica program installation steps and run the program. I highly recommend pinning it to your task bar to make it easier to access.
From there, you're met with the renpy app, it's a little daunting at first but let's talk about what all these buttons are for.

Projects
This part is simple, it just lists the current projects in the chosen directory. You probably won't have any in there of your own. You should still see Tutorial and The Question!
Both of those default projects are super helpful in their own ways, i highly recommend testing out the tutorial and playing around with it just to get comfortable with some of the basics.
Create New Project
The first step to actually making your game into a game!
You'll be met with a prompt letting you know that the project is being made in English and that you can change it. You can click Continue.
From here, you'll be asked to input a project name! Put in your games title, or even a placeholder title since this Information can be changed later! (this is also the title the folder will be in your file browser, be sure to name it something you won't overlook)

Now we get to choose our resolution!
If you have no idea what to choose, go for 1920x1080! This is the standard size for most computer monitors and laptops, but it will still display with moderately decent quality on 4k monitors too!
You can choose 3840x2160 as well. This is 2x the measurements of the default, with the same ration. These dimensions are considered 4k. Keep in mind, your image files will be bigger and can cause the game to have a larger size to download.

Now we get to choose our color scheme!
Renpy has some simple default options with the 'light mode' colors being the bottom two rows, and the 'dark mode' colors being the toop two rows.
You can pick anything here, but I like to choose something that matches my projects vibes/colors better. Mostly because depending on how in depth you go with the ui, it minimizes the amount of changes I need to make later.

Click continue and give it a minute. Note: If it says "not responding" wait a moment without clicking anything. It can sometimes freeze briefly during the process.
Now we should be back at our home screen, with our new project showing. Let's talk about allll that stuff on the right now.
Open Directory
This just opens that particular folder in your local file explorer!
game - is all the game files, so your folders for images, audio, saves, and your game files like your script, screens, and more.
base - this is the folder that the game folder is inside of. You can also find the errors and log txt files in here.
images - takes you to your main images folder. This is where you wanna put all of your NON gui images, like your sprites, backgrounds, and CGs. You can create folders inside of this and still call them in the script later. EX: a folder for backgrounds , a folder for sprites for character a, a seperate folder for spirtes for character b, etc.
audio - Takes you to the default audio folder. This is empty, but you can put all your music and sound effects here!
gui - brings up the folder containing all of the default renpy gui. It's a good place to start/ reference for sizes if you want to hand draw your UI pieces like your text box!
Edit File
Simple enough, this is just where you can open your code files in whatever text/code editor you have installed.
Script.rpy - where all of your story and characters live. This is the file you'll spend most of your time in at first
Options.rpy - Contains mostly simple information, like project name and version. There aren't a ton of things in here you need to look at. There is also some lines of code that help 'archive' certain files by file type so that they can't be seen by players digging in code however. Fun if you want to hide some images in there for later or if you just dont want someone seeing how messy your files are. We've all been there
Gui.rpy - where all of the easy customization happens. Here you can change font colors, hover colors, fonts, font sizes, and then the alignment and placement of all of your text! Like your dialogue and names, the height of text buttons, etc. It more or less sets the defaults for a lot of these unless you choose to change them later.
Screens.rpy - undeniably my favorite, this is where all of the UI is laid out for the different screens in your game, like the main menu, game menu, quick menu, choice menu, etc. You can add custom screens too if you want, but I always make my own seperate file for these.
Open Project - this just opens all of those files at once in the code editor. Super handy if you make extra files like I do for certain things.
Actions
last but not least, our actions.
Navigate Script - This feature is underrated in my honest opinion, it's super handy for help debugging! In renpy you can comment with # before a line. However, if you do #TODO and type something after it, it saves it as a note! You can view these TODO's here as well as easily navigate to when certain screens are called, where different labels are (super great if your game is long, and more. It saves some scrolling.
Check Script (Lint) - also super duper handy for debugging some basic things. It also tells you your word count! But its handy for letting you know about some errors that might throw up. I like using it to look for sprites I may or may not have mispelled, because they show up in there too.

Change/Update GUI - Nifty, though once you start customizing GUI on your own, it isn't as useful. You can reset the project at any point and regenerate the image files here. This updates all those defaults we talked about earlier.
Delete Persistent - this just helps you delete any persistent data between play throughs on your end. I like to use it when making a lot of changes while testing the game, so that I can reboot the game fresh.
Force Recompile - Full disclosure, as many games as I've made and as long as I've been using Renpy, i have never used this feature. I searched to see what it does and this is the general consesus: Normally renpy tries to be smart about compiling code (creating .rpyc files) and only compiles .rpy files with changes. This is to speed up the process since compiling takes time. Sometimes you can make changes that renpy don't pick up on and therefore won't recompile. In these cases you can run force recompile to force it. Another solution (if you know what file is affected) is to delete that specific. rpyc file.
The rest of your options on this right hand side are how you make executable builds for your game that people can download to extract and play later!

Sorry gang! that was a whole lot of text obviously the last button "Launch Project" launches an uncompiled version of the project for you to play and test as you go! Hang in tight because my next post is about how to utilize github for renpy, so you can collaborate easier!
After months of collecting, compiling and formatting, we are finally unveiling our biggest project to date:
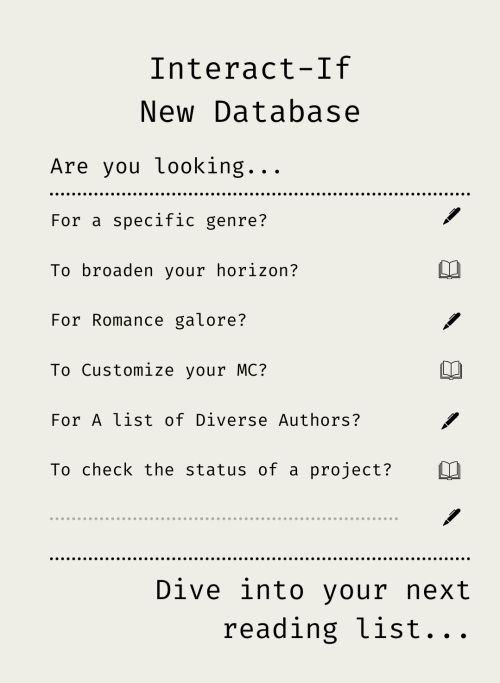
INTRODUCING: The Interact-IF Database
In an effort to help readers find games and WIP projects following a certain tag, genre, theme or level of customization, as well as finding diverse authors of a variety of identities, we have created a database of primarily Tumblr-based IF projects!
This list has been put together with the help of the authors of the featured projects, who have provided us with information about their games. It will be updated regularly by the mods of this Tumblr.
Are you a reader looking for your next read?
Head over on to our list [link].
The projects on this database are in compliance with our FAQ and Guidelines. We reserve the right to not include entries sent by authors if their projects do not follow said guidelines.
Are you an IF author/dev wanting to share your project?
• You can fill in this form [link].
Are you the author of one of the projects and found an error?
• Let us know through this form [link].
Do you have questions about our database?
• Head over to our Database FAQ first to see if we provided an answer for it. You can always send us an ask otherwise.
If you are an author of a playable project (WIP or completed), you should also consider adding it to the IFDB, the Interactive Fiction Database.
Writing Notes: Stages of Decomposition

The decomposition process occurs in several stages following death:
Pallor mortis
Algor mortis
Rigor mortis
Cadaveric spasm
Lividity
Putrefaction
Decomposition
Skeletonization
PALLOR MORTIS
The first stage of death.
Occurs once blood stops circulating in the body.
The cessation of an oxygenated blood flow to the capillaries beneath the skin causes the deceased to pale in appearance.
In non-Caucasians, the pallor may appear to develop an unusual hue; the skin will lose any natural lustre and appears more waxen.
Occurs quite quickly, within about 10 minutes after death.
ALGOR MORTIS
The cooling of the body after death.
The cooling process will be influenced by many factors, including the deceased’s clothing, or whether they are covered with bed linen such as blankets or duvets.
The body will typically cool to the ambient room temperature, but this alters if there is heating in the room or if there is a constant draught cooling the body.
RIGOR MORTIS
Can occur between 2 and 6 hours after death.
Factors including temperature can greatly affect this.
Caused by the muscles partially contracting, and the lack of aerobic respiration means that the muscles cannot relax from the contraction, leaving them tense, subsequently resulting in the stiffening we associate with rigor mortis.
This stage typically begins in the head, starting with the eyes, mouth, jaw and neck, and progresses right through the body.
The process is concluded approximately 12 hours after death (although, again, certain variables may occur) and lasts between 24 and 72 hours depending on circumstances.
Contrary to popular belief, rigor mortis is not a permanent state and is in fact reversed, with the muscles relaxing in the same order in which they initially stiffened.
The reversing process also takes approximately 12 hours, when the body returns to its un-contracted state.
It is possible to ‘break’ rigor mortis by manipulating and flexing the limbs. This is usually done by undertakers, pathologists or crime scene investigators who are attempting to examine or move a body – or by a murderer trying to hide their victim in the closet or the boot of a car.
CADAVERIC SPASM
A phenomenon that can be misinterpreted as rigor mortis.
The instantaneous stiffening of the body (most commonly the hands) following a traumatic death.
Unlike rigor mortis, the stiffening of the affected limb is permanent and is not reversed, causing the deceased to maintain the rigidity until such time as putrefaction causes breakdown of the particular muscle group.
Examples:
The deceased following an air crash were later discovered still clutching their seatbelts or arm rests in a final, desperate act of survival.
In a drowning case, the victim was discovered with grass from the riverbank still grasped in their hand.
Perhaps the most famous case of cadaveric spasm involves the rock band Nirvana’s lead singer, Kurt Cobain. Cobain reportedly committed suicide in April 1994. His body was discovered a few days after his death with a shotgun wound to the head, and tests revealed he had large traces of heroin in his system. He was reportedly discovered still clutching the gun in his left hand, due to cadaveric spasm. However, a great deal of controversy surrounds the veracity of this latter assumption, and indeed the cause of his death, with many people insisting and attempting to prove that he died as the result of foul play rather than suicide.
LIVIDITY
Also known as livor mortis, hypostasis, or suggillation.
Once blood can no longer circulate, it will gravitate towards the lowest point of the body.
Example: A supine body will display pinkish/purple patches of discoloration where the blood has settled in the back and along the thighs.
Occurs about 30 minutes after death, but will not necessarily be noticeable until at least 2 hours afterwards as the pooling process intensifies and becomes visible, finally peaking up to between 8 and 12 hours later.
Once it is complete, the lividity process cannot be reversed.
Therefore a body discovered lying on its side, but with staining evident in the back and shoulders, must have been moved at some point from what would have been a supine position at the time of death.
It is worth noting that if the body has had contact with the floor, a wall or other solid surface, lividity would not occur at the points of contact as the pressure would not allow the blood to seep through the capillaries and pool. The specific area of pressure will be the same colour as the rest of the body and a pattern of contact may well be evident.
PUTREFACTION
Derives from the Latin putrefacere, meaning ‘to make rotten’.
The body becomes rotten through the process known as autolysis, which is the liquefaction of bodily tissue and organs and the breakdown of proteins within the body due to the increased presence of bacteria.
The first visible sign is the discoloration of the skin in the area of the abdomen.
Bacteria released from the intestine cause the body to become bloated with a mixture of gases; over time these will leak out, and the smell will intensify to unbearable proportions.
Typically, this will attract flies that will lay eggs, which develop into maggots.
Bloating is most evident in the stomach area, genitals and face, which can become unrecognizable as the tongue and eyes are forced to protrude due to the pressure of the build-up of gases in the body.
At this stage, the body will also begin to lose hair.
The organs typically decompose in a particular order: starting with the stomach, followed by the intestines, heart, liver, brain, lungs, kidney, bladder and uterus/prostate.
Once all the gases have escaped the skin begins to turn black: this stage is called ‘black putrefaction’.
As with all the other stages of death so far, the rate of putrefaction depends on temperature and location. A body exposed to the air above ground will decompose more quickly than a body left in water or buried below ground.
During putrefaction, blistering of the skin and fermentation can also occur:
Fermentation - a type of mould that will grow on the surface of the body. This mould appears white, and is slimy or furry in texture. It also releases a very strong, unpleasant, cheesy smell.
As the putrefaction process comes to an end, fly and maggot activity will become less, which leads to the next stage.
DECOMPOSITION
The body is an organic substance comprising organisms that can be broken down by chemical decomposition.
If the body is outside, any remains that have not been scavenged or consumed by maggots will liquefy and seep into the surrounding soil.
Thus when the body decomposes it is effectively recycled and returned to nature.
SKELETONIZATION
The final stage of death is known as ‘dry decay’, when the cadaver has all but dried out: the soft tissue has all gone and only the skeleton remains.
If the cadaver is outside, not only is it exposed to the elements but it also becomes food for scavengers such as rats, crows or foxes.
As the remains are scavenged, the body parts become dispersed so it is not unusual to find skeletal remains some distance from where the body lay at the point of death.
The way in which skeletal remains are scattered in such cases is of interest to archaeologists, and is referred to as taphonomy.
Where a body has lain undiscovered at home for a period of time it has also been known for family pets, typically dogs, to feed on the body. The natural instinct of a pet is to attempt to arouse the deceased by licking them, but once it gets hungry, its survival instinct will take over and it will consider the body as little more than carrion: it will act with the same natural instinct as a scavenger in the wild, which will feed on any corpse, be it animal or human, if it is starving.
Obviously the number of pets, the body mass of the deceased and the time lapse before the body is discovered will influence to what extent it has been devoured.
For further research on the stages of decomposition and the factors that affect it, look up body farms. These are medical facilities where bodies are donated for research purposes so scientists can specifically observe the decomposition process. However, be aware that some of the images are quite graphic.
Source ⚜ More: References ⚜ Autopsy ⚜ Pain & Violence ⚜ Injuries Bereavement ⚜ Death & Sacrifice ⚜ Cheating Death ⚜ Death Conceptions
Pirate Terms and Phrases
-> Pirate Lingo
-> A Pirate's Glossary
Batten Down The Hatches - tie everything down and put stuff away for a coming storm.
Brig - a prison on a ship.
Bring a Spring Upon 'er - turn the ship in a different direction
Broadside - the most vulnerable angle of a ship that runs the length of the boat.
Cutlass - a thick, heavy and rather short sword blade.
Dance with Jack Ketch - to hang; death at the hands of the law (Jack Ketch was a famed English executioner).
Davy Jones's Locker - a mythical place at the bottom of the ocean where drowned sailors are said to go.
Dead Men Tell No Tales - the reason given for leaving no survivors.
Flogging - severe beating of a person.
Gangplank - removable ramp between the pier and ship.
Give No Quarter - show no mercy.
Jack - flag flown at the front of the ship to show nationality.
Jolly Roger - black pirate flag with a white skull and crossbones.
Keelhaul - a punishment where someone is dragged under the ship. They are cut by the planks and barnacles on the bottom of the ship.
Landlubber - an inexperienced or clumsy person who doesn't have any sailing skills.
Letters of Marque - government-issued letters allowing privateers the right to piracy of another ship during wartime.
Man-O-War - a pirate ship that is decked out and prepared for battle.
Maroon - to leave someone stranded on a. deserted island with no supplies, typically a punishment for any crew members who disrespected the captain.
Mutiny - a situation in which the crew chooses a new captain, sometimes by forcibly removing the old one.
No Prey, No Pay - a common pirate law that meant crew members were not paid, but rather received a share of whatever loot was taken.
Old Salt - experienced pirate or sailor.
Pillage - to steal/rob a place using violence.
Powder Monkeys - men that performed the most dangerous work on the ship. They were treated harshly, rarely paid, and were expendable.
Privateer - government-appointed pirates.
Run A Shot Across the Bow - fire a warning shot at another boat's Captain.
Scurvy - a disease caused by Vitamin C Deficiency.
Sea Legs - when a sailor adjusts his balance from riding on a boat for a long time.
Strike Colors - lower a ship's flag to indicate surrender.
Weigh Anchor and Hoist the Mizzen - an order to the crew to pull up the anchor and get the ship sailing.
If you like what I do and want to support me, please consider buying me a coffee! I also offer editing services and other writing advice on my Ko-fi! Become a member to receive exclusive content, early access, and prioritized writing prompt requests.
Key Takeaways - Neil Gaiman's MasterClass on Storytelling
I'm currently listening to Neil Gaiman's MasterClass on storytelling, and I thought I'd share some of my primary takeaways from the first few episodes.
There are a million bad lines inside of your pencil. Your job as a writer is to get them all out so that you can get to the good ones.
Your influences/inspirations as a storyteller are not just other fiction writers. Stop and think how musicians and other artists influence the stories you want to tell and how to tell them.
When you sit down to begin a new story or project, first take some time to write down everything you know about it so far. Write down all your ideas, sketch and doodle and annotate if you need to, and then look for connections. This is where a story emerges from a jumble of ideas.
What is it about? Every good story is saying something, even if it's not a deep social commentary. This is different from your concept and it will guide you as you go. Stories are about telling the truth through fiction (lies), so think about what truth you're trying to tell.
What do your characters want? This will help you establish conflict. Pick two of your characters, answer this question, and make their desires mutually exclusive. Characters will always get what they need, for good or ill, but not all of them can get what they want.
When you're stuck in your plot, you can also ask yourself what your characters want. They may just save you!
What happens next? This is the most important question, not just because you have to continually answer it to build your plot but because it's the question that makes your story matter. At the end of every chapter or at every shift in character perspective, etc., your readers should be asking this question. It's the only way to keep them turning pages. This question has to matter to you as well, because if the author doesn't care what happens next, neither will anyone else.
These were some of my favorite points or things that I felt were most foundational to young writers. I'm only partway through but I do recommend his MasterClass! It's very informational and uplifting, and he's easy to listen to. Check your local library to see if you can access it for free!
TWINE REF - Cycle Link With Descriptions
In Twine Sugarcube.
Cycle Link: Part 1 Part 2
We already know how to show basic cycling links on Twine Sugarcube, but if we what if we want to show a cycling link along with descriptions that changes in real-time, according to the player’s choices, but we don’t want the descriptions to be stored in the choice variable?
I gotchu: Class Object Variables
We can do this by using class object variables when we make the list of options. Let’s say we want to show weapon options along with a description.
Sword: A mid-range weapon
Dagger: A close-range weapon
Bow & Arrow: A long-range weapon
Then for the list of options, we can write:
<<set _listofweapons to { "Sword. A mid-range weapon”: “Sword”, "Dagger. A close-range weapon": “Dagger”, " Bow & Arrow. A long-range weapon": “Bow & Arrow” }>>
And to create the cycling link, as usual:
<span id=“cyclink”><<cycle “$weaponofchoice” autoselect >><<optionsfrom _listofweapons>><</cycle>></span>.
Sugarcube will shows the index of the class object variable to the players, so the one written on the left side. It’ll automatically save the actual content of the class object (right-side) as player’s choice in the variable $weaponofchoice.
And that’s it!
We’ve come full circle back to class object variables guys lol. At this rate, I’ll just go ahead and make a class object variable cult, but I can’t help it ok.. It’s just way too convenient, and we can do so much with it.
If you have any questions, or if you want to make something on twine but can’t seem to figure it out, feel free to send in an ask!
Fantasy Guide to Wards and Fostering

I get a lot of asks about wards and recently it's been a FAQ. So here's a quick guide to warding.
What is Warding?
Warding was a tradition in which a noble it royal family would take in a child from another family to their home for the purpose of educating them and preparing them for adulthood or to protect their interests. Warding was seen as a big compliment to the family of the foster child, especially if the family that fosters their child is much higher ranking. However, warding could also be in response to the family's misbehavior and insubordination or in some cases their death. Warding isn't adoption. Warding does not entitle the child to inherit anything. They cannot inherit a place in the succession, they cannot inherit lands or money or titles.
The Ward
The ward was usually a child of a lower ranking family, between the ages of seven to maturity at 16 or so. Wards usually had parents in which case the foster family was charged with the child's physical and educational welfare. The ward could return to their parents at any time either at their insistence or with the blessing of their foster family. Wards were raised alongside the host family's children as well as other wards. They were fed, clothed and educated by their foster family as essentially treated as part of the family. However, wards that come from unfriendly or rebellious families were essentially used as chips for good behaviour. If their parents or kin act up, they could be killed. Wards could also be orphaned. In this case, their foster father would have control their lands and money which is why an overlord would seek to claim warship over a vassal heir to ensure peace. Wards could also be adopted by family.
The Foster Family

The family were nearly always higher ranking and usually had another motive other than charity for taking in the ward. Sometimes the child could be used as collateral against an untrustworthy family or sometimes they were prospective spouses for the family's heirs. It was the responsibility of the foster family to discipline, educate and protect the ward. They would be charged with teaching the ward all the trappings of their position from warfare to statecraft to etiquette.
Wards to Royal families

In some cases, a ward might strike gold and be warded at court by the monarch. Wards would live at court but would be unlikely to be taught the skills by the monarch or Consort personally but would be provided with the best tutors. Wards could be brought in to be companions to the Royal children or in order to ensure their inheritances were not subjected to disputes if they were orphans or again, if their family were likely to commit trouble. Royal wards were always nobility but in some rare and extreme cases they could also be total themselves, usually of displaced and exiled families or as prospective matches to royal children.
Wardship & Women

In some cases, an unmarried woman or a widow could be placed in the protection of an overlord or male relative in order to protective her interests. If a woman was the heir to a grand title or vast fortune and had no father or brother, the monarch or overlord would insist that a male relative or her overlord would take her in lest her claim put her in danger. Usually, it would be up to their host to arrange a match or aid her in brokering one herself.
Some tips for using a few words to describe voices:
1. Tone Words: Use tone words to convey the emotional quality of a voice. For example, you can describe a voice as "melodic," "soothing," "sharp," "gentle," or "commanding" to give readers a sense of the tone.
2. Pitch and Range: Mention the pitch and range of the voice. Is it "deep," "high-pitched," "raspy," or "full-bodied"? This can provide insight into the character's age, gender, or emotional state.
3. Accent and Diction: Describe the character's accent or diction briefly to give a sense of their background or cultural influences. For instance, "British-accented," "Southern drawl," or "formal."
4. Volume: Mention the volume of the voice, whether it's "whispering," "booming," "murmuring," or "hushed."
5. Quality: Use terms like "velvet," "silken," "gravelly," "honeyed," or "crisp" to convey the texture or quality of the voice.
6. Rate of Speech: Describe how fast or slow the character speaks, using words like "rapid," "slurred," "measured," or "rambling."
7. Mood or Emotion: Indicate the mood or emotion carried by the voice. For example, a "quivering" voice may convey fear or anxiety, while a "warm" voice may express comfort and reassurance.
8. Resonance: Describe the resonance of the voice, such as "echoing," "nasal," "booming," or "tinny."
9. Timbre: Mention the timbre of the voice, using words like "rich," "thin," "clear," or "smoky."
10. Cadence: Highlight the rhythm or cadence of speech with descriptors like "staccato," "lilting," "rhythmic," or "halting."
11. Intonation: Convey the character's intonation by saying their voice is "sarcastic," "apologetic," "confident," or "questioning."
12. Vocal Characteristics: If applicable, mention unique vocal characteristics, like a "lisp," "stutter," "drawl," or "accented 'r'."

im going to have a stroke
-
 bejeweldjellyfich liked this · 2 months ago
 -
 abouttwocats liked this · 2 months ago
 -
 bluekxees liked this · 4 months ago
 -
 authorgirl0131 liked this · 4 months ago
 -
 drachmanspy reblogged this · 4 months ago
 -
 stormblessed-crow reblogged this · 4 months ago
 -
 clysma reblogged this · 4 months ago
 -
 orangepotatosoup liked this · 4 months ago
 -
 thespianwordnerd liked this · 4 months ago
 -
 is-lu-for-everyone reblogged this · 4 months ago
 -
 natureisgay reblogged this · 4 months ago
 -
 isapolvorita reblogged this · 4 months ago
 -
isapolvorita liked this · 4 months ago
-
 headcanonsandmore reblogged this · 4 months ago
 -
 prophecystorm liked this · 4 months ago
 -
 lonely-space-ace reblogged this · 4 months ago
 -
lonely-space-ace liked this · 4 months ago
-
 writing-my-mind-ink reblogged this · 4 months ago
 -
 sophia-ebooks reblogged this · 4 months ago
 -
 denverlake reblogged this · 4 months ago
 -
 drinkingjetfuel2 liked this · 5 months ago
 -
 malicioussuspiciousfishes liked this · 6 months ago
 -
 mgfb liked this · 6 months ago
 -
 fanwriting93 reblogged this · 7 months ago
 -
 irolith reblogged this · 7 months ago
 -
irolith liked this · 7 months ago
-
 hoarderofworlds reblogged this · 7 months ago
 -
 heckcareoxytwit liked this · 7 months ago
 -
 mernarf reblogged this · 7 months ago
 -
 peachjubilee liked this · 7 months ago
 -
 jollycapybara liked this · 7 months ago
 -
 alchemurder liked this · 7 months ago
 -
 fictionwriterthingss reblogged this · 7 months ago
